character from the Supporter class, who wields a Shotgun
weapon and belongs to the Electric
element. She's part of the Missilis
faction.
The spiritual glue that holds Dazzling Pearl together. She dotes on the forgetful Tia much like a older sister does to ensure that she remembers things. Appears mature on a regular basis, but if an accessory catches her eye, she often indulges in impulse purchases and overspending.
To learn more about Naga check the sections below. Use the tabs to quickly switch to the kind of information you're looking for.
To learn more about Naga check the sections below. Use the tabs to quickly switch to the kind of information you're looking for.
Profile
Review
Investment tips
Teams
Profile
Skills
Normal Attack
Normal Attack
Shotgun
Mode: Normal
Ammo: 9
Reload: 1.5s
■ Affects target enemy.
Deals 204.8% ATK as damage.
Deals 200% damage when attacking core.
Skill 1
Guardian of Friendship
Passive
Cooldown: -
■ Activates after 12 normal attack(s). Affects all allies.
Recovery of Cover's HP ▲ 14.57%.
■ Activates when applying Shield. Affects all allies.
Damage dealt when attacking core ▲ 85.17% for 10 sec.
Skill 2
Support of Friendship
Passive
Cooldown: -
■ Activates after 5 normal attack(s). Affects 2 ally unit(s) with the highest ATK.
Damage dealt when attacking core ▲ 40.07% for 5 sec.
■ Activates after 5 normal attack(s). Affects 2 ally unit(s) with the lowest HP percentage.
Recovers 9.58% of the caster's final Max HP as HP.
Burst
As Long As We're With Friends
Active
Cooldown: 20s
■ Affects self.
Gain Pierce for 10 sec.
■ Affects all allies.
ATK ▲ 16.18% of caster's ATK for 10 sec.
■ Activates when applying Shield. Affects all allies.
ATK ▲ 31.02% of caster's ATK for 10 sec.
Specialties
Buffer
Cover Heal
Healer
Pierce
Voice Actors
ENG
-
JPN
Hina Suguta
KR
Yu Yeong
Gallery
Review
Review
We all love gyarus, don't we! Naga is the new stylish Nikke in town as we get a closer look into the lives of Marciana's students. Naga and her Big Sis attitude towards Tia comes paired with tons of unique skills which we will take a look into soon. As taught by Marciana, Naga heals HP of all her allies. However, it seems that she's a scholar student, proving to be even more competent than her teacher. She also happens to heal cover, and gives a new unique buff where she increases damage dealt when attacking core! She also has a small cheeky ATK buff, which can turn into a very substantial ATK buff if paired with specific Nikkes (especially Tia!). Be careful around Naga though, she can pierce right through your hearts with the extra pierce buff that her burst provides for herself!
Performance Analysis
In Campaign, Naga works extremely well as all of her kit plays a part in helping the team do better. Her core damage buffs are highly appreciated since almost all raptures have a core which can be targeted to make use of her S1 and S2. Her HP and Cover heals are also not to be forgotten as she allows the team to heal right up, along with the ATK buff she provides when she bursts. Naga is also extremely flexible. She can work as an off burst healer and buffer, while also being able to work as the Main B2 if required in specific team comps. The highlight of her abilities can be seen with Tia, who allows Naga to unlock her full potential. However, Tia may need micromanagement due to her taunt all enemies for every 5 shots she makes, making her harder to use than other team comps. If you can get over that, the buffs being provided by these 2 are more than enough to help you clear stages, even when heavily under the CP requirement.
In Missilis Tribe Tower, Naga can act as a Team-wide Healer for the team, which previously was a job dedicated for Pepper. She beats out Pepper in heals while constantly allowing Liter to Burst, making her even more useful since majority of Pepper's heals come from her Burst. Not just that, she can be the Main B2 for stages that do not require Centi's Burst Gen. Of course, her duo pair Tia will allow Naga to shine even more in Tribe Tower when she accompanies her soon.
In Arena, Naga won't be seeing much spotlight. Her kit being locked behind annoying triggers like Independent Shield will make team formation a bit more clunky. The worst part? You need a B1 shielder to activate the major part of her Burst Skill, and the only unit that can do that, Ether, is also underwhelming at most. She is average, or rather below average, as most of her skills are useless for PvP (what core?) except for the minor ATK buffs that get overshadowed by other B2 like Poli or Blanc. Wielding a non-clip Shotgun, she also feeds Jackal while providing not-so-good burst generation.
Why Tia?
We've lately been talking about Shielders, and have specifically pointed out Tia to be the best pair for her. But why is that? Let's talk about her performance with and without Tia.
Naga with Tia
Tldr: Heals, Cover heals, Huge Core damage buffs and Substantial ATK buffs. Plus, Tia's button cannon can cause destruction.
At a glance, it simply feels meta. A very very decent core damage buff, since Tia unlocks the second part of Naga's S1 and allows her to buff all allies every burst rotation, which stacks with her S2 core damage buff. This is not as good a buff as an ATK buff per say, but since the value being provided is so high, it is overall a decent damage increase. Tia also allows Naga to unlock her extra ATK buff during burst, every burst rotation, which helps Naga give an additional 48% instead of 16% ATK to the whole team. In some situations, these two will be a better support than even the current best supports: Blanc and Noir!
In return, Naga activates her Big Sis instincts and decides to help Tia survive, who is possibly constantly taunting the enemies. Here is a literal insight on what they both provide together.
Tia & Naga together collective buffs
- Core damage buff 125.24% every burst
- Attack damage buff 32.11%
- ATK buff 47.20% every burst
The remaining skills act to allow Tia to survive, in order to counter the damage she will take during her possibly constant taunt:
- Cover Max HP buff every 5 shots, need to make sure to wait 5 seconds before you make 5 shots for perfect use with Tia.
- Cover heals at burst, recovers even more cover HP for damage dealt.
- Shield to prevent cover from taking damage at burst.
- Cover heals every 10.1 seconds.
- HP heals every 4.3 seconds.
Point to Note
The one and only Disadvantage to this pair is that Tia has a constant taunt, and hence may need manual use and micromanagement to allow her to survive a possible onslaught of damage dished out by raptures. This may also discourage use of other Manual heavy Nikkes, especially Alice. For this, we need to wait for testing with Tia to see how viable a constant taunt is for her, and whether this Tia Naga duo can survive the onslaught of damage that the raptures throw at us
Naga without Tia
Tldr: Heals HP, Cover heals, small buffs to core damage, and a very minor ATK buff. Trouble with synergy with other shielders causing her S1 to be extremely restricted. To put it simply. she doesn't unlock her full potential without Tia.
Without Tia, Naga will still heal a decent amount of cover HP and significantly recover HP of allies. Her S2 will still provide constant uptime for her Damage dealt when attacking core, no matter how diluted it may be. Her Burst will still allow her to Pierce and provide a small ATK buff. However, she will miss out on a large chunk of the actual buffs she is providing. Some shielders do allow to periodically or situationally activate some parts of her skills, but for the most part, she will be not be providing a large chunk of her buffs, as shown in the table below:
Buff Name
Naga with Tia
Naga without Tia
% Buff not being provided consistently without Tia
Damage dealt when attacking core
125.24%
40.07%
85.17%
Caster's ATK Buff
47.20%
16.18%
31.02%
Since we now know enough about Tia with Naga, let's talk about how other shielders work with Naga.
Aria - During Aria's burst, it'll help her activate higher core damage buffs from S1. This does help somewhat since Aria will have 100% hit-rate and since she is an Attacker MG, she will output decent damage. However this pair still isn't unlocking her full kit, she won't give the extra ATK buff during her own burst (which she will unlock with Tia, Ether or Folkwang), and the uptime on her S1 core damage buff is severely reduced, since she'll only give it every 40 seconds.
Folkwang - Having Naga as the second Highest ATK is a blow to team-building, hence we do not recommend this pair at all. However, Folkwang can allow Naga to activate S1 during Folkwang's burst, and if Naga Bursts when Folkwang's Skill 1 shield is active, she will provide the teamwide 47.20% ATK buff.
Ether - Ether is a 40s B1, whose burst will provide shield for 3 lowest HP Nikkes, so hopefully your Naga ticks this box when Ether is about to Burst. If she does, every 40 seconds, your Naga will activate her S1's core damage buff, and will provide the 47.20% ATK buff for all allies.
Should You Pull
We currently do not have a wide variety of B2 healers available to us. Right after Marciana, we have received a possible gem of a Nikke. Not only will Naga provide you with tons of heals, but she also has unique quirks and buffs, such as healing your cover, and providing you with Core damage and ATK buffs. You should definitely pull Naga. She seems to be an answer to a lot of current problems, especially in Missilis Tribe Tower, and provides additional options to use in Union and Solo Raids. Just remember that she does need to be paired with Tia to prove herself as the ultimate support. We believe that The Tiga (Tia+Naga) pair will probably shake and shift the meta around in the upcoming Solo Raid.
If you are an F2P, we recommend you to get one copy, and then wishlist her dupes if you want any. Since you will be able to wishlist her after Naga's Banner ends, we also urge you to not blindly spark her with golden tickets, unless if you already got Tia withing 10-30 pulls, and have already spent 80-90 tickets trying to get her. Any case apart from this one, we do not recommend sparking Naga with your golden mileage tickets.
Kit Analysis
Naga's kit is pretty straightforward, but it does incorporate some new terms that we have not seen before on other Nikkes. One of them is the new and self explanatory Damage Dealt while Attacking Core buff that she provides with her Skill 1 (Guardian of Friendship) and Skill 2 (Support of Friendship). These buffs, when active, will increase your attack damage whenever you shoot the core of a rapture. All Nikkes already have a 200% damage buff when attacking core (except for some being 250%), which means this buff is already very saturated.
Note that core damage buffs are further diluted by other damage modifiers in the same bracket: critical hits + critical damage (base 50%), range bonus damage (30%), and full burst bonus (50%). For instance, if Alice hits a core during full burst at optimal distance with a critical hit, then the total multiplier is 3.3x (1+1+0.5+0.5+0.3).
However, do not fret. There is a reason Naga and Tia have been getting shouts of being meta. Despite being diluted, the value of this Damage Dealt while Attacking Core is satisfactory. When both S1 and S2 core damage buffs are active, Naga provides a total of 120.24% core damage buff. Not only that, the uptime of these buffs is also long (but currently requires Tia to be paired with Naga to have high uptime for S1). Her Skill 2 reactivates every 4.3 seconds and lasts for 5 seconds, so theoretically it is permanent!
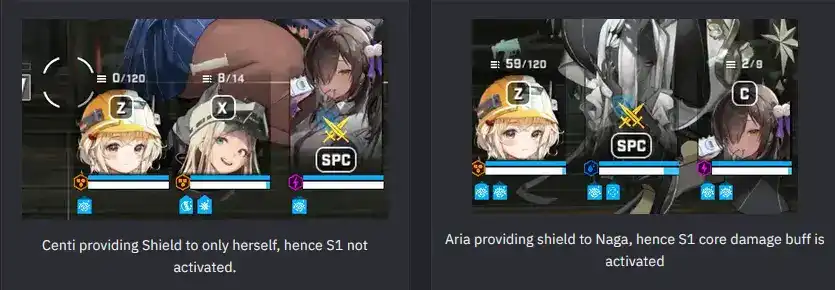
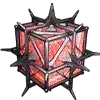
Her Skill 1's buffs, however, along with her Burst's extra ATK Buffs, are locked behind a unique requirement: Activates when applying Shield. This trigger is fulfilled only if Naga's skills are activated when she possesses an Independent Shield, shown as a cyan bar on top of her HP. Dependent or Shared Shields such as the ones belonging to Centi, Poli, or Blanc cannot trigger this skill as the shield is placed in front of them instead. This means that her Skill 1's team-wide core damage buff will only activate with the help of a team-shielder like Aria, Folkwang, Ether, or her close acquaintance Tia. She also needs to have the Shield present when she bursts to upgrade her small 16.18% ATK into the potentially game-changing 47.20% ATK buff.
One thing to note is that her Burst (As Long As We're With Friends) provides Caster's ATK Buff, which is essentially worse than, say, Liter's ATK Buff if we are talking about raw buffs for Attackers. This is due to Supporter Type Units having weaker Base ATK stats than Attackers.
However, these kinds of buffs are actually more beneficial for other Supporters and Defenders. Most of the time, they will be less invested than Naga. Defenders like Tia also rely on lifesteal to heal herself. Since her base ATK stats are poor, she will benefit more from non-self ATK buffs like the ones from Naga!
The frequency of activation for her Skills is as follows:
For Naga S1
Her Cover HP recovery will proc averagely every 10.3s.
Whenever she is shielded, she provides extra core damage buff, the uptime of which is dependent on the shielder paired with her.
Ideally, use a 10 seconds cooldown-on-shield Nikke like Tia to make the best use of Naga's Core Damage Buffs.
For Naga S2
Her S2 will proc approximately every 4.3s, theoretically giving her S2's core damage buff a 100% uptime.
Due to her fast S2 procs, she's one of the best single target non-burst Healer. Better than Rapunzel and Pepper.
For Naga Burst
10 second Pierce every Burst.
10 second ATK Buff, value dependent on Shielder paired with her.
Investments
Gear Investments
You may Overload her gear to boost your CP in campaign, or in general to increase Base ATK Stat so that Naga provides more ATK Buff from her Burst. However, remember that ATK rolls on her Overload gear NOT increase the Caster's ATK buff she provides on Burst. One ideal roll for Naga is MAX AMMO, which reduces her reload frequency and allows her to activate certain skills more frequently. ATK and ELEMENTAL DAMAGE are also great as secondary options to boost her DPS slightly.
Skill Investments
Naga's Skill 1 is top priority due to the value of Core Damage buff she provides in it, along with the Cover Heal to help Tia.
Her Burst is a close second in priority due to the Caster's Attack Buff that she provides.
Her Skill 2 comes last. The value gain per level is comparably low versus the other two, but it has a nearly permanent uptime. The increased heals may also be useful.
We recommend starting with 5/5/5, then 7/5/7, then 10/7/10. To conserve materials, you may choose to upgrade S2 beyond 5 only if the extra healing is needed.
Cube Investments
Resilience Cube or Bastion Cube will be the best options to use with Naga, as both promote Naga land more shots. Wingman Cube is also a decent alternative.
Review
Pros
One of the best Off-Burst Healers.
Provides a unique Buff: Damage dealt while attacking core.
Provides HP and Cover Heals.
Assists her major pair, Tia, heavily in her survivability.
May provide higher offensive support than Bunnies when all buffs are effective.
Buffs are retained across mob waves (unlike Blanc's debuff).
Cons
Dependent on shielder Nikkes like Tia, Ether, Folkwang or Aria to unlock parts of her Skills.
Core Damage Buff can be heavily diluted depending on team comps or stage.
Burst without being shielded barely provides anything.
Less versatile than Bunnies and only optimally works with units that can hit cores all the time
You would always want to run her with Tia, else her performance is lowered.
With Tia, you're forced to run a 2-1-2 formation.
Ratings
S
Story
A
Bossing
C
PVP
Investment Tips
Skill Investment
Here's the explanation for all the numbers and colors used in the guide:
10/5/7 means upgrading Skill 1 to lvl 10, Skill 2 to lvl 5, and Burst Skill to lvl 7,
Yellow means the immediate investment when u get the unit. There are 3 reasons for this:
If the unit is Meta or High Priority, it will have a starting investment of more than 1/1/1 (such as 4/4/4) depending on what the unit provides.
If the unit is Medium or Low Priority, 1/1/1 will be mentioned, meaning no immediate investment is required, and you can invest in this character if you need to use it according to the priority listed.
If we deem that a unit does not have usable skills to be meta for any gamemode, no investment will be mentioned.
Blue means minimum investment to take advantage of the Nikke's skills. There are 2 reasons for this:
Sometimes, minimum investments are breakpoints such as for Noir or SAnis.
Sometimes, minimum investments are just the ideal way to progress to upgrade that unit, before moving on to Recommended and High.
Red means recommended investment for F2P players,
Purple means maximum recommended investment, in order to get the best out of the unit. You should only try to reach these investments if you have a surplus of Skill Books leftover.
More info:
The skill investment list below features a lot of Level 4 and 7 because they are easier to understand. Any higher levels will cost a new type of resource.
However, you may choose to upgrade to Level 5 if you need a stronger effect instead of 4, as the increase in Blue Manual cost from Level 4 to 5 is still low. The leap only starts from Level 6 onward.
There is also a leap from Level 3 to 4, so if you want to save a tiny bit of Blue Manuals, then leave at 3 instead of 4.
This Overload (OL) Recommendations and Priority guide unravels in detail everything you need about a character in terms of priority, overload targets (effects), and order of acquisition, alongside some notes to explain our thinking process.
For OL targets and order of acquisition, we decided to divide the target effects into several categories.
Essential: With all gear combined, your unit must have the roll(s) prescribed as a minimum requirement. Example: Charge Speed on Alice. You cannot compromise on these rolls.
Ideal: These rolls will improve your unit's performance significantly. Aim for 2 lines of Essential/Ideal per gear for maximum performance and the best Return on Investment (ROI). If you get 3, you are lucky. You can choose to only have 1 as well to save materials. Example: Elemental Damage on Scarlet.
Passable: Low-priority line that has either limited value or the impact is not as strong as other rolls. Should this show up as a bonus together with a better line, you can choose to keep them. Example: Charge Speed on Red Hood.
Overload effects are ordered by importance from Left to Right, which means anything on the left provides more value than the right. Effects that belong to the same group generate too similar an impact to make a difference (and are sometimes interchangeable). Try to follow this order as faithfully as possible for maximum mileage.
Additional tips:
Priority (PvE/PvP) isn't necessarily lower than Priority (Universal), which has no tag/label. It just indicates that this unit performs only in select types of content.
If a suggested effect has the number ×2 next to it, that means you should get the effect on at least 2 gear. The same idea applies to other numbers.
Focus on obtaining Essential(s) then you can start worrying about optimizing your rolls. Units require these to function, and the impact is too massive to ignore.
If a unit has no Essential(s), that means their performance is not that dependent on OL, but they can still benefit from good effects.
Remember that this is just a recommendation list, and attaining perfection is impossible. You will have to make some compromise, pick whichever rolls you desire the most, and conserve as much material as possible.
Often used in PvE but without Burst (paired with Crown). Seeing less usage in SR because core becomes scarce. Still a good buffer against cores, especially with Crown/Tia, but as an off-burst, she does not scale off caster's stat (upgrade for CP padding). Scales off caster's stat if Bursting.
PVP Priority
5/10
PVP Comment
Can buff the team gently and deal notable damage herself.
Cube Investment
PVE
Resilience Cube
Bastion Cube
Vigor Cube
Destruction Cube
PVP
Vigor Cube
Healing Cube
Tempering Cube
Endurance Cube
Resilience Cube or Bastion Cube will be the best options to use with Naga, as both promote Naga land more shots. Wingman Cube is also a decent alternative.
Teams
Teams
Team 159
Standard School Girl
Mode: Campaign || Element: All
Characters
B3
B3
About the team
This team used to be the best Campaign team, but now it lost ít's flavor.
Substitutions
-
Team 160
Going behind Tia's back
Mode: Campaign || Element: All
Characters
B3
B3
About the team
This is just purely better than Tiga in anyway, sadly.