


Nikke Beginner’s Guide
A Comprehensive Beginner’s Guide for Goddess of Victory: NIKKE that would help many newcomers learn the game. This page contains:
- Gameplay Mechanics & Tips
- Team Building
- Basic Game Knowledge
- Your First & Final Goals
Always check the guide’s last updated date!
Starting Off
Before Proceeding, Decide Whether You Want to Reroll!
When you are first starting a game like NIKKE, which is built on FOMO, consider whether rerolling would be worthwhile for you.
NIKKE doesn’t employ the same gacha system seen in other gachas. Instead of having old units rerun, they are added into a “Standard Pool”. This makes most units that are not seasonal or limited obtainable by any player, new or old, which is good. However, the problem with this system is that the rate of pulling them outside their initial rate-up banners will be low, especially when you aim for Pilgrims/Over-specs (Nikke’s broken character faction, usually Light/Dark in old-fashioned gachas). Even with Wishlist, which narrows the number of Nikkes you can get from unlimited to just 20, it’s still unpredictable.
If you are a competitive player, especially if you plan to be F2P or just spend a little, rerolling for a head start is recommended because most of the renewable gem sources from mid to late game will be from competitive content. In fact, most Pilgrims/Over-specs are mandatory to enjoy the game to its fullest. That being said, the rerolling process is time consuming. Each reroll can take about 10-20 minutes depending on speed and whether you join the game during major events. Thankfully, you don’t need to clear/redownload data during the process. For more info, read the following guide:

Gameplay Mechanics
Positions
Before we go to team building, we need to first learn the game’s mechanics.
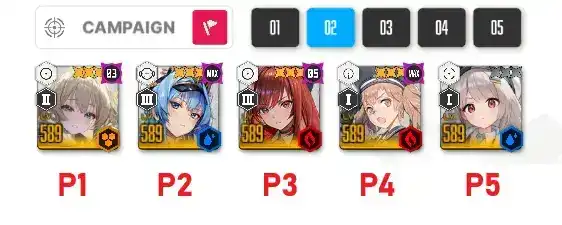
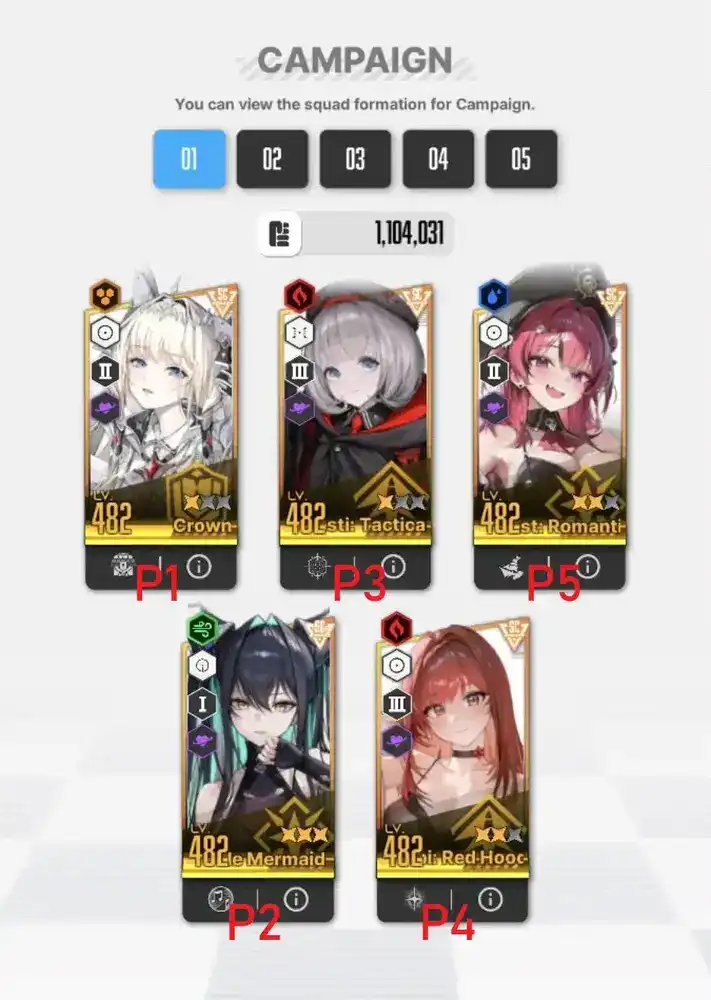
This game features a basic gameplay of shooting and killing enemies, just like you would encounter in a TPS (Third-Person Shooter) game. The difference is that you can't move your characters. They are stuck in any of the 5 positions, which you can set up in the team before combat. In the community, we refer to these positions as P1 → P5 (left to right). In the game, these positions are referred to as frontline (P1, P3, P5) and backline (P2, P4). For a beginner, these positions don't matter much, but you should know that there are Nikkes who require placement in a specific spot and bosses who attack in a certain order (from left to right, or vice versa).


A Nikke in combat has two main positions: in cover and out of cover. When Nikkes are shooting, they will be out of cover (peeking). When a Nikke is out of cover, enemy attacks directed toward that Nikke will damage them. If the Nikke is not shooting and therefore is in cover, enemy attacks will hit the cover instead, and the Nikke will not take damage. However, the cover has a certain amount of HP, so they can be destroyed! To use cover, control the Nikke you want to cover and do not shoot (do not tap/click/hold the screen). You can also cover the whole team at the same time by pressing that Nikke's avatar again (mobile & PC) or Spacebar (PC only).
Tip: In this game, there is a technique called i-framing—used to dodge enemy attacks. You don't need to learn this for now, but we would like to let you know its existence because you will have to employ it sooner or later. Basically, enemy attacks are NOT actually directed toward a Nikke. They are directed toward the Nikke's snapshot position at the time of launch (cued by the blinking red circle). Abusing this allows you to deliberately "redirect" an enemy's attack to a Nikke's in-cover or out-of-cover coordinate and evade it by switching to the other position just before it lands. For demonstration, check out this video:
Skill Types
In combat, Nikke can use skills. There are three types of skills in this game:
- Active: This skill activates automatically x seconds into the battle and repeats every x seconds. The value x is shown on the Nikke's skill in question. For example, Liter's Skill 2 "Bolt Boost" has a Cooldown (CD) of 15 seconds. This means it activates after the first time 15 seconds into the battle and will repeat every 15 seconds until the end of the battle.
![Liter]()
- Passive: This skill activates automatically and has no temporal condition. They are active throughout the battle but may have sub-skills (components) that only trigger upon the fulfillment of certain conditions. For example, Alice's Skill 1 "Energizing Carrot" grants 2 allies with the highest ATK with increased Charge Speed and Charge Damage upon entering Full Burst.
![Alice]()
- Burst Skill: This is the most important skill type in Nikke because this is what makes this game different from a normal shooting game. Burst Skills are active skills that are triggerable on command. They do not activate automatically. Every Nikke is guaranteed to have one Burst Skill (their third skill) under the B1, B2, or B3 category. This category distinction matters because you need to follow a specific order to progress Burst Cycles.

Here are screenshots of ![]()


This is a passive skill. It has no cooldown.

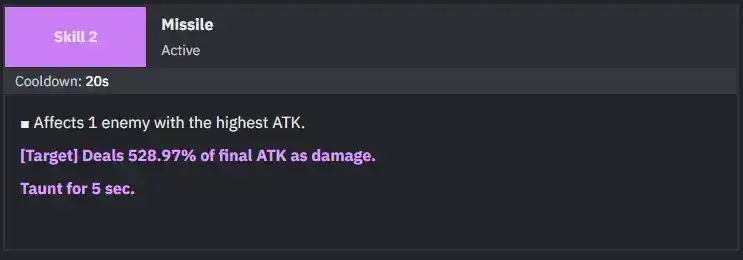
This is an active skill. It has a cooldown and triggers automatically every 20s, starting from the 20th second.

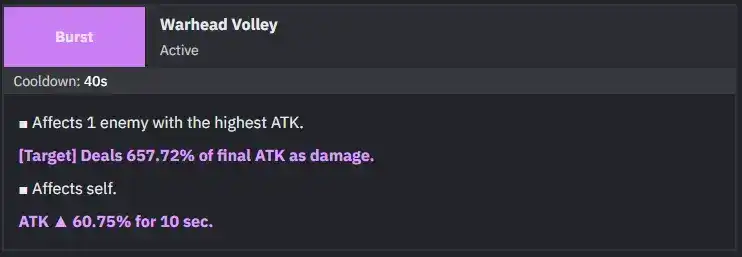
This is a Burst Skill. It can be activated on command in a Burst Chain to deliver powerful effects.
Chaining Skills Into Full Burst
In combat, there is a term called Full Burst. Full Burst grants your team additional firepower through increased total damage multiplier and focus fire (controlling one Nikke to aim at something will cause all Nikke(s) to aim at that thing). Most skills also only activate when entering, inside, or exiting Full Burst. To achieve Full Burst (default duration: 10 seconds), you will need to successfully trigger the Burst 3 (B3) skill of any Nikke. However, before you can trigger the B3 of any Nikke, you will need to trigger B2 first, and B1 before that. Therefore, we can simplify the Burst Chain into:
Recharge Burst Gauge → B1 → B2 → B3 → Full Burst
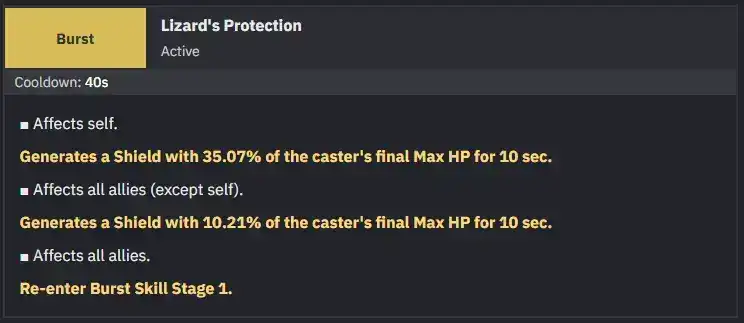
In each Burst step above, only one Burst Skill of the correct category can be used, moving the chain to the next step. However, there are skills that repeat the same step (noted in skill description as "Re-enter B1/B2"). These units include ![]()
![]()
![]()
After the B3 skill is used, the team enters Full Burst for 10s (can be modified by certain skills). Then, Full Burst ends, and the cycle repeats (we usually refer to this as one rotation or one cycle; nomenclature may vary). When the cycle repeats, you will need to fill the Burst Gauge again (through Nikkes' shooting & landing attacks [note: must land], or certain skills) before you can start another Burst Chain. For your information, in later guides, we refer to the burst generation coefficients of Nikkes as simply "burst gen". "Low burst gen" means a Nikke is not good at generating Burst Energy.
Team Building: Use Burst Types to Make a Functional Team
Having understood how Burst Cycles work, now you know that teams must consist of B1, B2, and B3 if you want Full Burst. That's correct, but pay attention to Burst Skill cooldowns! There are 3 cooldown values in the game: 20s, 40s, and 60s. We can simplify these into 1 rotation, 2 rotations, and 3 rotations respectively. In a Burst Cycle, you will have to use one B1, one B2, and one B3 at least. This means you must also take the Burst Cooldown(s) into account because you don't want to get stuck with all units on the same Burst Step on cooldown. For example, running ![]()
![]()

Important!
Be careful of Re-Enter Burst Types too, as shown above! These repeat the same Burst Stage. For example,
Tia is a Re-Enter B1. Using her Burst Skill will require you to trigger another B1 again.
The most common formation in this game is B1-B2-B3-B3. You need at least two B3 because all B3 have a cooldown of 40s. The B1 and B2 here have a 20s cooldown. The last unit in this formation is called a FLEX because they are not part of the "main rotation". FLEXes can be a support or DPS, but usually you won't use their Burst Skill (you use some FLEXes' Burst Skills, however). There are also other formations that feature duos/trios. This is different—because now you don't have a FLEX. You are forced to bring those duos/trios together like married couples. Whether a team allows a FLEX or features a duo/trio doesn't matter as long as all units synergize well. Often, a FLEX is also called “an off-burst unit”. Look for these keywords when reading our guides or asking our community.


This team works because ![]()


This team doesn’t because it only has 1 40s B1.


Neither does this (not enough B3).


Or this… ( ![]()
You can use our tool here to verify if your team works:

Pay extra attention to the warnings, e.g.:
Your Burst I units can't rotate properly. You need one 20s burst or at least two 40s burst units. 60s units won't work for rotations.
You only have 1 Burst Ill unit. You need 2 for proper rotations.
Game Knowledge
Types of Campaign Combat
Now that you've understood the fundamentals, let's go straight to Combat. In Nikke, two things are essential: survival & the death of enemies. If all your Nikkes are dead, you lose the stage/battle no matter what, and if you fail to kill all enemies before the time runs out (yes, there is a time limit), you also lose, except on Defense Stages. To make it less confusing, study the differences below:

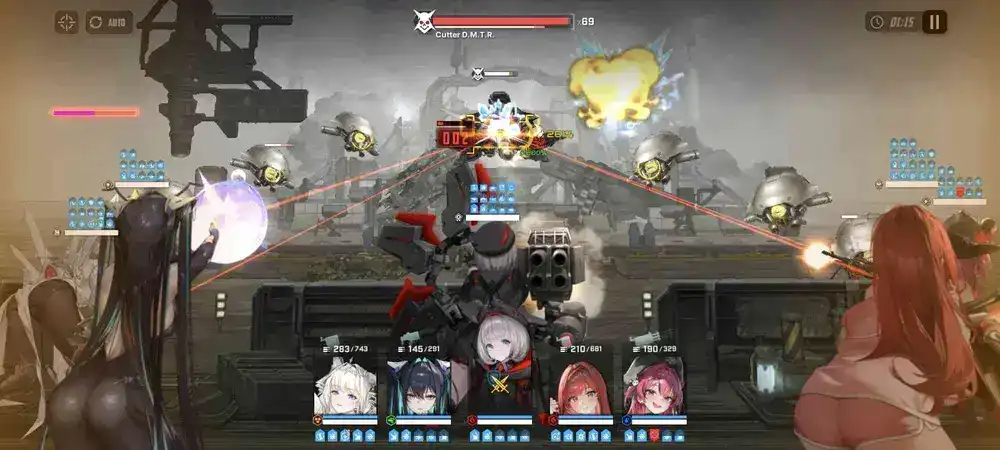
- Destroy Stage: This is the most common stage type in Nikke, where enemies come in waves and you have to kill them fast while surviving. To clear this stage, you must kill the Boss mob that spawns in the Boss wave. If you have turned on the Attention setting, the game will "focus" your screen on the Boss mob when it spawns, zooming in. We recommend disabling it, though, because it can mess up with targeting.
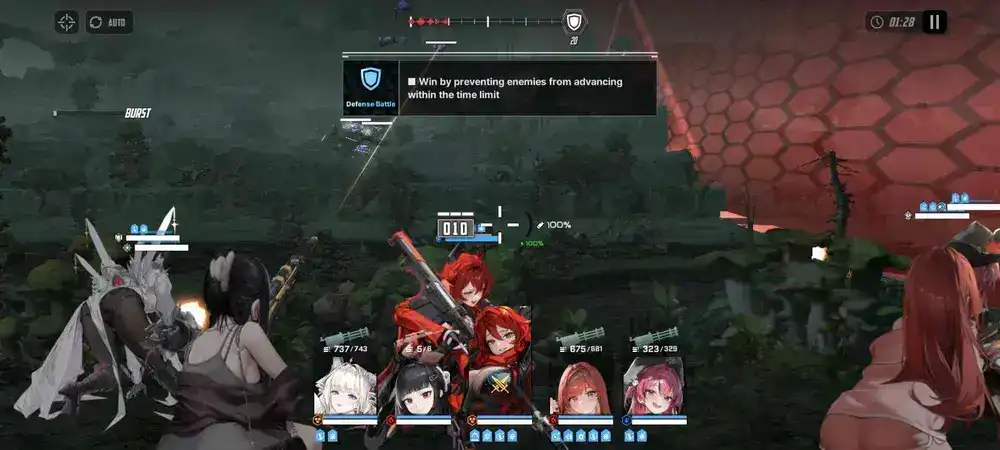
- Defense Battle Stage: This is a Defense Stage where endless mobs continue to spawn (their patterns repeat and are therefore predictable). Your goal here is to prevent as many enemies as possible from entering the Wall on the right. A passed enemy will inflict a certain amount of integrity damage, and once the integrity HP is 0, you lose the stage. This type of Defense Stage is also the most likely to feature a Black Hole/Stun Rapture, which as you can guess, will gather/stun Raptures if killed. You win if the time runs out, and at least one Nikke survives, and the integrity HP is ≥1.
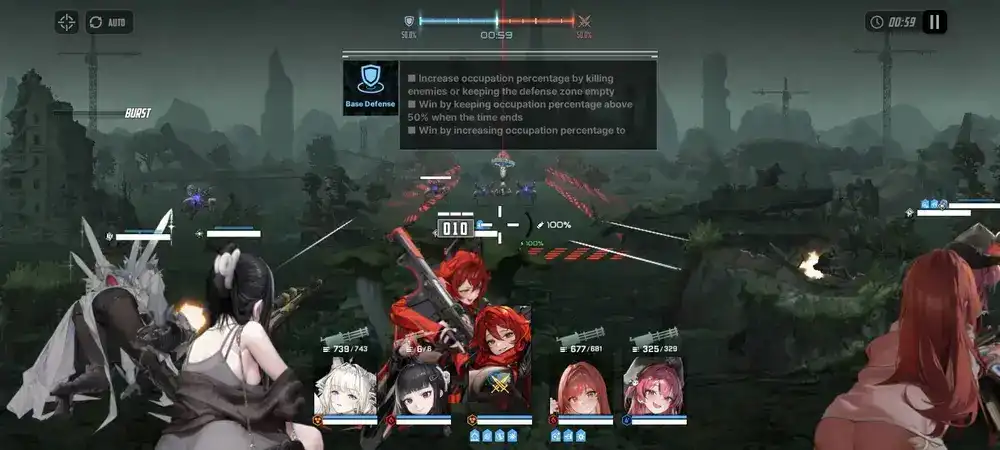
- Base Defense Stage: A variant of Defense Stage where endless mobs will continue to spawn. To finish this stage, you must dominate the Control Zone (progress is displayed at the top of screen) and achieve >50% control when the timer runs out, or you reach 100% control at any point, prematurely ending it. You control the zone when there are no Raptures in it (or if there is only one minor Rapture). Aerial Raptures usually do not count as Active Raptures (you can ignore and use them as wave stallers).
Mobs in this game may spawn based on time or on "number of Raptures dead from the previous wave exceeds X%". You can do what the community refers to as stalling by letting a mob stay alive longer than it should be to intentionally stall the time and prevent the next wave from coming (handy for waiting for Burst Skill(s) to cool down or preparing units who rely on stacks/ammo). This is a crucial technique that you will use as you progress in Campaign and fight at higher deficits.
It’s Okay to Skip
Defense Stages are generally harder to clear than Destroy Stages. It’s normal to skip or get stuck at them. Make sure to revisit once you’re stronger to get the Outpost Defense level (we’ll explain about that soon).
Campaign Deficit
As you progress in Campaign, your team's CP (or Power, but the community unanimously uses CP) will inevitably drop below the Recommended CP. When this happens, you will get hit with CP Deficit—which inflicts Stat Penalty. Yes! All your Nikkes' stats, such as HP, ATK, & DEF, will be reduced. This is fine and is an intended feature. You will have to push Campaign in deficits or ideally so. In fact, you need to push as far as possible before you get stuck because the more stages cleared = the higher your Outpost Defense level, which is your main resource faucet (we'll talk about this later). The fights will become harder and harder as you go on because the weaker stats will make the Raptures relatively stronger, but as long as you have good aim and do the optimization of the two discussed sections above, you can push far.
For more detail on CP deficit check out:

We have a quantitative measurement for "how far one is in Campaign", which we refer to as "Deficit". Deficit is calculated by dividing your current team CP by a stage's recommended CP and subtracting it from 100%. For example, 50000 CP / 60000 = 16.67% deficit. When one says they are in High Deficit (our tier list uses >25%, but competitive players go beyond 35% and up to 40-50%), that means they are very far ahead of the competition. This nets them more resource gain but requires a lot of skills (and luck). Conversely, if one is in Low Deficit, that means they are not pushing Campaign and are obtaining resources at a less-than-optimal rate.
How far you can go in Campaign will highly depend on units' investments but most importantly the units you have. You cannot push far without meta characters. Check our [Tier List] & [Reroll Guide] for a head start. We recommend that you reroll in games like Nikke because this game is very FOMO-based and does not have reruns outside seasonal units (if there are, it's inconsistent).

Blue CP (above recommended) means you don’t suffer from stat penalty.

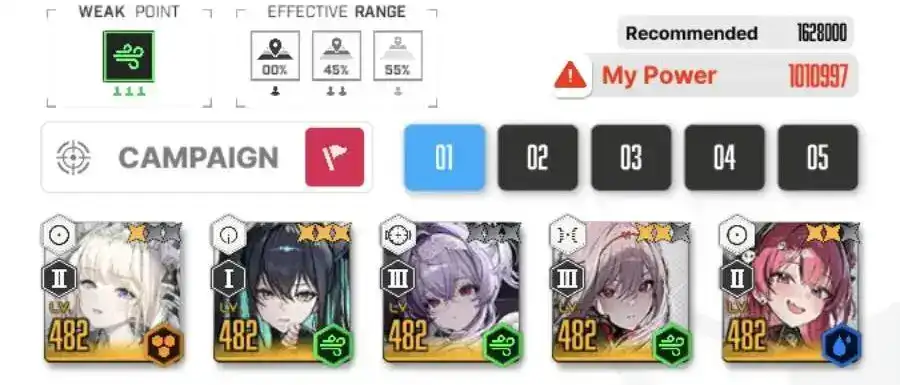
Red CP (below recommended) means you suffer from stat penalty.
Outpost Defense
Each cleared Campaign stage, excluding bonus side stages from Blabla & EX stages, contributes 1 XP to your Outpost Defense. Collecting 5 XP (5 stages cleared) will level it up, improving its output. This may include Core Dust, Battle Data, Credit, and even Equipment. Chasing the highest level attainable by your current team comp + investments is key to long-term sustainability, hence pushing Campaign is key to competitive lead.
Outpost gathers resources automatically and stores up to 24 real-life hours of resources at once, which can be claimed using the Claim button. Excess resources will reduce the Outpost's generation rate by a massive amount, so avoid letting it overflow. Outpost also determines how many resources you get from opening resource boxes/crates (1H, 2H, 4H, etc) in your inventory. 1H = 1 hour of Outpost Defense resource generation. You can also do Wipe Out for free once a day, collecting 2H of Outpost Defense output instantly. Extra Wipe Out(s) will cost gems at an exponentially increasing price.

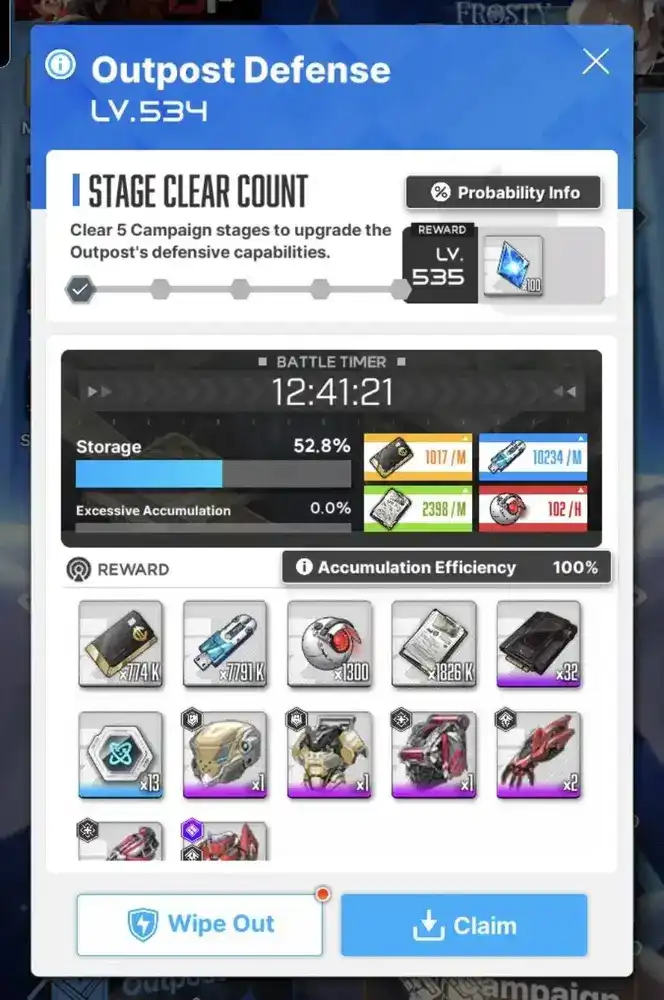
Outpost Defense interface accessible from main menu
Resource Crate Optimization

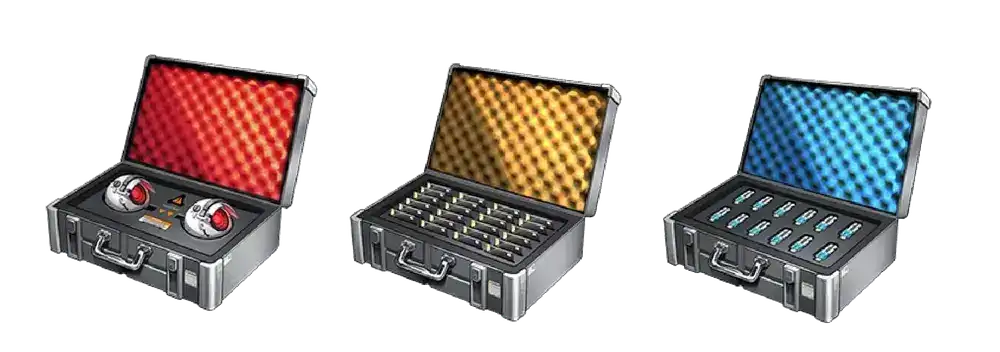
Since crates' value is tied to the Outpost Defense's level, there is merit to hoarding them, although you should know when and when not to hold them. If you are a beginner, you need to open them just enough until you reach the next Outpost Defense (OD) level or feature breakpoint (unlocking Special Interception, Arena, etc). Then, you open them again until you can reach the next breakpoint and so on. Late-game players who have cleared all Normal Campaign chapters, on the other hand, can hoard the resource boxes until new chapters get released, so they can clear them first before opening them, receiving more in return.
Synchro Device
The next thing we want to discuss is Synchro Device, central to Nikkes' leveling system.

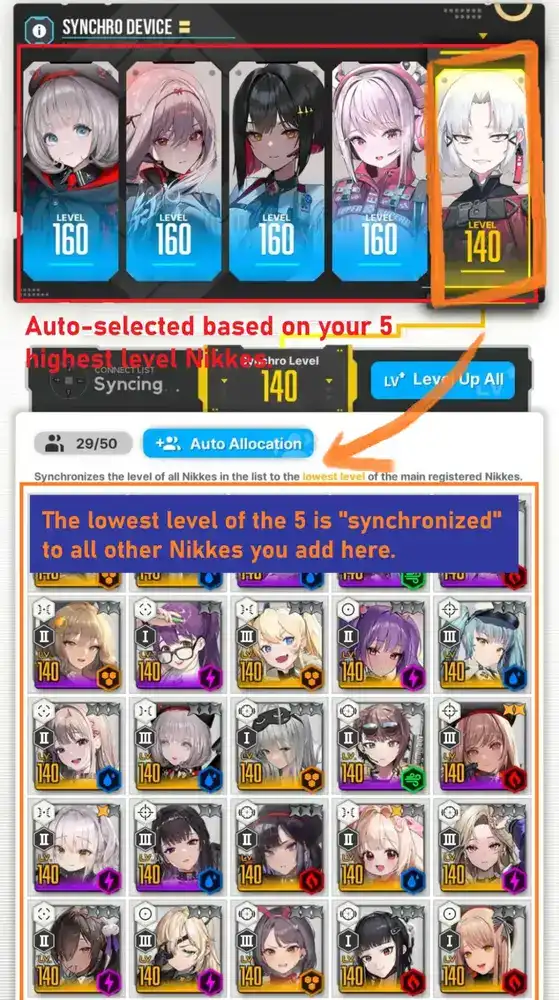
After clearing Chapter 4-15, you unlock Synchro Device. Synchro Device applies the lowest level of your 5 highest leveled units (automatically chosen; if you want the Device to pick others, reset those Nikke(s) and level up the ones you want) to all units in the Synchro Device (the slots at the bottom, where you can put in any units). This allows you to build just 5 units and have the rest of your units enjoy the same level investments (so, just invest in 5 units tops; don't invest in everyone; note that this is for level only and does not apply to gear, skill, etc). Units can be moved in and out of the Synchro Device without a time restriction. SR and 0-2★ SSR units can go up to Lv. 160, while 3★ SSR units (3 dupes+/MLB) can reach Lv. 200.

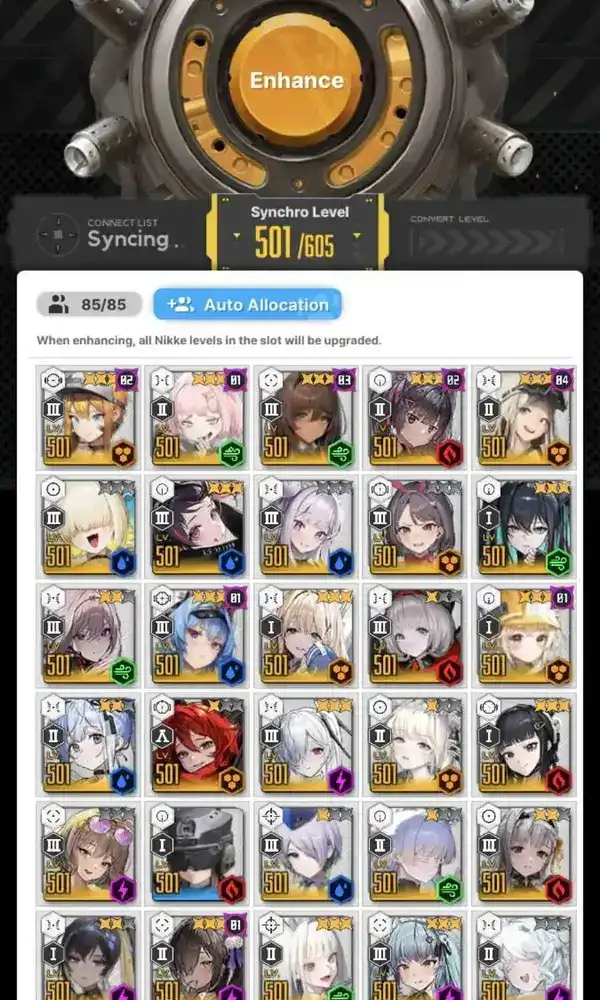
The interface of the Synchro Device past Sync Lv. 200.
After you get 5 MLB Nikkes (and thus 5 Lv. 200 Nikkes), Synchro Device is upgraded, and all the 5 Nikkes at the top that are chosen by the highest level are permanently locked. From this point on, you can only level them simultaneously by leveling up the Synchro Device, which costs a lot of materials, especially Core Dust. Like before, the Synchro Device level will still apply to the Nikkes at the bottom, which you can add and remove at will. There is actually a Synchro Device max. level based on unique character possessions (+1/char) & dupes (+1.33 per dupe till MLB), but at no reasonable point will a normal player (non-heavy-spenders) reach it.
You can unlock additional bottom slots in Synchro Device by paying 500 gems. However, this is not purely worth it if you can manage your time well. You can pay if you want, but you can just insert and remove units for free without a cooldown, so only do that for QoL. ShiftUp also usually gives free Synchro unlocks in anniversary events. For your information, Nikkes obtain stat increase every level/sync level, but the big ones come every 20 (e.g. Lv. 201, 221, 241, and so on).
Gacha
The main part of the beginner’s walkthrough is now over. Let’s now zero in a bit on this game’s gacha system. There are three major gacha types:

Ordinary: Costs 300 gems (50% off once daily) or 1 Ordinary Ticket. You have a 4% chance of obtaining a character in your wishlist once you have unlocked it or random if you have not. With wishlist, you can select up to 5 units from each Manufacturer. There is a 3.5% chance of obtaining a regular SSR and a 0.5% chance of a Pilgrim/Over-Spec. Ordinary pulls build up Silver Mileage, which you can trade for old units' spare bodies/dupes at 200.
Advanced: Costs 300 gems or 1 Advanced Ticket. There is an X% chance of obtaining the rate-up character (check the gacha detail), 0.5% chance of obtaining a Pilgrim/Over-Spec, and (3.5-X)% chance of obtaining a regular SSR. There is no wishlist. Advanced pulls generate Gold Mileage, which at 200, can be traded for any rate-up character for free. Ideally, spend Gold Mileage on 1% Rate-Up characters only (Pilgrims/Over-Specs, who are powerful).


2025 Step Up Recruit promotion illustration
Step-Up: Usually happens at New Year. Step-ups have you pull an n number of times at an exponentially increasing price, and the last step will guarantee an SSR selector (non-Pilgrims/Over-Specs). The chance is the same as Ordinary but does not build up any Mileage. You cannot use Gacha Tickets here.
Note that there is no pity system.
Your First Goals
All right, with all the basics covered, you’re set to grow and explore things on your own. You can finish the rest of the guide, but if you have time, take a quick look at [Advanced Combat Mechanics & Tips].

Push Campaign & Unlock Features

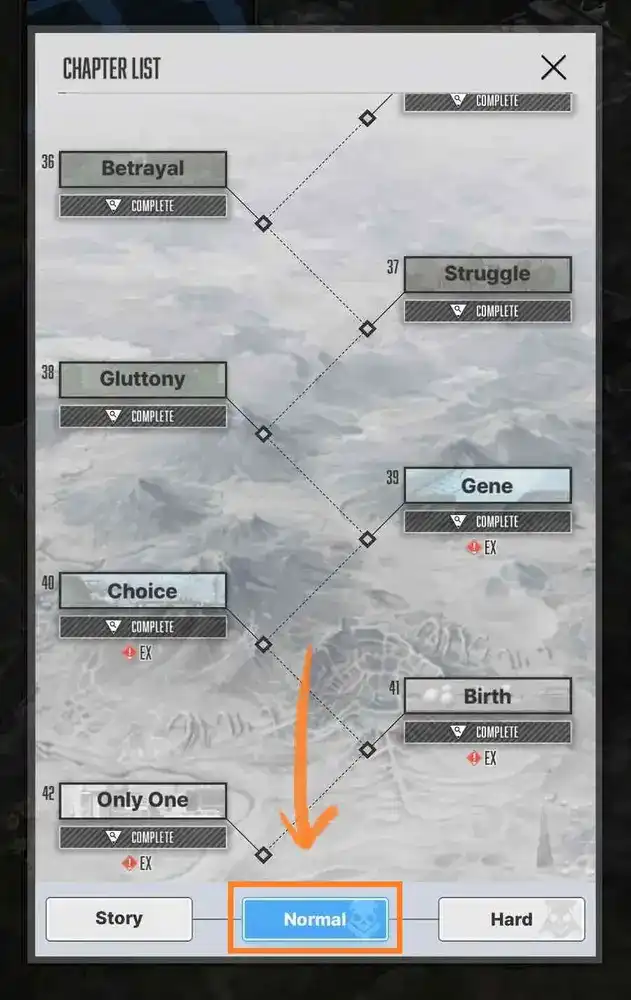
Your very first goal in NIKKE is to push Campaign as far as possible in Normal Mode, and that means grinding through high deficits. By clearing more Campaign stages, you level up your Outpost Defense and accrue more resources per hour. It also makes your resource boxes more valuable. You will also unlock more content.
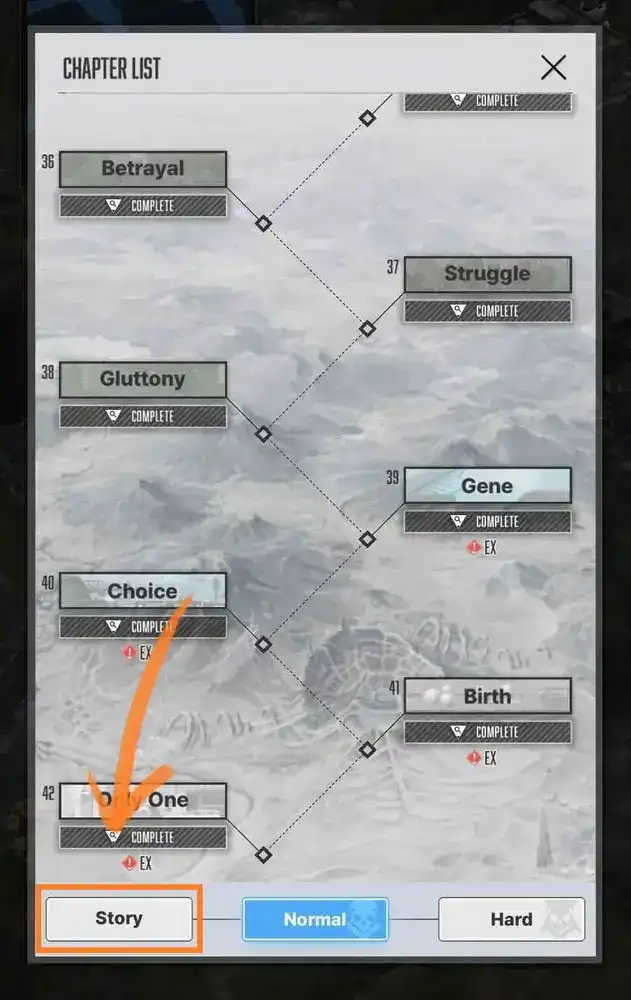
Should you get stuck, immediately evacuate to Story Mode. This difficulty is mainly for you to enjoy NIKKE’s lore, but we are doing it for the Campaign Mission (the one that asks you to clear Campaign Chapter X-Y). You can get early T9M Equipment from it, which gives you a huge competitive head start. It’s a time sink, however. If you don’t want to do it, skip this part. Note that you don’t unlock new features by clearing Story Mode.
Do Dailies & Other Game Modes
As you clear further Campaign stages, you unlock additional game modes. Clear daily/weekly missions and those additional game modes to earn more resources and gems. Pay extra attention to game modes with daily attempts; make sure to spend all of them!
Here is a table of features you can unlock:
| Game Mode | Campaign Chapter Unlock | Resets | Obtainable Rewards |
|---|---|---|---|
| Interception D | Normal 3-9 | Daily | Gear, Gear EXP |
| Interception S | Normal 9-15 | Daily | Gear, Gear EXP |
| Special Interception | Normal 16-28 | Daily | T9M Gear, Custom Modules, Gear EXP |
| Anomaly Interception | Normal 22-36 | Daily | T9M Gear, Custom Modules, Gear EXP |
| Simulation Room | After Tutorial | Daily | Skill Mats |
| Simulation Room OC | Pass Simulation Room C | Biweekly | Skill Mats |
| Rookie Arena | Normal 3-16 | Daily & Biweekly | Arena Exchange Vouchers |
| Special Arena | Normal 11-13 | Daily & Biweekly | Gems |
| Champion Arena | Normal 11-13 | Daily & Biweekly | Titles, Frames, Credits |
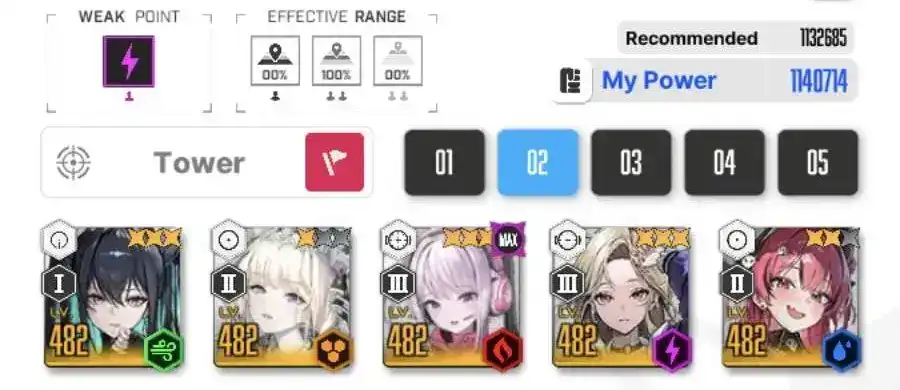
| Tribe Tower | Normal 3-3 | Never | Gems, Molds |
| Manufacturer Tower | Normal 7-13 | Limited Daily Attempts | Gems, Molds |
| Union | Commander Lv. 10 | Unlocks Forever | Access to Union Raid |
| Union Raid | Join Union + Union Lv. 3+ | Monthly | Union Chips |
| Solo Raid | Normal 6-4 | Monthly | Gems, Collection Item Materials |
| Collection Item | Normal 6-4 | Unlocks Forever | New Equippable |
| Lost Sector | Normal 5-3 (First) | Never | Gems, Recruit Vouchers, Cubes |
| Tactics Academy | First Upgrade at Normal 3-6 | Unlocks Forever | Miscellaneous |
| Synchro Device | Normal 4-15 | Unlocks Forever | Level Sync |
| Arcade | After Tutorial | Never | Gems |
| Recycling Room | Normal 5-10 | Unlocks Forever | Permanent Stat Boost |
| Liberation | Normal 5-20 | Daily | Exclusive Nikkes, Gems |
| Account Events | After Tutorial | Varies | A Lot of Valuables |
| Patch Events | After Tutorial | Daily; Changes Every 2-4 Weeks | A Lot of Valuables |
| Coordinated Operation | After Tutorial | Daily For 3 Days Every 2-3 Weeks | Broken Cores, Rusted Bones |
| Surface | Normal 18-33 | Has Daily Quests | Gems, Custom Modules, Permanent Stat Boost |
Higher Interceptions yield better rewards, even if you deal 0 damage (lowest stage). If unlocking them is within reach, unlock them immediately and switch to farming the new one. Open your resource crates if you need to.
Tip: All Interceptions use the same attempt count. This means, if you spend them on Interception D, you cannot spend them on Interception S. If you plan to unlock a new Interception level on a specific day, DO NOT DO INTERCEPTION before you push Campaign.
You might also have already realized that leveling up gear increases CP, but…
DO NOT LEVEL UP EQUIPMENT THAT ARE NOT T9M OR ABOVE!
You can equip lower-tier gear, but avoid leveling them up if possible.
T9M Equipment look like this:

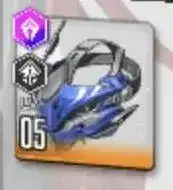
You will obtain them as you unlock Special Interception or higher.
Some game modes feature vouchers as rewards that can be traded in their respective shops. We are planning to deploy a Shop Guide soon, but for now, you can ask our community for help.
Beware! Invest in the Right Units!


When you are new, resources will be scarce. Here are some tips on managing resources when you are new:
- Focus on your main roster. Avoid diversifying your team unless needed and focus on your main five. This allows them to “brute force” various content even at disadvantage. Units that are SSS in our tier list are good brute forcers.
- Prioritize investing in units that are already good at low investments (cheap units). Some units can only perform at high investments, such as Aliceor
![Alice]() Milk: Blooming Bunny. Avoid gradually investing in these units unless you are completing a certain mission.
Milk: Blooming Bunny. Avoid gradually investing in these units unless you are completing a certain mission.![Milk: Blooming Bunny]()
- Prioritize units who have more coverage (i.e. can do mobbing, bossing, and PvP at the same time). This will allow you to enjoy more returns as you collect more gems to pull more units. Use our Tier List to grasp the general gist of what unit is the most versatile.
- Avoid investing in units that are not future-proof. Units that only work well for beginners but not for veterans, e.g. Harran, will just waste your materials in the long term.
![Harran]()
- Avoid over-investing in units that you think will be replaced soon in your main roster. If you think your unit will be replaced soon (you are aiming to pull someone in a future banner or your unit is someone that is very weak), avoid over-investing in them.
- With that in mind, pay attention to game news or dev notes. They often announce scheduled reruns.
- You can also ask the community if a new unit is good (their kit must be out first, usually D-1).

The key is to invest less but maximize returns.
Final Goal: Breaking the 160 Wall


NIKKE is very harsh toward new players due to its Wall restriction. In short, your Nikkes' level is walled at Lv. 160 unless you have 5 SSRs with 3 dupes (MLB), who can reach Lv. 200. As we explained earlier, you need 5 Nikkes at Lv. 200 before you can "upgrade" the Synchro Device. Because of this, we refer to getting 5 MLBs as Breaking the Wall. Without Breaking the Wall, you are basically barred from accessing the later part of this game because you are not strong enough. You will also lose rank in Special Arena (which affects gem's income) and be unable to get higher rewards from Interception and pre-Challenge Solo Raid (a bossing game mode where you deal as much damage as possible with 5 unique teams to achieve a competitive rank and obtain gems based on that rank and other kinds of guaranteed rewards).
Breaking the Wall is no easy task. Getting dupes for a specific unit when there are hundreds of other units is RNG-dependent. Not only that, we usually recommend using gems for Advanced Gacha only (for rate-up characters), but Advanced Gacha does not have any wishlist system, making the drops more random. Ordinary does have, but it's less "worth it" because it's 1:15 (or 1:20)—harder to get rate-up characters—and excludes seasonal characters. The drop rate for Pilgrims (rarest Nikke's Manufacturer type) is abysmally low, and you build up Silver Mileage, which can only be traded for old units' dupes, and not Gold Mileage (which you get from Advanced Gacha and can trade for rate-up units; sparking). That said, Ordinary is still ironically the best way to Break the Wall because the unit(s) are limited to your wishlist pool.
Before we go further, let’s learn one more term: Treasure/Favorite Item.
Treasure/Favorite Items
In NIKKE, getting dupes after Breaking the 160 Wall isn’t really necessary. NIKKE isn’t like CZN or most other gacha games whose units get unlockable skills with dupes. No, thankfully, it’s just +2~2.2% stat per dupe here. In other words, as described earlier, your first 5 MLBs are what’s vital. However, getting Treasure/Favorite Item is another question.
What is Treasure? Treasure is a progression system that unlocks a buffed kit for select Nikkes (not all). You can find which Nikke(s) can have Treasure by checking out the Favorite Item Encyclopedia in the Nikkes page on the lobby screen. Treasure is also known as Favorite Item. They fall in the same family as Dolls/Collection Items, which are powerful equippables that you can use after clearing Normal 6-4. For more info, visit Introduction to Collection Items & Collection Item - Priority. Treasure-able units have a cyan background/font color on Prydwen and are often dubbed in guides and communities with the suffix -Tr, such as HelmTr & ToveTr.
Why are we telling you this now? The thing is the pathway of obtaining 5 MLBs and getting Treasure units overlaps substantially. Wouldn’t it be better getting an MLB unit who is also a Treasure (and meta) than an MLB that’s bad? Not only are you more efficient, but you also build an early competitive advantage that can snowball and give you more gems.
Break The Wall
- Ordinary Recruit - Ordinary Recruit is the fastest way of Breaking the 160 Wall because pulls are your main source of getting units. That said, we don't recommend spending gems on this gacha unless you are a spender. The reason why this is here is because you should implement these optimizations:
- Set up your wishlist properly. Make sure it contains all meta units you don't have and units who you have at least 1 copy already. Units who have Treasure and are good can also be prioritized as they explicitly require 2 copies.
- For this reason, we highly recommend adding Helm to Elysion Wishlist.
![Helm]()
- Utilize Bonus Recruit to recruit high-value units for your roster (i.e. if you have Crown but no
![Crown]() Helm (Treasure)/
Helm (Treasure)/![Helm (Treasure)]() Mast: Romantic Maid,
Mast: Romantic Maid,![Mast: Romantic Maid]() Helm [to unlock Treasure]/
Helm [to unlock Treasure]/![Helm]() Naga can be useful). If you don't urgently need a unit right now, save them for breaking the wall.
Naga can be useful). If you don't urgently need a unit right now, save them for breaking the wall.![Naga]()
- If you are a spender and want to break the wall ASAP, always buy the discounted 150 gem pull daily. According to the game, there is no difference between single pulls and multi pulls.
- Bonus Recruit
- Bonus Recruit is a feature recently added to the Ordinary Gacha, which allows players to get Liter,
![Liter]() Naga,
Naga,![Naga]() Helm,
Helm,![Helm]() Tia, or
Tia, or![Tia]() Alice for free every time they do 100 pulls (up to 10 times).
Alice for free every time they do 100 pulls (up to 10 times).![Alice]()
- Generally, the unit one picks here should be the one that helps one’s team the most. If one has Crown or
![Crown]() Tia, then
Tia, then![Tia]() Nagais the top pick (
Nagais the top pick (![Naga]() Helm is better for Crown if you can get her Treasure). If one lacks CDR, then
Helm is better for Crown if you can get her Treasure). If one lacks CDR, then![Helm]() Liter is the top pick.
Liter is the top pick.![Liter]() Aliceis good, but you get her for free from her Diary event—so you can get her after everyone else, for dupes and stat.
Aliceis good, but you get her for free from her Diary event—so you can get her after everyone else, for dupes and stat.![Alice]()
- However, because Helm (Treasure) is a universally performant unit and is one of the non-powercrept ones of the bunch, we highly recommend choosing Helm over anything else if possible until you get 2★ (2 dupes).
![Helm (Treasure)]()
- But, what should you get if you’ve gotten everyone or what if you don't really need anything (comfortable with current setup, etc)? Good question. We won't underplay the fact that Helm dupes are the best here, especially for unlocking her Treasure (you need 2 dupes for Treasure). Then, it’s Alice, followed by
![Alice]() Naga, because both are dependent on stat (do know that these two are being edged out of meta). While these are truthful facts, this Bonus Recruit system is more useful for helping you Break the Wall. Instead of basing your judgment on our dupe priority, you should prioritize getting units you already have copies for. If you already have 2★
Naga, because both are dependent on stat (do know that these two are being edged out of meta). While these are truthful facts, this Bonus Recruit system is more useful for helping you Break the Wall. Instead of basing your judgment on our dupe priority, you should prioritize getting units you already have copies for. If you already have 2★![Naga]() Liter, then getting Liter from Bonus Recruit will solve 1/5 MLB. But, before you do that, there is one more thing you can do.
Liter, then getting Liter from Bonus Recruit will solve 1/5 MLB. But, before you do that, there is one more thing you can do.![Liter]()
- Postponing your decision for as long as possible. Yes, until you are 100% sure that claiming your pity helps you Break the Wall without any resource loss, you should hold onto it. Who knows if your desired unit(s) will spook you from gachas? What if you received Liter from Bonus Recruit and later you got her randomly from pulling the next Pilgrim, for instance? Wouldn't that “pity” you obtained turn into waste? Hence, instead of just getting Liter immediately from Bonus Recruit, you can just put her in your Ordinary Wishlist (alongside Naga & Alice too, of course). You should also do the same with Silver Mileage because technically that’s also a pity in some form. One day, once you have a surefire way of Breaking the Wall, you can use up your “pity” according to plan.
- Freebie SSR - During anniversary and half-anniversary, the game offers you 1× Free MLB SSR to help you break the wall. For example, for the 3rd Anniversary, we got Chime. Note that, if you select one of the older freebie SSRs from the Freebie SSR Selector Box, you will have to purchase any remaining copies (for MLB) for 200 Silver Mileage each.
![Chime]()
- Silver Mileage Shop
- As you pull on Ordinary Banner, you accumulate Silver Mileage, which you can trade for Spare Bodies of old SSRs. Spare Bodies are copies for limit breaks; they will NOT allow you to obtain the units. You need to get them first through gacha. The SSRs only include those available on release, except Alice & Pilgrims (but including
![Alice]() Noah). Spare bodies of Freebie SSRs are also available. New Treasure units also have their Spare Bodies featured there for 6 months after release. After that, they will be removed forever.
Noah). Spare bodies of Freebie SSRs are also available. New Treasure units also have their Spare Bodies featured there for 6 months after release. After that, they will be removed forever.![Noah]()
- Use the Silver Mileage (if you don’t urgently need them to buy Spare Bodies of new Treasure Units) to purchase remaining copies for old characters once you can be certain that doing so will break the wall. Delaying spending Silver Mileage is crucial to knowing which characters you should buy as sometimes those units whom you are planning to get will spook you in gacha.
- Selector + Molds
- As you complete challenges (especially if you are a spender and decide to buy the Beginner’s Gacha) and as you progress in Tribe Tower, you will accumulate Selectors & Molds. Unit Selectors, like Bonus Recruit and Silver Mileage, should be saved until you can guarantee Breaking the Wall. Note that these are not the same as Freebie SSR Selectors discussed earlier. Meanwhile, Molds can be opened immediately, unless new meta units are going to enter them (but this is more for late-game players). If you have the choice to do pulls, exchange Bonus Recruit, spend Silver Mileage, or open Molds first, always open Molds first because they are random. It’s the same as gacha, and that means units will spook you.
- Road to Villain & Day by Day
- There is an on-going event called Road to Villain where you can get up to 3 Drake(s) for free. These are not Spare Bodies, which means, iIf you don’t have her, you will get her. Further
![Drake]() Drake(s) will then become Spare Bodies. Sadly, 3
Drake(s) will then become Spare Bodies. Sadly, 3![Drake]() Drake(s) are not enough to MLB her. You should put her in your Missilis Wishlist to increase your chances of being spooked (or you can use Silver Mileage later to buy her last copy).
Drake(s) are not enough to MLB her. You should put her in your Missilis Wishlist to increase your chances of being spooked (or you can use Silver Mileage later to buy her last copy).![Drake]()
- There are two other events called Day by Day, where you can get 1 Privaty and 1
![Privaty]() Alice for free. Since
Alice for free. Since![Alice]() Alice is part of the Bonus Recruit, make sure to put her in your Tetra Wishlist too.
Alice is part of the Bonus Recruit, make sure to put her in your Tetra Wishlist too.![Alice]()
- For Those Who Dare to Spend
- If you are willing to spend, here’s some advice:
- Get a total of 2,000 Paid Gems to pull the Beginner's Gacha. You get 2 random old SSRs (1 from pull & 1 from Mission), which are usually bad, but might be helpful for Breaking the Wall. The most economic way is to buy $5 Monthly seven times (yes, you can stack them).
- Buy the $0.99 packs from clearing Towers or Commander level-ups. These grant 2 Ordinary Ticket(s) each, which aren't the most economic per se, but help Break the Wall faster if you are a spender. Note that these packs are time-limited and can only be bought within 2 hours of achieving a milestone.
- Buy the Campaign packs, Beginner's packs, or Monthly packs (Calendar tab). The $5 Monthly pack gives the most gems, but the $15 Monthly pack gives the most resources/progression. The other two packs have good value.


The end
Congrats, you have reached the end of the guide! You truly have some commendable attention skills! We highly appreciate the support thus far, and we hope you’ll enjoy your stay in NIKKE!
If you have questions not answered here, feel free to approach us in our Discord server and tag any of our @Nikke Staffs (Kisenix, Snake, Retro, or Gatrix) or our lovely members there. We hope to see you around! (。•̀ᴗ-)✧