character from the Supporter class, who wields a Minigun
weapon and belongs to the Water
element. She's part of the Abnormal
faction.
The younger of the twin maids who works at Roswaal Mansion.
To learn more about Rem check the sections below. Use the tabs to quickly switch to the kind of information you're looking for.
To learn more about Rem check the sections below. Use the tabs to quickly switch to the kind of information you're looking for.
Profile
Review
Investment tips
Teams
Profile
Skills
Normal Attack
Normal Attack
Minigun
Mode: Normal
Ammo: 300
Reload: 2.5s
■ Affects Target(s).
Deals 5.57% of ATK as damage.
Deals 200% damage when attacking core.
Skill 1
Leave it to Rem!
Passive
Cooldown: -
■ Activates after landing 15 normal attack(s) in Demon's Breath status. Affects self.
ATK ▲ 4.22%, stacks up to 30 times(s) and lasts for 10 sec.
■ Activates when using Burst Skill. Affect all allies.
Shares HP recovery for 10 sec.
Skill 2
Rem the Healer
Passive
Cooldown: -
■ Activates when entering battle. Affects self.
Recovers 42.24% of attack damage as HP continuously.
■ Activates when entering battle. Affects self and 2 Rocket Launcher-wielding ally unit(s) with the highest ATK.
Shares HP recovery continuously.
Burst
No Mercy from Rem
Active
Cooldown: 20s
■ Affects self.
Demon's Breath: Critical Rate ▲ 37.8% for 10 sec.
■ Affects all allies with a Rocket Launcher.
ATK ▲ 50.78% of caster's ATK for 10 sec.
Max Ammunition Capacity ▲ 5 round(s) for 10 sec.
Specialties
Buffer
Healer
Voice Actors
ENG
-
JPN
-
KR
-
Gallery
Review
Review
Our adorable blue-haired twin sister has finally joined the fray, commanding a heavy-duty machine gun enchanted with youthful energy and the omnipotence of magic. Rem is an almighty support character that not only provides continuous healing but also batters enemies with her comically large ATK buff. Her Burst Skill momentarily strengthens active RL units and increases their Max Ammo.
Summary
Can you give us a brief description?
Rem is a versatile unit with high DPS potential (top 8) that can also heal the team at the same time. She can also buff RL units. Her healing may not be the best, but it's still better than nothing. Rem is also a versatile character and can fit in many teams. Sadly, she is rather investment-dependent, as her DPS and lifesteal scale exponentially with appropriate OL.
Should I pull this unit?
Absolutely. While her performance in PvP is far from desired, it is our job to proselytize Rem's supremacy in Raids. Sorry, we mean to say that she is expected to stay relevant for a long time. In other words, you will without doubt gain value by using her, as long as she is invested properly. We would also recommend exchanging Gold Mileage Ticket(s) for her if you have some spare. In fact, she is worth obtaining additional copies since strengthening her further beyond OL is pretty difficult, but stat increase is straightforward. After all, she is a limited unit and will most likely never return in the future. That aside, remember that we are one month away from Half Anniversary.
Usage Analysis
The ranks below have been adapted to our most recent tier list update. We'd encourage you to check if you haven't seen.
Campaign (LD) - SS
The addition of Rem is fantastic news for campaigners. She exhibits near-Modernia Level of Single-Target DPS while also being able to take care of hitcount mobs/projectiles, which are a major threat beyond Chapter 19+. In addition, she also provides supportive heals to RL units like A2 or Emilia, challenging Centi in terms of versatility. While Centi shows consistency at any deficit as an energy battery, we believe that Rem is a suitable alternative for low-deficit clears, allowing for a more offensive approach, provided that the team can accumulate Burst Energy through other ways.
Campaign (HD) - S
While Rem is usable at high deficit, Bunnies (and Tiga) are still better for pushing campaign stages due to the nature, comfort, and flexibility of their heals, damage buffs, indomitability and ammo buffs. Rem's heals are also too low to become meaningful in high-deficit combats, where nearly everything is a one-shot, one-kill.
Boss (Solo) - SS
A dynamic B2 contender that blends offense and survivability, making her a versatile unit for all sorts of situations. Unbelievable personal damage (top 8 in our calculation) and can fit in many teams. If her heal is insufficient, then you can bring another healer like Helm. Buff restrictions on RL may hinder supportive performance but should not weaken her impact. In fact, it may unlock the potential of even ancient RL characters. Being the third water "DPS" after XLud and Emilia, she seems to be promising and should hold for a very long time in Solo Raid, especially against Fire bosses. Since Team 1 and 2 are already occupied by Bunnies and Tiga, we can expect to use Rem in Team 3.
Specifically in Solo Raid, Rem will most likely have the highest ATK at all times, causing her to taunt attacks naturally. This can be good or bad. Pay close attention!
Boss (Adds) - SS
For this, we will do a direct comparison against the Bunny twins. While Rem can closely compete with Blanc in terms of the full team's raw damage, she offers less utility that the team can benefit off, subtracting their DPS damage in exchange for her own damage. With no in-built AoE skill, this will become more apparent in Boss (adds). A few things she has a lead over Bunnies is that you are not forced to bring Noir with you (which can be advantageous for some formations). For instance, swapping Noir with Emilia can help deal with ranged mobs. Besides that, MGs can also handle hitcount mobs/projectiles and shields with ease, notable in Plate and Mother Whale Boss Campaign boss fight, and Material H Solo Raid fight.
PVP - C
MGs are not viable for PvP and can cause more harm than good, unless it's Rosanna. However, Rem has a HP Recovery Share effect + decent damage that doesn't trigger additional procs. She also buffs the ATK of RL units, so it's a nice bonus if you ever get to burst with her. Her potential may be unlocked if she is able to make use of her HP Recovery Share effect nicely. These strategies will only be viable for ATK strats, and are not good for DEF strats. For example, an overhealing DPS (with Helm) can now split their excessive healing among the team.
Simulation Overclock
One of the only B2 MG and Water "DPS" that is worth considering when the restrictions favor her in the future.
Kit Analysis & Highlights
A Literal Otherworldly Grater
Rem is another outstanding unit that challenges the meta by undertaking two jobs at the same time: DPS and healing. Despite her naturally lower supporter stats, her monstrous ~126% ATK buff affecting self, in unison with the high base multiplier of MG, allows for some crazy damage. If normalized to Attacker's standards, the final ATK would be comparable to Attacker's ATK + ~88% ATK. This would be on par with Guillotine, or perhaps slightly higher, without the drawback of losing HP and reduced team flexibility. Furthermore, it ramps up much more quickly, reaching its cap within just one use of Burst Skill and persisting throughout the battle as long as subsequent Burst Skill(s) are initiated within ~9.5s of the previous one, which demands CDR and constant activation.
Rem's DPS stems from her ridiculous ATK buff, which is not disappointing per se. However, it also means it will be diluted, making it uneconomical to scale her further with ATK. Focus on stacking Max Ammo, Elemental DMG, and/or buffs from other categories.
Endearing Yet Avaricious
Not so fast, brother. Rem's extremely high personal ATK comes with a drawback, or a twist, we would say. That is, she will almost always steal all buffs that target units with the highest ATK. Why? Because this gauges final ATK. There are only several units who consistently have higher ATKs than her at the right time, such as Scarlet and SBS at the beginning of Full Burst. So, yes, that means she will steal one of Alice's and Maxwell's S1 enhancements, so be careful!
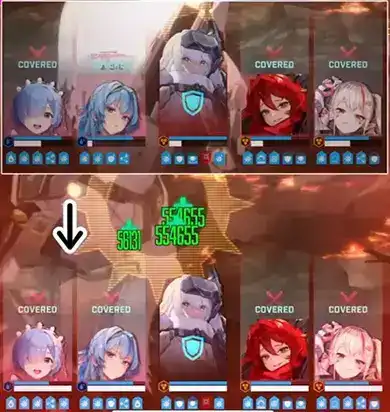
Additionally, Rem's Skill 1 also provides an additional "link" to her Heal Share ability when her own Burst Skill is used (explained in detail in the next 2 sections). This adds a Heal Share link to each unit present in the team, as opposed to the usual 1, 2 or 3 units benefitting from Rem's heal depending on how many RLs are in the team. There is an interesting interaction that takes place here: while Rem is healing everyone herself, any external heal sources (such as from Helm, Rapunzel, etc) will also heal all units linked to this Heal Share Chain. Here is an example from youtuber: PESU MY, where if you burst with Rem and Helm both together, and had "saved" Snow White's Burst Skill from her previous burst, you can shoot with Snow White to receive a gigantic heal that fully heals your team from the brink of death:
Besides DPS, Rem is also capable of healing. Her damage acts as a lifesteal. Normally, this would only be shared among self and all RL units. For 10s after using Burst Skill, the scope is expanded to the whole team. This not only makes Rem the fourth B2 healer (after Blanc, Naga, and Marciana) but also the most versatile one concerning synergy. Laplace's last ammo mechanic may be affected but not to the point that she loses damage. Rem is also not tethered to any other unit to perform, although her offensive buffs do only work for a particular weapon type.
Her HP Recovery Share actually works unidirectionally! What this means is that any healing provided by any of the associated units is distributed evenly among that sharing group. For instance, given Volume + Rem + Diesel — if Rem's Burst Skill is used and Full Burst is triggered, then any healing Diesel receives from taking damage will be split among the team.
Any% Insanity Speedrun
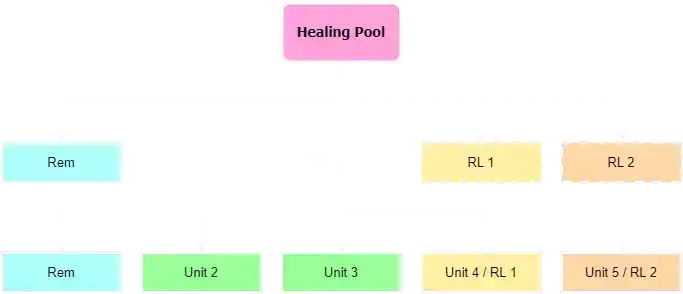
The sharing system is also quite convoluted. The easiest way to visualize this is to picture a reservoir projecting troughs that connect to your units, healing them. When an instance of HP Recovery Share is active, every unit involved gets one share, splitting the healing pool any of the linked units provides. However, the number of troughs hooked to each unit varies, so the healing is not even! The more channels, the more healing (scales multiplicatively) for them. However, since the total number of shares increases, other units who are entitled to fewer portions will also receive less healing at the same time. This is because the amount of healing per share is equal toHealing Pool / Total Number of Shares.
HP Recovery Share Diagram
Rem's kit consists of two HP Recovery Share instances. One is linked to her and a maximum of 2 RL units with the highest ATK, whereas the other one is linked to ALL units in team (when using Burst Skill). Therefore, we can infer that:
When the effect of Burst Skill is not active, Rem and a maximum of 2 RL units each receive one share from the pool. If there are no RLs, Rem will devour all of it. When there is only one, Rem and that RL will each consume half.
When the effect of Burst Skill is active, another instance of HP Recovery Share activates. This time, all units are entitled to one additional share from the pool.
But, this does not mean that there are 5 shares in total. Referencing the first bullet point, Rem and the relevant RL units will actually have 2 shares each. Hence, the total number of shares will also shift depending on whether there are RLs in the team, from 6 (no RL) to 8 (2 RLs).
More shares result in less healing per share. With 0 RL, each share amounts to 1/6 with Burst Skill. With 1, it equals 1/7. Lastly, with 2, it equals 1/8.
A unit at maximum HP with at least one share still dilutes the pool, so Rem's healing works better for AoE than Single Target.
Clash of the Two Waifus
Her playstyle resembles Marciana's inasmuch as how her healing functions. The difference lies on the fact that one instance of Marciana's healing skills is derived from each ally's own damage, whereas Rem's is dependent on her personal damage. On top of this, Rem's healing is weak, but thankfully it can be compensated by investments. This means you need to focus on building Rem's DPS too, and that is primarily achieved via OL. One thing to also note is that, due to Elemental Advantage, Rem would also be healing more against enemies of the countered type (such as against Nihilister).
In summary, Rem can be seen as a more offense-inclined unit compared to Marciana since Marciana's heals are more consistent. On the contrary, Rem deals a hefty amount of damage. Marciana also does not need to use Burst Skill to heal, making it possible to run her as an Off-Burst B2 unit. Meanwhile, Rem is always required to use Burst Skill. Otherwise, Rem will NOT obtain any ATK buffs, lowering her healing potential and significantly weakening her. Even then, nothing can beat Rem's dualistic contribution.
Selective Love
■ Affects self.
Demon's Breath: Critical Rate ▲ 37.8% for 10 sec.
■ Affects all allies with a Rocket Launcher.
ATK ▲ 50.78% of caster's ATK for 10 sec.
Max Ammunition Capacity ▲ 5 round(s) for 10 sec.
Finally, let's discuss the effect of her Burst Skill itself. To begin, she obtains increased CRIT Rate for 10 seconds, boosting her overall damage and healing. This is always a welcome buff, even if its value is not that significant. But, that is nowhere as impactful as the second component, where she dramatically increases the ATK of all RL units in team, analogous to Tove's, for 10s. The buff is equal to ~50% of caster's ATK (~41.67% in Attackers' stats at similar investments), alongside a Max Ammo increase of +5 (at max level). This strongly synergizes with Emilia's Max Ammo mechanic and SBS's infinite ammo strat (especially when paired with Alice as she loses ammo faster). Emilia is the main protagonist here as her kit has no ATK buff at all, thus she utilizes Rem's buff efficiently. Meanwhile, SBS is already overcharged with her ~115% ATK buff, but extra buffs would not hurt, would they?
We would like to remind you that S1 does not increase the strength of this ATK buff.
While it is optional to pair her with RLs, to benefit from her offensive utilities, RL units must be present somewhat. This can be of Attacker, Supporter, or Defender type as they will all benefit equally. Note that, in practice, you do not always need to bring 3 RL DPS. Sometimes, you can use better units that deal even more damage without any offensive support.
Investments
Gear Investments
Rem is amazingly good at dealing damage, and only by dealing damage is she healing the team. To put it simply, her DPS delimits her potential. There are two main ways of increasing it:
Max Ammo - MGs' damage skyrockets in proportion to uptime, which can only be ideally achieved using Max Ammo via OL.
Elemental DMG - Against enemies of countered type, especially Nihilister (the next Solo Raid boss), Rem's DPS and healing will easily multiply.
Other than these two, both ATK and CRIT lines can serve as bonuses that will help boost her damage slightly. Even if ATK is already heavily diluted, there is really nothing else better.
Skill Investments
Unfortunately, it is a common understanding that Rem swallows hundreds of skill books, but you can get away with fewer:
Skill 1: 10
ATK is her main source of damage (and healing). Prioritize leveling to 10.
Skill 2: 5+
Rem's healing is weak, so in some cases, it may be insufficient. If this happens, we recommend settling somewhere above 5 and upwards if necessary. The reason we choose 5 is because the cost of Blue Manual(s) to upgrade from 4 to 5 is only 42, but then it leaps to 126 at level 6. Blue Manual is often the bottleneck for regular skills. However, before upgrading, we advise trying a more polished assortment of OLs to see if that itself is enough to fix the problem. Only upgrade in hindsight.
Instead of trying to fix something that is expensive, why not consider other alternative team formations?
Burst: 3/4/7/10
At Level 3 & 7, her Burst Skill raises the Max Ammo cap further by +1. However, we do not recommend leaving it at 3, or you'll be missing out on the ATK buff. Therefore, our general recommendation will be 4/7/10.
Since Emilia is the only RL unit worth investing right now aside from SBS, it may not be worthwhile to upgrade beyond 7. If in the future they release a new RL unit that is performing well, you can then revisit this idea.
Cube Investments
Bastion - The universal choice for all MGs as it offers the highest uptime extension without external help.
Resilience - If paired with reload speed buffers like Privaty, Resilience (with some Max Ammo) may reduce downtime to the point that it is unfelt.
Review
Pros
2nd Best Water DPS after xLudmilla.
Very high single-target DPS, especially for bossing, and is unrivaled in the B2 category.
Provides ATK buffs and Ammo buffs to RL units.
High synergy with RL units since she heals RLs well as compared to other units.
Permanent ATK buff from Skill 1, has good DPS outside of Burst as well.
Can tank damage against raptures with "target Highest ATK" skills since she heals herself better than she heals others.
Provides substantial Crit Rate during Burst, which is appreciated against Bosses with no core.
Heals from other linked units are shared with all of the team.
Best girl
Cons
Limited Unit.
Needs a lot of skill investments to be fully optimal, especially Max Ammo OL , as well as lvl10 Skill 1.
Does not scale well with ATK buffs.
Will steal Maxwell's Skill 1 and Alice's Skill 1 buffs for herself due to innate ATK buff.
Can lose her Skill 1 ATK buff stacks if playing on lower FPS, low Burst Gen, no CDR or low Investments.
Healing can be extremely diluted for non RL units. Rem can be an unreliable healer at times.
At best, Rem will heal herself and 1 or 2 RLs paired with her, the other 2 units may struggle to survive.
Since Rem is an MG unit, Lower FPS = Lower damage. (For MGs, Bullets per second = FPS).
Please fix her hands Shift Up..
Ratings
B
Story
B
Bossing
E
PVP
Investment Tips
Skill Investment
Here's the explanation for all the numbers and colors used in the guide:
10/5/7 means upgrading Skill 1 to lvl 10, Skill 2 to lvl 5, and Burst Skill to lvl 7,
Yellow means the immediate investment when u get the unit. There are 3 reasons for this:
If the unit is Meta or High Priority, it will have a starting investment of more than 1/1/1 (such as 4/4/4) depending on what the unit provides.
If the unit is Medium or Low Priority, 1/1/1 will be mentioned, meaning no immediate investment is required, and you can invest in this character if you need to use it according to the priority listed.
If we deem that a unit does not have usable skills to be meta for any gamemode, no investment will be mentioned.
Blue means minimum investment to take advantage of the Nikke's skills. There are 2 reasons for this:
Sometimes, minimum investments are breakpoints such as for Noir or SAnis.
Sometimes, minimum investments are just the ideal way to progress to upgrade that unit, before moving on to Recommended and High.
Red means recommended investment for F2P players,
Purple means maximum recommended investment, in order to get the best out of the unit. You should only try to reach these investments if you have a surplus of Skill Books leftover.
More info:
The skill investment list below features a lot of Level 4 and 7 because they are easier to understand. Any higher levels will cost a new type of resource.
However, you may choose to upgrade to Level 5 if you need a stronger effect instead of 4, as the increase in Blue Manual cost from Level 4 to 5 is still low. The leap only starts from Level 6 onward.
There is also a leap from Level 3 to 4, so if you want to save a tiny bit of Blue Manuals, then leave at 3 instead of 4.
This Overload (OL) Recommendations and Priority guide unravels in detail everything you need about a character in terms of priority, overload targets (effects), and order of acquisition, alongside some notes to explain our thinking process.
For OL targets and order of acquisition, we decided to divide the target effects into several categories.
Essential: With all gear combined, your unit must have the roll(s) prescribed as a minimum requirement. Example: Charge Speed on Alice. You cannot compromise on these rolls.
Ideal: These rolls will improve your unit's performance significantly. Aim for 2 lines of Essential/Ideal per gear for maximum performance and the best Return on Investment (ROI). If you get 3, you are lucky. You can choose to only have 1 as well to save materials. Example: Elemental Damage on Scarlet.
Passable: Low-priority line that has either limited value or the impact is not as strong as other rolls. Should this show up as a bonus together with a better line, you can choose to keep them. Example: Charge Speed on Red Hood.
Overload effects are ordered by importance from Left to Right, which means anything on the left provides more value than the right. Effects that belong to the same group generate too similar an impact to make a difference (and are sometimes interchangeable). Try to follow this order as faithfully as possible for maximum mileage.
Additional tips:
Priority (PvE/PvP) isn't necessarily lower than Priority (Universal), which has no tag/label. It just indicates that this unit performs only in select types of content.
If a suggested effect has the number ×2 next to it, that means you should get the effect on at least 2 gear. The same idea applies to other numbers.
Focus on obtaining Essential(s) then you can start worrying about optimizing your rolls. Units require these to function, and the impact is too massive to ignore.
If a unit has no Essential(s), that means their performance is not that dependent on OL, but they can still benefit from good effects.
Remember that this is just a recommendation list, and attaining perfection is impossible. You will have to make some compromise, pick whichever rolls you desire the most, and conserve as much material as possible.
Was meta for one patch then powercrept by Crown. No longer used by top players. Good personal damage and can buff RLs. May be used as an alternative B2 for Water-weak SR.
PVP Priority
1/10
PVP Comment
Usage should be avoided due to low burst gen and feeding potential, but RL buff is nice.
Cube Investment
PVE
Bastion Cube
Resilience Cube
Healing Cube
PVP
Healing Cube
Vigor Cube
Tempering Cube
Endurance Cube
Bastion - The universal choice for all MGs as it offers the highest uptime extension without external help.
Resilience - If paired with reload speed buffers like Privaty, Resilience (with some Max Ammo) may reduce downtime to the point that it is unfelt.
Teams
Teams
Team 145
Farewell, Marciana! Squad
Mode: Bossing || Element: All
Characters
About the team
Sometimes, more healing is not really necessary. Rem has shown to provide a much higher damage output, which is what we care most of the time. In this team, Rem also enjoys the "short reload" strat, which helps increase her damage.
Substitutions
-
Team 146
The WaterWorks Squad
Mode: Bossing || Element: Water
Characters
About the team
Full Water team! Ludmilla Winter Owner buffs the team while Rem buffs Emilia. Emilia can be changed to Anis: Sparkling Summer if you're planning to use this team for Union Raid since she is a better damage dealer and parts are usually weak in Union Raids unless you have a low sync level.