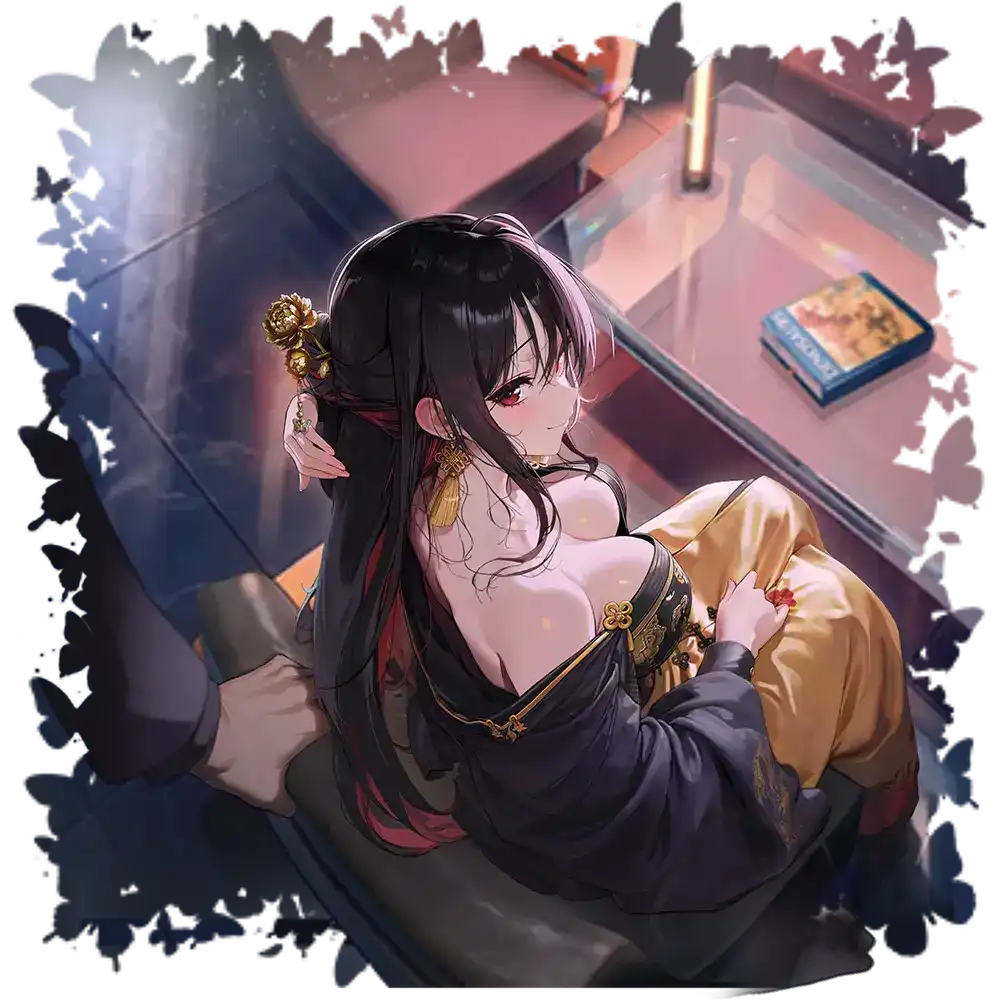
character from the Defender class, who wields a Assault Rifle
weapon and belongs to the Electric
element. She's part of the Tetra
faction. This character information showcase the Treasure version only.
To learn more about Moran (Treasure) check the sections below. Use the tabs to quickly switch to the kind of information you're looking for.
To learn more about Moran (Treasure) check the sections below. Use the tabs to quickly switch to the kind of information you're looking for.
Profile
Review
Investment tips
Teams
Profile
Skills
Normal Attack
Normal Attack
Assault Rifle
Mode: Normal
Ammo: 60
Reload: 1s
■ Affects target enemy.
Deals 14.71% ATK as damage.
Deals 200% damage when attacking core.
Skill 1
Bring It On!
Passive
Cooldown: -
Unlocks at: Phase 1
■ Activates at the start of battle. Affects self.
DEF ▲ 3.51% continuously for every 1% of HP lost.
■ Activates when landing 5 normal attack(s) while weapon is charged. Affects the target.
Deals 47.18% of final ATK as additional damage.
■ Activates when Raptures appear. Affects self.
Fervor: Cooldown of Burst Skill ▼ 20 sec continuously.
Skill 2
Leave It To Me!
Passive
Cooldown: -
Unlocks at: Phase 2
■ Activates when firing the final bullet. Affects the 3 enemy unit(s) with the highest final ATK.
Taunts for 4 sec.
■ Activates when HP falls below 20%. Affects self.
Effect changes according to the number of activation times. Perseverance: Effect of each phase does not stack.
Once: Max HP ▲ 91% for 3 sec. Activates once per battle.
Twice: Max HP ▲ 69.84% for 3 sec. Activates once per battle.
Three Times: Max HP ▲ 51.09% for 3 sec.
Activates once per battle.
■ Activates when entering Full Burst while in Fervor status. Affects all allies.
Cooldown of Burst Skill ▼ 7.48 sec.
Burst
Fair and Square
Active
Cooldown: 40s
Unlocks at: Phase 3
■ Affects self.
Changes the weapon in use:
Damage: 14.7% of final ATK
Duration: 10 sec
Additional Effect:
Recovers 36.14% of attack damage as HP for 10 sec.
Attract: Taunts all enemies for 10 sec.
Unlimited ammunition for 10 sec.
■ Affects all allies.
Damage Taken ▼ 35.14% for 10 sec.
DEF ▲ 14.85% of caster's DEF for 10 sec.
ATK ▲ 42.57% of caster's ATK for 10 sec.
Specialties
Buffer
Burst CD Reduction
Taunter
Voice Actors
ENG
-
JPN
-
KR
-
Gallery
Review
Review
Moran fights competitively for the gold medal in the “Best Treasure Released” Olympic Games. The real best Treasure unit varies depending on an account to account basis, and especially on the priorities of a player. Regardless of whatever we think about her though, Moran has re-entered the realm of PvE in spectacular fashion. A comeback for the ages! A must build for all accounts, in our opinion, at least. Let's get right into this one now, shall we?
Can you give me a brief summary about this unit?
Moran – a Nikke already known to be as one of the strongest PvP soldiers to exist thanks to her ability to tank damage well – receives massive buffs that allow her to work in all contents as an absolutely amazing B1 unit, almost anywhere, with her re-worked universal kit.
In PvE, she now becomes a CDR, with her Burst Skill CD reduced to 20 seconds. Her said Burst Skill now gets a team wide ATK buff on top of Damage Reduction, Attract and Life-steal – making her one of the hardest Nikkes to die in the game. Fights that deal a lot of damage, such as the returning Storm Bringer in Solo Raid Museum, or some Campaign bosses like Black Snake and Ziz, will extremely favor her because she allows the team to survive with ease.
Her impact in mob stages cannot be dismissed either, aside from the ATK buff that benefits any DPS, the Damage Reduction can allow her to tank some attacks that almost guarantee the team dies without her notably from Elite Wheels and Bronchus. Her Attract, however, is a double edged sword; it can make Sentries stun her so that a more important unit doesn't eat the stun instead, resulting in a retry, and she can tank Jellyfish when she gets targeted and with enough healing, but attracting all the mobs can lead to her quick death on extreme deficits if they aren't dealt with fast enough. Crown S2 Attract will still have target priority for mobs than Moran if she is on the left side of Moran, keeping her safe for its duration.
The ability to burst every rotation also allows her to realize the damage potential she was expected to have back when she was released, offering a good amount of damage despite her very supportive role. This is more notable against Electric weak enemies, especially in Bossing, as using her in the standard Electric team can outperform even the likes of Rouge, despite buffing Cinderella less, due to her personal damage. Nikkes that can buff her well, like Anis Sparkling Summer or Trina, might see potential use with her in Electric-Weak Solo Raids/Museums as a standalone team.
In PvP the main improvement is the ATK buff. Since her CD reduction skills only work when “a Rapture appears”, it is impossible to happen in Arena (as of her release), but it's still a good buff nonetheless, increasing the team damage enough to matter.
Should I get her Favorite Item?
Absolutely Yes! The changes to her kit make her one of the strongest and most versatile Burst 1 in the game, covering buffs and survivability while having some personal DPS contribution. Practically speaking, she is META for all game-modes now. She almost rivals Siren, in terms of usability as a B1 unit, just that she provided a different variant of QoL.
Phase 2 is needed for her to start becoming usable in PvE game modes, because the CD reduction is locked behind them. Meanwhile, Phase 3 grants the much desired teamwide ATK buff making her reach her full potential.
Kit Analysis
Skill 1: Self CDR (Phase 1)
Activates when Raptures appear. Affects self.
Fervor: Cooldown of Burst Skill ▼ 20 sec continuously.
Moran, despite being an incredible tank due to her 35.14% team-wide Damage Reduction buff, Stacking 3.51% DEF for every 1% HP she loses, Attract, life-steal and emergency self HP buff at 20% HP, was not good outside PvP because of her 40s CD Burst and her lack of any other supportive buffs, meaning you could only burst once every 2 rotations and still need an external CDR to have a working team.
This change fixes one of her problems, reducing her burst skill CD to 20s allows her to normally rotate which contributes to her usability and makes her tanking potential more accessible in PvE. She is not bound to another B1 unit any longer.
In addition to that, her personal damage when bursting is actually good for a Burst 1, which also gets buffed by having the ability to use her Burst every rotation.
This does not affect her PvP performance in any way as Raptures cannot appear there, so no abusing that in stall comps.
Skill 2: Team CDR (Phase 2)
Activates when entering Full Burst while in Fervor status. Affects all allies.
Cooldown of Burst Skill ▼ 7.48 sec.
With a non-conditional CDR skill, on top of being a 20s Burst 1 in PvE, Moran can be the sole Burst 1 for any team. This significantly increases her value as she can also be used as an off-burst CDR for teams with a better main Burst 1 (like MirandaTr). By timing her Taunt on the last bullet, she can tank some single target attacks even without bursting thanks to her relatively high DEF and emergency HP increase, which could prove useful.
Her on-burst tank potential can also be fully realized since all the restrictions she had basically got completely removed. It is so insane, so much so that her ability to protect the team alone can make her viable if needed without compromising on basic team CDR needs. One of the best examples of this is against Black Snake, where the best teams against it rely on Anchor Innocent Maid and Helm Treasure to simply survive. However, Moran can now replace Anchor completely, freeing up her slot for more offensive buffs, or using both if your deficit is high enough to need this much sustain to survive.
Even without enemies that deal crazy damage, she pretty much guarantees your team will survive in Solo Raid without taking an extra slot away, and in-directly increases the team damage by minimizing any need to cover or have to deal with most projectiles.
Since this needs Fervor to work and that needs a Rapture to appear, this is also a completely useless upgrade for PvP.
Burst Skill: Team Buffs (Phase 3)
Affects all allies.
ATK ▲ 42.57% of caster's ATK for 10 sec.
She can now take cover during her Burst.
Having a decent ATK buff on top of all the protection she provides for the team is the cherry on top. Survivability aside, just the ATK buff and her personal damage is enough to make her outshine most B1 we currently have. She completely replaces Rouge in Electric teams and can directly compete with Liter in most teams, where Liter wins when buffing DPSes with front loaded damage (Helm Treasure and Liberalio being the main ones), or when used with Grave. Aside from those cases Moran Treasure provides similar or more damage for the team, she can even rival neutral Rapi Red Hood as a Burst 1 (provided she isn't being buffed by Ada Wong).
Having more duplicates and max level OL gear makes her ATK buff better as it scales off her own base ATK.
But when you take into account the QoL and survivability Moran provides, her value starts to show, covering buffs exceptionally well while keeping the entire team alive and healthy. She can also now cover during her Burst, useful when you need to i-frame projectiles.
This time there is a noticeable improvement to PvP too, the ATK buff works there normally which could be the difference that makes your team win, and can be the difference between an attack being lethal or barely missing the mark.
For team order: If you plan to use Crown S2 or any other Attract to re-direct attacks from Moran, make sure Crown is on the left side of her. This is because if multiple Nikkes use Attract the leftmost one has the target priority.
Tier List & Usage Analysis
Campaign: SSS
Her Damage Reduction is situationally overpowered, her Attract is an advantage if used right, and with a solid value ATK buff during full burst: you can't go wrong with her. She hard counters Bronchus and Wheels, and against Jellyfish stages (with enough healing on your team), she will come back strong from anything that doesn't one-shot her. You can check out these clears that highlight those use cases.
Moran is, unfortunately, a target for sniper mobs. Past the 35-40% deficit range, she is quite susceptible to one-shots by any random mob, making her likely to die first for your team (the Tia experience). She also doesn't help with the Elite Launchers that spawn mobs preventing the team from bursting, meaning you'll need to prioritize those mobs, and time your burst based on the mob spawn times which is a disadvantage (something that Siren can more aptly help against thanks to her Team Aim QoL).
We internally discussed whether she'd fit in SS or SSS better because she is somewhere in between, not as comfy or impactful as Siren but also not as weak as RRH or RH B1. However, because Moran unlocks some stages that cannot be previously cleared by Siren with ease thanks to her taunting dangerous mobs, Damage Reduction and ATK buff, we think she fits SSS better. This will also be in line with the fact that Moran is BiS for certain bosses in Campaign, although those are more for the Bossing TL.
She also completely powercreeps Rouge in Tetra Tower, but only if you use Ade Agent Bunny as your Burst 2. She can be used in Blanc teams as long as Blanc has an enabler (Noir/Rouge). You can also use someone like off-burst Ludmilla to abuse damage reduction (must be to the left of Moran; not auto-Burst-friendly).
Make sure Crown is to the left of Moran, so her S2 works.
Bossing: SSS
Moran’s Favourite Item version at Phase 3 solidifies herself as one of the best Burst 1 Nikkes against Bosses. CDR alone isn't enough, of course, to be considered the best. Peak team damage isn't everything when it comes to ratings either. Technical ability that helps the team often in various situations matters a lot, and that Moran has, a unique one too while we're at it.
While a unit like Siren provides Burst Generation, Off-Burst team Aim, and DPS for the team, Moran specialises in Survivability, a trait not yet seen in the other 20s B1-CDR role. The team-wide damage reduction, ability to tank and taunt away single target damage, as well as competitive team buffs + DPS which allows her to rival the likes of Siren and Liter (in terms of overall Team Damage dealt—do note some units like Grave & frontloaded DPS like HelmTr may prefer Liter more than Moran) are highlights of Moran's performance, and her rating reflects as to how good we think she is in her role!
Her tanking capabilities are actually insane. If you find yourself dying to any boss in the game or don't want to deal with any mildly annoying attack patterns just use her, more likely than not, you'll survive without even breaking a sweat. (She still can't save your team from Anomaly Interception Elemental Damage Bonuses tho, that's just too much unfortunately)
In single-team Electric Weak bossing content, she simply outperforms Rouge, even though Rouge buffs Cinderella and xMaiden, just by buffing the rest of the team better, in addition to her noticeably high personal damage. (The damage is more noticeable the more Elemental Damage lines she gets on her OL gear). Her damage can also get buffed by Trina to the point that it might be a good idea to build a team around her. This idea will be mainly restricted to Solo Raid/multi-team Electric content though.
On Neutral Bossing, her main value is her CDR, ATK buff, and team survivability: making her an amazing pick against any boss. Her personal damage is also decent for a Burst 1, which contributes to her usability.
In Union Raid she can be used as the 3rd Burst 1 unit in your teams, be it any element (except for Wind). Lower-sync players should try to take advantage of her survivability to maximise their damage dealt. For them, she might be a Team 1 unit if their usual teams have healers.
PvP: SSS
Moran is still the same insane tank she was before her Treasure, tanking enough to not get nuked before bursting. She is also a defender meaning she can benefit from Biscuit’s S2 invulnerability and an Electric Assault Rifle benefitting from Trina’s buffs and invulnerability at start. Her Damage Reduction buff also makes the team significantly tankier along with her long Attract duration, even more when stacked with more Damage Reduction buffs enabling stall comps.
The PvP boost she gets from her Treasure is the ATK buff, which is impactful especially for DPSes that need a buffer to perform well and gives more insurance for strong ones to get the kill, it can be the difference between a win or a loss. It doesn't change her teams much, it just makes them stronger.
Investments
Gear Investments
Moran can work without any specific OL lines, since most of her use-case is just her tanking. Her ATK buff is caster’s ATK buff, which is not affected by OL lines.
For Electric weak content, however, you want to give her the usual DPS build. She will want Elemental Damage and ATK lines. Ammo is useless on her, since she has unlimited ammo during her burst. Ideally, you do not want Max Ammo lines on Moran. Crit lines are passable. For PvP, DEF is also passable.
Ideal: 4× Ele, 4× ATK
Filler: 4× Crit Damage, 4× Crit Rate, 4× Defense
Priority: Medium
Note: Base OL for CP padding and base stats alone is worth it, but less priority than main DPS.
Skill Investments
Skill 1: 4/7/10
Contributes to her personal damage and her tankiness in PvP.
Burst CD reduction doesn't scale with levels.
Stop at 7 to save Gold Skill Mats if not interested in PvP.
Skill 2: 10
Her CDR skill should be maxed for faster rotations.
Increases her emergency HP buff, very useful for PvP.
No excuse not to have this skill at Lvl10.
Burst Skill: 10
More damage reduction is always worth it, in all game modes.
Should be raised for her ATK buff.
Ideally, have this skill at 10 to get the most out of her.
Cube Investments
In PvE, the highest level cube lends the most damage (Destruction will win if there are frequent parts too), while Tempering provides the best tanking.
Doll Investments
Moran is just a universally strong B1 CDR. Campaign, check. Bossing, check. PvP? Well, she doesn't have CDR, but Damage Reduction & self-survivability are insane, so... PvP, check. She has risen from one of the worst units (outside PvP) in the game to one of the best. Holy ShiftUp simping for her!
We rate her priority as the highest among all Treasures, followed by PrivatyTr & HelmTr. Get her ASAP!
This is even more true if you don't have Siren for Campaign.
Review
Pros
Tankiest B1 you'll ever use.
Teams are blessed with her Damage Reduction, allowing them to survive even the nastiest of blows.
Non-conditional CDR, need we say more?
Can be used an off-burst CDR B1.
20s B1, can finally be used as a normal B1.
Team-wide ATK buff which allows her to compete against Liter.
Best B1 for electric content.
Good DPS for a B1 unit, especially in electric content.
Her Attract can deflect single target attacks
You can finally use her cute dinosaur skin without any kind of regrets or worry about Meta units.
Cons
The main flaw is her Attract, even though it can be used for positive effects as well.
Attract can get herself one-shot in high-deficit campaign.
All her CDR benefits don't work in PvP, need phase 3 to see any improvement for PvP.
Buff value is caster's ATK, defenders have low base ATK. The value of the ATK buff is much less than advertised.
Positioning sensitive. If two units have Attract buff, whoever is leftmost will Attract. Because of this, she may not be auto-Burst-friendly. If you use her with Crown, remember to put Crown to her left. Do note that Attract (buff) ≠ Taunt (debuff).
Ratings
SSS
Story
SSS
Bossing
SSS
PVP
Investment Tips
Skill Investment
Here's the explanation for all the numbers and colors used in the guide:
10/5/7 means upgrading Skill 1 to lvl 10, Skill 2 to lvl 5, and Burst Skill to lvl 7,
Yellow means the immediate investment when u get the unit. There are 3 reasons for this:
If the unit is Meta or High Priority, it will have a starting investment of more than 1/1/1 (such as 4/4/4) depending on what the unit provides.
If the unit is Medium or Low Priority, 1/1/1 will be mentioned, meaning no immediate investment is required, and you can invest in this character if you need to use it according to the priority listed.
If we deem that a unit does not have usable skills to be meta for any gamemode, no investment will be mentioned.
Blue means minimum investment to take advantage of the Nikke's skills. There are 2 reasons for this:
Sometimes, minimum investments are breakpoints such as for Noir or SAnis.
Sometimes, minimum investments are just the ideal way to progress to upgrade that unit, before moving on to Recommended and High.
Red means recommended investment for F2P players,
Purple means maximum recommended investment, in order to get the best out of the unit. You should only try to reach these investments if you have a surplus of Skill Books leftover.
More info:
The skill investment list below features a lot of Level 4 and 7 because they are easier to understand. Any higher levels will cost a new type of resource.
However, you may choose to upgrade to Level 5 if you need a stronger effect instead of 4, as the increase in Blue Manual cost from Level 4 to 5 is still low. The leap only starts from Level 6 onward.
There is also a leap from Level 3 to 4, so if you want to save a tiny bit of Blue Manuals, then leave at 3 instead of 4.
For PvE, S2 gets priority for CDR. For PvP, Burst gets priority for Damage Reduction.
Gear Investment
This Overload (OL) Recommendations and Priority guide unravels in detail everything you need about a character in terms of priority, overload targets (effects), and order of acquisition, alongside some notes to explain our thinking process.
For OL targets and order of acquisition, we decided to divide the target effects into several categories.
Essential: With all gear combined, your unit must have the roll(s) prescribed as a minimum requirement. Example: Charge Speed on Alice. You cannot compromise on these rolls.
Ideal: These rolls will improve your unit's performance significantly. Aim for 2 lines of Essential/Ideal per gear for maximum performance and the best Return on Investment (ROI). If you get 3, you are lucky. You can choose to only have 1 as well to save materials. Example: Elemental Damage on Scarlet.
Passable: Low-priority line that has either limited value or the impact is not as strong as other rolls. Should this show up as a bonus together with a better line, you can choose to keep them. Example: Charge Speed on Red Hood.
Overload effects are ordered by importance from Left to Right, which means anything on the left provides more value than the right. Effects that belong to the same group generate too similar an impact to make a difference (and are sometimes interchangeable). Try to follow this order as faithfully as possible for maximum mileage.
Additional tips:
Priority (PvE/PvP) isn't necessarily lower than Priority (Universal), which has no tag/label. It just indicates that this unit performs only in select types of content.
If a suggested effect has the number ×2 next to it, that means you should get the effect on at least 2 gear. The same idea applies to other numbers.
Focus on obtaining Essential(s) then you can start worrying about optimizing your rolls. Units require these to function, and the impact is too massive to ignore.
If a unit has no Essential(s), that means their performance is not that dependent on OL, but they can still benefit from good effects.
Remember that this is just a recommendation list, and attaining perfection is impossible. You will have to make some compromise, pick whichever rolls you desire the most, and conserve as much material as possible.
Moran is a solid B1 pick for every content. There are situations where her damage reduction and abilities are unmatched, and you are practically forced to use her, or wait until you have a low enough deficit to progress in Campaign. She is also META for Raids as a B1-CDR Buffer + Survival unit! Doll increases her base ATK, which in turn boosts caster’s ATK buff.
PVP Priority
10/10
PVP Comment
Must-have, must-build PvP unit. Used by every single Champions Arena winner since she was released. Her tanking ability and damage reduction are far too important not to have in your roster, and improving her base stats with maxing out her Doll can only improve her performance. Doll increases her base ATK, which in turn boosts caster’s ATK buff. Damage Reduction also stacks, and your team should all have Dolls too.
Cube Investment
PVE
Tempering Cube
Resilience Cube
Vigor Cube
Destruction Cube
PVP
Tempering Cube
Vigor Cube
Endurance Cube
Healing Cube
Teams
Teams
Team 376
Anti-Fart
Mode: Campaign || Element: All
Characters
B3
flex
About the team
Dying from Bronchus? Not anymore, the DR from MoranT and the life-steal Ada gives the active B3 with Nayuta sharing it across the team makes this a hard counter for any Bronchus stage, given that your b3s do enough damage to actually heal back. The 2 free slots can be any B3 and a flex, with the ability to move Ada to flex slot and run 2 different B3s instead.
Substitutions
Helm Treasure can replace Ada Wong but she needs to burst for heals.
Team 377
Blacked out Snake
Mode: Campaign || Element: Water
Characters
About the team
The new BiS team against Black Snake. MoranT allows easier time tanking the boss attacks while HelmT and Maid Anchor heal back any damage done, and SwHA gets the job done. There is only 1 MG for the clones but by killing one and stalling the kill on the 2nd one till HelmT burst is available to tank the spit is possible.
Substitutions
Mast Romantic Maid may be replaced with Crown.
Team 378
Ziz wipe vs a Moran
Mode: Campaign || Element: Fire
Characters
About the team
Moran replaces Maid Anchor as a more reliable tank for Ziz wipe, allowing the team to run a flex slot for more damage. HelmT heals back all the damage lost after the wipe too while helping hyper buff Rapi Red Hood to have enough damage to clear.
Substitutions
Mast Romantic Maid may be replaced with Privaty Treasure.
Team 379
Moran Electric
Mode: Bossing || Element: Electric
Characters
About the team
The combination of Moran damage, buff and CDR can actually replace Rouge which is wild, while also maintaining more survivability.
Substitutions
Crown may be replaced for Ade Agent Bunny or Nayuta.