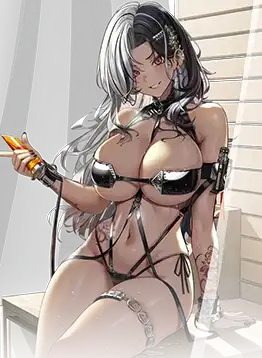
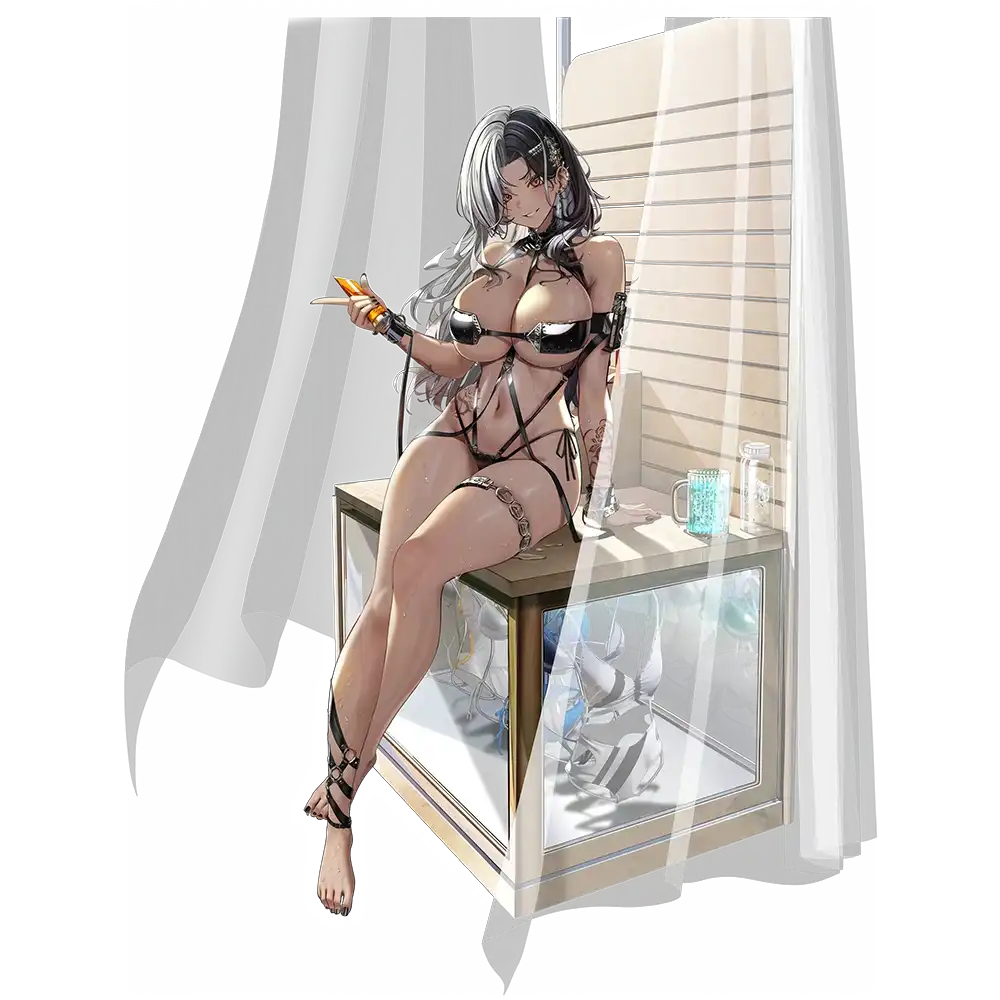
character from the Supporter class, who wields a Assault Rifle
weapon and belongs to the Wind
element. She's part of the Tetra
faction.
To learn more about Rosanna: Chic Ocean check the sections below. Use the tabs to quickly switch to the kind of information you're looking for.
To learn more about Rosanna: Chic Ocean check the sections below. Use the tabs to quickly switch to the kind of information you're looking for.
Profile
Review
Investment tips
Teams
Profile
Skills
Normal Attack
Normal Attack
Assault Rifle
Mode: Normal
Ammo: 60
Reload: 1s
■ Affects Target(s).
Deals 13.65% of ATK as damage.
Deals 200% damage when attacking core.
Skill 1
Ferita
Passive
Cooldown: -
■ Activates when entering battle. Affects all allies.
Damage to Parts ▲ 24.26% for 15 sec.
■ Activates when an ally or self destroys an enemy's part. Affects all allies.
ATK ▲ 3% of caster's ATK, stacks up to 5 time(s) and lasts for 30 sec.
Skill 2
Spina di Rosa
Active
Cooldown: 30s
■ Affects all allies.
Damage to Parts ▲ 24.26% for 15 sec.
■ Affects the enemy nearest to the crosshair.
Deals 70.4% of final ATK as sustained damage every Sec for 15 sec.
Burst
Onda Grande
Active
Cooldown: 20s
■ Affects all allies.
Sustained Damage ▲ 20.32% for 10 sec.
■ Affects all enemies.
Damage Taken ▲ 32.23% for 10 sec.
Specialties
Buffer
Debuffer
Stack Oriented
Voice Actors
ENG
-
JPN
-
KR
-
Gallery
Review
Review
The infamous Arena underdog who has been dominating the dome of steel and sparks finally agrees to taste the excitement of demolishing giants. Rosanna, now in her summer outfit, is ready to propel her team with incredible Sustained Damage and Damage Taken support skills. She is also adept at salvaging bosses' parts, increasing the team's ATK and Parts Damage while doing so.
Can you give a brief summary about this unit?
Rosanna: Chic Ocean (or S. Rosanna) is purely a supporter who is able to provide a variety of simple and straightforward buffs. Her burst is the main key to her usefulness, as it provides the team with Sustained Damage buffs and inflicts increased Damage Taken debuff on enemies. The latter part of the Burst is of good value and helps all allies in her team, while the former is key to her end-game use. Her main end-game use is in Solo Raids, which comes from the synergy between her and S. Sakura, as she buffs her significantly. Hence, any time S. Sakura is destroying enemy bosses in Raids, Rosanna (paired with Helm) might be a viable choice. In campaign, her performance is also impressive since she is not restricted to any other unit, and hence allows for an extra DPS or better offensive support (e.g. Maxwell). Apart from all of this, Rosanna also provides increased Damage to Parts, along with a caster's ATK buff, all of which combine to make her an extremely viable unit!
Should I pull this unit?
YES! Rosanna gives a multitude of reasons as to why one should pull her! While she is not at the top in any food chain, her immense flexibility allows her to be used in all available contents as a very decent unit. She proves to be a competitor of the famous 777 bunnies in campaign stages where healing is not a requirement since she allows for that extra DPS/support slot. In Solo Raids, she (paired with Helm) allows for a cheaper and easier-to-use (but not always better) alternative to the Tove-SG team or SW-Yulha team, basically landing a team 4/5 spot for newer or casual players. Even in Union Raids, she may be used over the Blanc-Noir duo by higher sync level players who do not require healing, and hence slotting an extra DPS in these situations would be more beneficial!
For beginners without the Duos (Tia & Naga; Blanc & Noir) or Crown, Summer Rosanna will allow you to witness nearly optimal performance from your meta DPS, making her a good pull choice. In end-game campaign however, she is not considered a Meta Unit. As for dupes, she does not need any since she is a support. Her caster's ATK buff is of low value and will not increase much with dupes, especially due to her Supporter base stats. However, the MLB lobby screen is incredibly beautiful, and might be good enough to make a case for MLB!
Usage Analysis and Tier List
Campaign (LD) - SS | Campaign (HD) - S
S. Rosanna can be used to high effect in Campaign due to her Damage Taken debuff, which has a decent value and is comparable to Blanc. In Low Deficit, she directly competes with the Bunny Duo of Blanc and Noir since healing or shielding is usually never a requirement. Hence, slotting in an extra DPS instead of using a support SG like Noir will be more effective in most cases since this will allow for a higher damage ceiling! The extra FLEX slot that she provides can be considered similar to what Crown provides since neither of them are locked to another duo, such as seen with Tia and Blanc. While not as strong as Crown, S. Rosanna can definitely compete with Blanc here!
In higher deficits, S. Rosanna's problems start becoming more apparent. The need for shields and/or heals becomes a necessity in most stages. Not only that, we start to realize that both of her Skills basically provide nothing in Campaign. There are no Parts in Campaign, hence the entirety of Skill 1 and the first part of Skill 2 are rendered useless. The second part of Skill 2 is Sustained Damage, but due to its small value and under Rosanna's supporter stats, it will be negligible. At the end, what's left is her Damage Taken debuff.
If a healer is paired with S. Rosanna, she definitely becomes worse than the support duo of Blanc and Noir due to their only being 2 DPS units. S. Sakura is not as strong of a unit in Campaign since her Sustained Damage is not strong enough to kill multiple raptures, and it is usually not ideal to burst with Helm in Campaign anyways. A strong contender for the flex spot can be Naga, but she has better pairings with Crown and Tia. In higher deficits, Rosanna cannot be considered a meta unit, but is still a decent choice if you lack other supports.
Boss (Solo) - S | Boss (Adds) - S
Everything that S. Rosanna cannot do in Campaign, she can against Bosses! Sustained Damage dealers (currently only S. Sakura) are now considered as viable units, and Bosses often come with Parts! Her resurrection provides ~13% ATK buff (when converted to Attacker Stats) and some Parts Damage buffs. The latter has a 50% uptime due to her Skill 2 having the same exact buff with the same exact value, and can be considered as a decent damage buff, especially against Bosses with regenerating boss parts! Her Burst Skill's Sustained Damage buff is now viable as well due to S. Sakura being relevant!
But, now remains one very serious problem. S. Rosanna does not heal, and neither is she a shielder like Crown. This problem may be circumvented by using units like Helm, who provides offensive Attack Damage buffs. Against bosses with parts, this pairing can be considered as a side-grade to the 777 Bunny Duo, just that instead of Ammo Buffs, we receive Bonus Damage to Parts and Sustained Damage buffs. Against Bosses where parts break often and regenerate (such as in the current Golden Kraken Solo Raid), Rosanna + Helm will be able to provide a higher damage ceiling than what the Bunny Duo can provide, and will be the better choice of supports. However, this does lead to them being a situational support structure.
Against Bosses with additional, smaller Raptures, her performance does not falter, but again, the problem lies in the fact that Rosanna cannot heal. Other competitors are able to heal and provide offensive buffs together, which leads to Rosanna having a hard time trying to slot into the the top teams.
PVP - B
In PvP, Rosanna can be considered as a side-grade to Poli or Crown, and a direct downgrade from Blanc. She does exactly what Blanc does, just without providing the Indomitability. She lacks Burst Gen and special skills that matter in PvP, and hence cannot be considered as a meta unit in PvP, albeit still usable.
Kit Analysis
Rosanna: Chic Ocean (abbreviated as S. Rosanna) is a capable support unit with a balanced kit. There is not much to say about the kit other than repeating words, so we will keep it short. The massive Damage Taken will make her useful for weaker teams in Solo Raid, just inferior to the Crown & the two Duos, and her unique Sustained Damage buff will empower the already decent Summer Sakura even further. Her ATK buff is on the low side in terms of value, and the activation requires breaking parts. Thus, it may take a backseat against bosses that do not sprout parts regularly. However, since it is stackable, you can use the likes of Pepper to keep it at maximum forever.
Remember that you need to break a part to activate the ATK buff stacks, otherwise Pepper cannot increase the stack count from 0 → 1.
The Parts Damage will significantly boost the team's DPS against bosses that have a lot of parts, but if the boss doesn't have parts, then it is also useless. All in all, her kit is nothing special, but she would work just sufficiently for any kind of situation.
One disadvantage of using S. Rosanna, especially for veterans, is the fact that she is a non-healer B2. In the current trend, we usually prefer B1 CDR + B2 Healer + Three B3 DPS for our compositions. Or, in some cases such as the SG team, no CDR at all. Hence, S. Rosanna being a B2 Buffer will put her in a similar category as Novel. With that, we are limited to these less preferred alternatives, both come at a cost of DPS loss:
Using B2 CDR like Dolla or Summer Helm, together with a B1 Healer like Pepper, so we can keep deploying 3 B3 DPS.
Using B1 CDR with B3 Healer like Helm (ideal) or an extra B1 Healer like Bunny Alice/Rapunzel/Noise.
As far as synergy goes, it might be desirable to either pair her with Pepper + Dolla/SHelm (as Pepper will help keep S. Rosanna's ATK skill ramp up much more quickly while maintaining its otherwise volatile stacks), or run her with Helm. With Helm, your second DPS choice has restricted choices since you will have to choose a unit who can deal good damage without Bursting, in which case Modernia and Scarlet are the top choices.
As the meta develops, and depending on the boss we are facing, better tech/teams with higher DPS potential are usually uncovered. You may want to keep an eye out for those.
Investments
Gear Investments
If we talk about efficiency, there is no need to OL Rosanna's gear as her caster's ATK buff has a rather low value. However, efficiency is rarely the case for tryhards of Solo Raids, so while we recommend not OL-ing her for most players, competitive players might benefit from the increased base stats. Other than that, OL-ing her should only be done for one other reason: CP padding. Be it Campaign, Tribe Tower or PvP, S. Rosanna does not need overload gear, but if you want to CP pad, go for it. She does not need any specific gear to work properly.
The strength of her ATK buff is based on caster's ATK, and since she is a support, it will only be around ~13% if you overload her.
Essential: -
Ideal:
Passable:
Priority: Low
Skill Investments
Skill 1: 4-10
Skill 1 is of low Priority to upgrade for a couple of reasons. The first is that the initial Parts Damage buff is a one-time buff, and it has an extremely low uptime since it is active for only 15 seconds out of 180. The second is that the ATK buff that S. Rosanna provides has a low value overall, but damage is damage, so only go for it if you are a competitive player in Solo Raids. Otherwise, 4 is a good stopping point.
Skill 2: 4/7/10
Rosanna's Skill 2 is where the majority of her Parts Damage buff lies. Any DPS that Bursts first will be able to take full advantage of this. Any DPS that does not need to Burst to deal damage (e.g Modernia or Scarlet) may also take full advantage of this buff as well. Strictlg timed burst activations with Snow White can also help SW take advantage of this buff!
Burst Skill: 7~10
Her Burst is the major part of her skill. The massive Damage Taken debuff on enemies benefits all kinds of allies, and the Sustained Damage effectively increases her synergy with S. Sakura.
Cube Investments
Rosanna does not particularly require any cube. Any generic cube works on her, but Bastion will allow her to shoot more bullets over 3 minutes. Despite that, it is recommended to use the highest level cube available for the base stat bonuses to help with her caster's ATK buff.
Review
Pros
Massive Damage Taken debuff on enemies.
Powerful Sustained Damage buff - strong synergy with S. Sakura.
Provides decent Parts Damage buff.
Quite flexible, can be used with different B3s, and allows for extra B3.
Insanely hot with a very lewd MLB lobby screen.
Cons
Lacks healing, hence tough to fit into the current meta.
ATK buff is of low value and stacking is dependent on breaking parts.
Without parts, her Skill 1 and half of Skill 2 are entirely useless.
Cannot open Nikke on your phone in public if you have her as your lobby screen.
Will age-restrict Youtube videos.
Ratings
A
Story
S
Bossing
B
PVP
Investment Tips
Skill Investment
Here's the explanation for all the numbers and colors used in the guide:
10/5/7 means upgrading Skill 1 to lvl 10, Skill 2 to lvl 5, and Burst Skill to lvl 7,
Yellow means the immediate investment when u get the unit. There are 3 reasons for this:
If the unit is Meta or High Priority, it will have a starting investment of more than 1/1/1 (such as 4/4/4) depending on what the unit provides.
If the unit is Medium or Low Priority, 1/1/1 will be mentioned, meaning no immediate investment is required, and you can invest in this character if you need to use it according to the priority listed.
If we deem that a unit does not have usable skills to be meta for any gamemode, no investment will be mentioned.
Blue means minimum investment to take advantage of the Nikke's skills. There are 2 reasons for this:
Sometimes, minimum investments are breakpoints such as for Noir or SAnis.
Sometimes, minimum investments are just the ideal way to progress to upgrade that unit, before moving on to Recommended and High.
Red means recommended investment for F2P players,
Purple means maximum recommended investment, in order to get the best out of the unit. You should only try to reach these investments if you have a surplus of Skill Books leftover.
More info:
The skill investment list below features a lot of Level 4 and 7 because they are easier to understand. Any higher levels will cost a new type of resource.
However, you may choose to upgrade to Level 5 if you need a stronger effect instead of 4, as the increase in Blue Manual cost from Level 4 to 5 is still low. The leap only starts from Level 6 onward.
There is also a leap from Level 3 to 4, so if you want to save a tiny bit of Blue Manuals, then leave at 3 instead of 4.
This Overload (OL) Recommendations and Priority guide unravels in detail everything you need about a character in terms of priority, overload targets (effects), and order of acquisition, alongside some notes to explain our thinking process.
For OL targets and order of acquisition, we decided to divide the target effects into several categories.
Essential: With all gear combined, your unit must have the roll(s) prescribed as a minimum requirement. Example: Charge Speed on Alice. You cannot compromise on these rolls.
Ideal: These rolls will improve your unit's performance significantly. Aim for 2 lines of Essential/Ideal per gear for maximum performance and the best Return on Investment (ROI). If you get 3, you are lucky. You can choose to only have 1 as well to save materials. Example: Elemental Damage on Scarlet.
Passable: Low-priority line that has either limited value or the impact is not as strong as other rolls. Should this show up as a bonus together with a better line, you can choose to keep them. Example: Charge Speed on Red Hood.
Overload effects are ordered by importance from Left to Right, which means anything on the left provides more value than the right. Effects that belong to the same group generate too similar an impact to make a difference (and are sometimes interchangeable). Try to follow this order as faithfully as possible for maximum mileage.
Additional tips:
Priority (PvE/PvP) isn't necessarily lower than Priority (Universal), which has no tag/label. It just indicates that this unit performs only in select types of content.
If a suggested effect has the number ×2 next to it, that means you should get the effect on at least 2 gear. The same idea applies to other numbers.
Focus on obtaining Essential(s) then you can start worrying about optimizing your rolls. Units require these to function, and the impact is too massive to ignore.
If a unit has no Essential(s), that means their performance is not that dependent on OL, but they can still benefit from good effects.
Remember that this is just a recommendation list, and attaining perfection is impossible. You will have to make some compromise, pick whichever rolls you desire the most, and conserve as much material as possible.
Usable alternative B2 (worse than many other B2), but currently a must-invest for endgame SR players once you have Raven and/or Mihara:BC. This is due to her kit providing Sustained Damage▲.
PVP Priority
3/10
PVP Comment
Not the first B2 to use for debuffing enemies (amplifying damage dealt) due to her wielding AR.
Cube Investment
PVE
Bastion Cube
Resilience Cube
Destruction Cube
PVP
Vigor Cube
Tempering Cube
Endurance Cube
Rosanna does not particularly require any cube. Any generic cube works on her, but Bastion will allow her to shoot more bullets over 3 minutes. Despite that, it is recommended to use the highest level cube available for the base stat bonuses to help with her caster's ATK buff.
Teams
Teams
Team 115
Summer Solstice
Mode: Bossing || Element: All
Characters
About the team
The two summer units have high synergy together! S. Rosanna buffs S. Sakura extremely well. Her Damage Taken debuff, paired with extra Parts Damage buffs, as well as the Sustained Damage buff are all highly appreciated. Combined, they allow S. Sakura to deal immense damage to opponents. This buffs S. Sakura beyond what most other teams can, even higher than the famous bunny duo!
Substitutions
-
Team 116
2~2.5~3RL Simple Nuke
Mode: PVP || Element: All
Characters
About the team
Scarlet team is 2.5RL at base, 2RL with feed or Quantum Cubes. S. Sakura team is 3RL at base, 2.5 with feed. Fast-buffed Nukes to wipe off slower teams quickly. Expensive, but it saves Blanc.