


Disk 4
CRIT Rate% = CRIT DMG% = HP%
Disk 5
Physical DMG% > HP%
Disk 6
HP%
Billy - Starlight has at least one video guide available, so if you prefer this sort of medium to learn more about a character, check it out:
Last review/pros & cons update
Patch 2.8
Last build/calcs update
Patch 2.8
Last teams/synergies update
Patch 2.8
Last profile update*
May 27th, 2026
*Profile update means smaller edits to disk drives, stats or other things that don't require new calculations.
To learn more about Billy - Starlight check the sections below. Use the tabs to quickly switch to the kind of information you're looking for.
Profile
Review
Build
SD/DA Analytic
Teams & Synergy
Calculation
Profile
Core Passive Knight's Resolve
Starlight - Billy gains extra Sheer Force based on his Max HP, with every 1 point of Max HP increasing Sheer Force by 0.1. All Physical DMG Starlight - Billy deals is Sheer DMG, ignoring enemy DEF and using his Sheer Force stat as the DMG Multiplier.
Starlight - Billy restores 60 Adrenaline upon entering the battlefield. In Investigation Zone Mode, this effect can trigger once every 180s.
When his HP is greater than 25%, press Special Icon to consume HP and activate Special Attack: Drive Suppression. While in combat, each use of this skill increases his CRIT DMG by 45% for 45s. Repeated triggers refresh the duration. When HP is at or below 25%, the DMG he takes is reduced by 50%.
Starlight - Billy gains Determination when his attacks hit enemies, with the amount depending on the skill used. Determination regenerates slowly while in combat, and is capped at 120. Hitting an enemy with EX Special Attack: Cool Wheelie, activating Chain Attack: Knight's Swagger, or triggering a block restores additional Determination. Triggering a Perfect Dodge by any means restores 3 Determination. This effect can trigger once every 0.5s.
When Determination is greater than or equal to 100, hold Normal Icon to consume 100 Determination and activate Basic Attack: Full-Throttle Starlight.
Hitting an enemy with Basic Attack: Knight's Technique restores a small amount of HP. Hitting an enemy with Dodge Counter: Duel King activated through a Perfect Dodge restores HP. Using EX Special Attack: High-Traction Wheels or EX Special Attack: Rocking Footwork restores HP.
CRIT Rate: 0
BASE HP: 0
Additional Ability Blazing Starlight
When another character in your squad is a Stun, Support, or Defense character:
Hitting an enemy with EX Special Attack: Cool Wheelie, the 4th hit of Basic Attack: Knight's Technique, Chain Attack, or Ultimate grants 1 stack of Starlight for 45s, up to a maximum of 2 stacks, Only one stack can be obtained per use of a skill. Each stack increases the DMG of Chain Attacks, Ultimates, EX Special Attacks, and Basic Attack: Full-Throttle Starlight by 20%.
Basic Attack: Knight's Technique
Basic Attack: Full-Throttle Starlight
Dodge: Close Call!
Dodge: Through the Galaxy
Dash Attack: Starlight Retribution
Dodge Counter: Duel King
Dodge Counter: Afterfire Spin
Special Attack: Drive Suppression
Special Attack: Run Wild
Chain Attack: Knight's Swagger
Ultimate: Starlight Knight Flying Kick
Quick Assist: Starlight - Power of Bonds
Defensive Assist: Hero's Entrance
Assist Follow-Up: Villain's Exit
Heroic Entrance
Mindscape 1
Wasteland Automaton
Mindscape 2
Knight's Chivalry
Mindscape 3
Flames of Justice
Mindscape 4
Radiant Armaments
Mindscape 5
Starlight Knight
Mindscape 6
Billy - Starlight Stats at level 60 (including Core passive bonuses).
Billy - Starlight images aren't available yet. They will be added soon!
Review
This tier list assesses Agents (characters) based on their combat potential in Zenless Zone Zero’s most demanding contents - Deadly Assault (DA) and Shiyu Defense (SD). Please keep in mind Zenless Zone Zero is a skill-based game and each character has a different playstyle, difficulty level and even special tricks and combos. Zenless Zone Zero is also a team based game and it's only by combining both these factors to the highest level a character can reach optimal performance.
Has both high burst in stun combos and decent out of stun damage via Cool Wheelie, making him uniquely suited to some encounters (e.g. Thrall).
High stat saturation from his Core Passive means that his substat distribution is far more forgiving than that of other Rupture Agents.
Wide variety of moves, with multiple EXs, Dodge Counters and mobility skills that keep him feeling fresh.
Raidā Kikku!
Massively reliant on a few key teammates, with some of the biggest performance drops out of any Agent yet when not in his best team.
Spread out damage across multiple skills, making him expensive to invest in.
Reeeeeeeeally long animations, which can feel clunky and cumbersome at times, having strict combo requirements.
The closest we’ll ever get to playable Pompey, and yet doesn’t even have Scarlet Engine as a Core Unlock material.
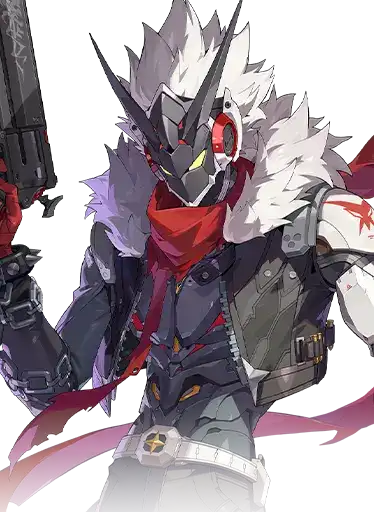
Starlight Billy is a Physical Rupture Agent who is able to quite literally ride a motorcycle in combat, with drifts, flips and wheelies that are integral to his gameplan.
By consuming his own HP for resources then healing it back up, he gets to build up Determination, seen as a gauge with a cap of 120 points. All of his skills but one will generate Determination, with the exception being his enhanced Basic Attack: “Full-Throttle Starlight”. This is the attack that consumes Determination, costing 100 points to cast and dealing some heavy damage as a result.
In addition to this, Billy has multiple Specials and EXs that can weave into one another: some are used to sustain his buffs, others for resource generation or damage, where knowing when and where to use each skill is key to his gameplan.
Overall though, he’s a rather straightforward character that epitomises the Rupture archetype: he has on-field parries, as much of his damage be loaded on Specials and Ultimate, and has both high in-stun burst and decent sustain that comes from building his resources.
Billy’s Core Passive nodes build CRIT Rate, which is especially important for him. While Attackers and Rupture Agents generally want all their skills to CRIT, it’s especially important for Billy because of the obscene amount of CRIT DMG that he gets.
When Billy’s HP drops below 25%, he takes 50% reduced DMG, and with good reason, for as long as his HP is above this threshold, he can consume it to use Special Attack: “Drive Suppression”, being his trademark bike riding skill, being what much of his gameplay revolves around.
As part of his Core Passive, it also increases Billy’s own CRIT DMG by 90% for 45s, being the primary reason as to how he gets so much of the stat.
Given that his Special is consuming HP, Billy needs a way to recover it, and he does so by landing any of his regular Basic Attack strings, his regular Dodge Counter: “Duel King” if it is triggered by a Perfect Dodge, and either of his Adrenaline EX Specials.
It’s here that his Determination gauge is outlined, and while most skills have their own build-up value associated with them, a few have additional bonuses, namely his EX Special Attack: “Cool Wheelie”, his Chain Attack, as well as either getting a block (with his Drive Suppression Special) or Perfect Dodging.
These bonuses are all tied to a given skill, with the exception of the Perfect Dodge, which generates a blanket 3 Determination regardless of the means used to get it - something that’s relevant as Billy has multiple ways to Dodge. It is also the one bonus that has a cooldown associated with it, at 0.5s, so multi-hit attacks often won’t help build extra gauge.
As for his Additional Ability, it demands Stun, Defence or Support Agents in the team, and it builds a stack of “Starlight” whenever the Cool Wheelie EX, Chain Attack, Ultimate or his regular Basic 4 hits an enemy, capped at 2.
Each stack increases Billy’s Chain Attack, Ultimate and all EX Special damage by 20%, for 40% total. This functions as a buff with a 45s duration, so it doesn’t need much thought to maintain it.
Billy has 2 Basics, the aforementioned Full-Throttle Starlight enhanced Basic and a regular string, being “Knight’s Technique”.
The enhanced Basic is split into a bike ride section first and a bike exhaust beam second. The first is slightly stronger than the second, which can influence how it's integrated into combos, as it has a very long animation - well over 3 seconds in total.
This is made up by its strong damage, and given it only costs Determination, is used often.
The regular Basic has low multipliers, but comes with slight healing on all its hits. As other healing skills are dependent on either enemy behaviour (Perfect Dodges) or resources (Adrenaline), it’s an accessible filler string if needing to recover.
It also has a unique property where it will half the HP cost of the Drive Suppression Special, which can be situationally useful.
Most of Billy’s kit revolves around his different Specials, of which he has 5.
2 of which come in a pair: the Drive Suppression Special costs 16% Max HP to use, and it’s both slow and weak. It can function as a gap closer, but the real reason to use it (besides refreshing the Core Passive buff) is that it will automatically lead to the Cool Wheelie EX once it ends.
It also has a parry property, where if Billy is hit while in Drive Suppression, he will block the enemy, build an extra 5 Determination, and transition into the Cool Wheelie EX immediately.
Not only is this used for Billy’s Additional Ability buff, it also deals surprisingly good damage and builds a lot of Determination, more than 10 if it lands in full.
As it’s an EX, it can also be used to sustain Yunkui Tales’ 4-piece buff, making it an integral part of how Billy plays. Getting as many Cool Wheelie EXs as HP allows out-of-stun to deal damage, build Determination and maintain buffs is ideal.
The next set are the Adrenaline EXs. Pressing Special leads to Drive Suppression, but holding it when over 60 Adrenaline will go into “High-Traction Wheels”, a high damaging bike slam.
Pressing or holding Special after the Cool Wheelie EX however, leads to “Rocking Footwork”, an alternate Adrenaline EX that’s a little slower, but also hits a little harder.
Both of these skills will heal Billy a significant amount, but their primary purpose is in their high multipliers. Look to save up Billy’s Adrenaline for stun periods to unload these EXs during it for the most damage.
The final Special is “Run Wild”. It’s used automatically after Cool Wheelie EX or if Billy is swapped out of Drive Suppression before it gets to it.
There’s no particular use to it, being slow and weak, working as a sort of forced recovery to these skills. It can link to Billy’s regular Dodge Counter, but as its not done off a Perfect Dodge, yields no extra Determination or healing.
Said Dodge Counter, Duel King, is rather unremarkable. It’s about average with its multipliers, but can be useful to quickly heal Billy, as it recovers far more HP than his Basics.
It can also shortcut into Basic 4 after a Perfect Dodge, so between its own healing, that of Basic 4’s, and the lower HP consumption cost of the Drive Suppression Special that comes after, makes for an HP-positive string.
There is also an alternate Dodge Counter: “Afterfire Spin”. Holding a directional input during the Drive Suppression Special will have Billy drift, and other than the slight movement, changes nothing about the skill: it still leads to Cool Wheelie EX and Run Wild if it ends early.
The difference is that if Billy is hit while drifting, rather than getting a parry like normal, he’ll transition into this alternate Dodge Counter instead.
While it regens no HP, it hits almost twice as hard as a regular Dodge Counter and has some respectable Determination build, so it's more efficient for resources than relying on the parry.
It will then always link into the Cool Wheelie EX, so the only downside from doing it is the extra time that it takes for the skill to land, making it ideal in most circumstances.
Doing Assist Counters off it can be easier than with regular Dodge Counters, but be aware that as Billy needs to be in Drive Suppression to get to it, needs to start far earlier.
Separate from combat abilities, holding the Dodge button has Billy ride his motorcycle, being a unique dash that gives him faster movement.
Both Billy’s Defensive Assist and Assist Follow-Up work mostly as standard, but aside from weaving them in for Decibels and Daze, they also generate Determination.
The Defensive Assist itself is especially useful, as the Determination is generated on hit. This means that multi-hit attacks where Billy parries multiple times in a single Defensive Assist will generate additional Determination as many times as he’s hit.
Against aggressive enemies, this can be a good way to build up Determination without needing to keep Billy on-field at all times.
While he has a Quick Assist, it’s rarely ever used, as if he is over 25% HP it’s automatically converted into a Drive Suppression Special with a 5 second cooldown.
Although Billy’s Chain Attack hits decently hard, it’s the weakest out of his burst skills (enhanced Basic, Adrenaline EXs, Ultimate) and isn’t particularly fast.
It does, however, generate 19.5 Determination on use, making it an integral part of his combos. With it, it’s possible to get 2 enhanced Basics in a single stun window!
As for his Ultimate, it’s a very slow, very flashy and very strong move. That’s all there is to it, best saved for combos for its high damage numbers.
Billy’s general gameplan can be summed up as:
Look to get as many uses of the Cool Wheelie EX out of stun as possible for everything, be it damage, resources or buffs.
Do the above ideally through parries on Drive Suppression or with the alternate Dodge Counter for even better results.
As Drive Suppression consumes HP, make use of the regular Basic string and regular Dodge Counters to heal, with an occasional Special use after B4 to reduce its HP cost.
Have as much Determination and Adrenaline filled when going into stun, then unload his enhanced Basic, Adrenaline EXs, Chains and Ultimates for the most damage.
On top of the above, making use of Defensive Assists to pad out Determination alongside Decibels, as well as being aware of enemy invulnerability phases and Billy’s HP so as to not drop key buffs can be important.
A standard combo for Billy would be:
Basic Attack: High-Throttle Starlight
Swap to another character to trigger a Chain Attack
Chain to Billy
EX Special: High-Traction Wheels
Swap to another character to trigger a Chain Attack
Chain to Billy
Ultimate
EX Special: High-Traction Wheels
Basic Attack: High-Throttle Starlight
The 2nd enhanced Basic’s exhaust beam would land out of stun, but the first part - which does more damage - should land in full.
It’s unlikely that Billy will have all his resources up on every stun, in which case, being flexible with his skill use works best.
While High-Traction Wheels is the default Adrenaline EX to fall back on, if there aren’t enough Decibels for an Ultimate, or not enough Adrenaline to fit in 2 EXs, using a Cool Wheelie for damage after his second Chain Attack, then cancelling its recovery with Ultimate can be better.
Alternatively, linking into the alternate Adrenaline EX Rocking Footwork can be better if there won’t be time or Determination to get another enhanced Basic.
Since Billy takes a long time to cast his enhanced Basic, it’s a good opportunity to swap to other characters to refresh buffs and debuffs - like a Support for Moonlight Lullaby or a Stunner for King of the Summit - and get back to him via a Quick Assist conversion to Drive Suppression to cut out recovery animations.
Although he has the standard features of a Rupture unit, Billy has a varied kit that allows him to adapt to different situations, and it's in learning how to balance out his skill that one can master his gameplay.
Best Build
The W-Engines are listed in order of priority. Sometimes the percentages appearing near them won't reflect their performance as pure damage or Stun output isn't the only thing we're looking at - the utility of the W-Engine might be more important than the calculations imply.
The W-Engine calculations below are team-buffed calculations and here's the team we used for them:
100%
Increases CRIT Rate by 20/23/26/29/32%. When the equipper launches a Special Attack, their Physical Sheer DMG increases by 10/11.5/13/14.5/16%, stacking up to 2 times and lasting 30s. Repeated triggers reset the duration.
86.54%
CRIT Rate increases by 20/23/26/29/32%. When the equipper launches an EX Special Attack, the character gains the Qingming Companion effect, stacking up to 2 times and lasting 15s. On entering combat, immediately gain 2 stacks. Repeated triggers reset the duration. Each stack of the Qingming Companion effect increases the equipper's Ether DMG by 8/9.2/10.4/11.6/12.8%, and increases Ultimate and EX Special Attack Ether Sheer DMG by 10/11.5/13/14.5/16%.
84.10%
When the equipper activates an EX Special Attack, they gain 1 stack of a buff. Each stack increases the equipper's DMG by 4/4.6/5.2/5.8/6.4%, up to 3 stacks, and lasting 20s. This effect can trigger once every 0.5s, and repeated triggers reset the duration. At 3 stacks, the equipper's CRIT Rate increases by 6.5/7.5/8.5/9.4/10.4%.
80.97%
Increases Physical DMG by 20/25/30/35/40%. The equipper's DMG increases by 25/31.5/38/44/50% when attacking the enemy from behind.
80.31%
The equipper's Fire DMG increases by 15/17.25/19.5/21.75/24%. When the equipper's HP decreases, their CRIT Rate increases by 15/17.25/19.5/21.75/24% for 5s.
76.55%
Upon launching an EX Special Attack, the equipper's CRIT DMG increases by 16/18.4/20.8/23.2/25.6% for 12s. Additionally, if the target's current HP is below 50% of their Max HP, EX Special Attack DMG increases by 20/23/26/29/32%.
75.39%
When launching a Chain Attack or Ultimate, the equipper gains 1 stack of a buff effect. Each stack increases the equipper's Sheer Force by 80/92/104/116/128, stacking up to 3 times, and lasting 12s. The duration of each stack is calculated separately.
100.00%
Yunkui Tales is the only real viable 4-piece set for Billy. It should be noted however, that as he's usually run into encounters with long phase transitions, there's a very real risk of this buff falling off, so be sure to use Cool Wheelies every so often to maintain it even during downtimes. The 2-piece is varied however: so long as Billy is capped out on CRIT Rate, the difference between CRIT DMG and DMG % is minimal, with HP % being a little worse but still a serviceable option.
Best combined with your choice of 2-PC Set:
Woodpecker Electro
Branch & Blade Song
Fanged Metal
White Water Ballad
Astral Voice
Hormone Punk
Bunny in Wonderland
Substats: CRIT RATE > CRIT DMG = HP% > Flat HP > Flat ATK
SHEER FORCE: 2200+
ATK: 1800 - 2000+
HP: 18,000+
DEF: 600+
CRIT RATE: 90 - 100% (In combat; Including Disc Drive Bonus & Signature Weapon)
CRIT DMG: 120 - 150%+
Chain Attack
Special Attack
Basic Attack
Assist
Dodge
Teams & Synergy
Below we list only the most important synergies for Billy - Starlight. The character can work with others if you know what to do and how to use them.
Team #1
Team #2
Team #3
For more Teams, check this video:
This section lists most popular teams featuring Billy - Starlight in the current phase of Shiyu Defense.
There are no teams featuring Billy - Starlight who have cleared Shiyu Defense in the current cycle.
This section lists most popular teams featuring Billy - Starlight in the current phase of Deadly Assault.
There are no teams featuring Billy - Starlight who have cleared Deadly Assault in the current cycle.
Calculations
Don't use the damage output calculations as an indication on who is worth pulling or investing as those are just simulations and in day-to-day gameplay there's a lot variables and also the skill of the player is important. As usual, don't compare the numbers between characters.
ZZZ has changed a lot from 1.0 - many new mechanics, enemies characters have been introduced and biggest of all the game has a new competitive endgame mode Deadly Assault. Deadly Assault is based around dealing as much damage as possible in 180 seconds, because of this we're changing our calculation style away from a focus on burst to instead focus on extended fights over 3 minutes (180s). Also, many Mindscapes, Disc Drive and W-engine calculations can meaningfully change when factoring in the buffs of an Agents best team, for this reason we're also adding a new feature, allowing you to see damage output with one of the agents best teams buffs factored in.
The W-Engine calculations below are team-buffed calculations and here's the team we used for them:
Rotation time: consistent DPS over 180s.
Billy Starlight (M6)
Billy Starlight (M5)
Billy Starlight (M4)
Billy Starlight (M3)
Billy Starlight (M2)
Billy Starlight (M1)
Billy Starlight (M0)
And here are the W-Engines and Disk Drives used in the calculations.
Increases CRIT Rate by 20/23/26/29/32%. When the equipper launches a Special Attack, their Physical Sheer DMG increases by 10/11.5/13/14.5/16%, stacking up to 2 times and lasting 30s. Repeated triggers reset the duration.
Substats: HP (27%), CRIT Rate (26.4%), CRIT DMG (67.2%)
A very strong M1, being the usual 18% RES Ignore from Supportive Mindscapes (e.g. Astra, Lucia, etc.) but rather than applying to the whole team, it applies to Billy alone. Given that he’s going to be doing anywhere from 90 - 95% of a team’s damage, when coupled with the extra EX Special he gets from the additional 60 Adrenaline this Mindscape gives, it’s at the very least matching the raw damage output of similar M1s.
This changes Billy’s combos somewhat, as it becomes more valuable to land Cool Wheelies in a stun. It’s still possible to fit 2 Adrenaline EX Specials and 1.5 enhanced Basics, but considering that the latter gets a DMG % bonus, saving the resources and making use of the faster Cool Wheelie to get 2 full enhanced Basics in a stun tends to be best.
A generic CRIT DMG increase; comparatively low to what Billy gets from his Core, but an increase nonetheless. The healing when inactive is barely worth a mention, as it’s very slow.
Sheer DMG is a valuable bonus, and with at least half of Billy’s damage coming from Ultimate and enhanced Basic, this is a big increase to his total output. The Sheer Force bonus multipliers from the Brilliant Starlight stacks are small in isolation, but can add up, amounting to almost a Cool Wheelie’s worth of extra damage every stun.
Shiyu Defense / Deadly Assault
Billy - Starlight Shiyu Defense stats aren't available yet. They will be added soon.