


Lifeng Guide and Best Build


Lifeng Introduction
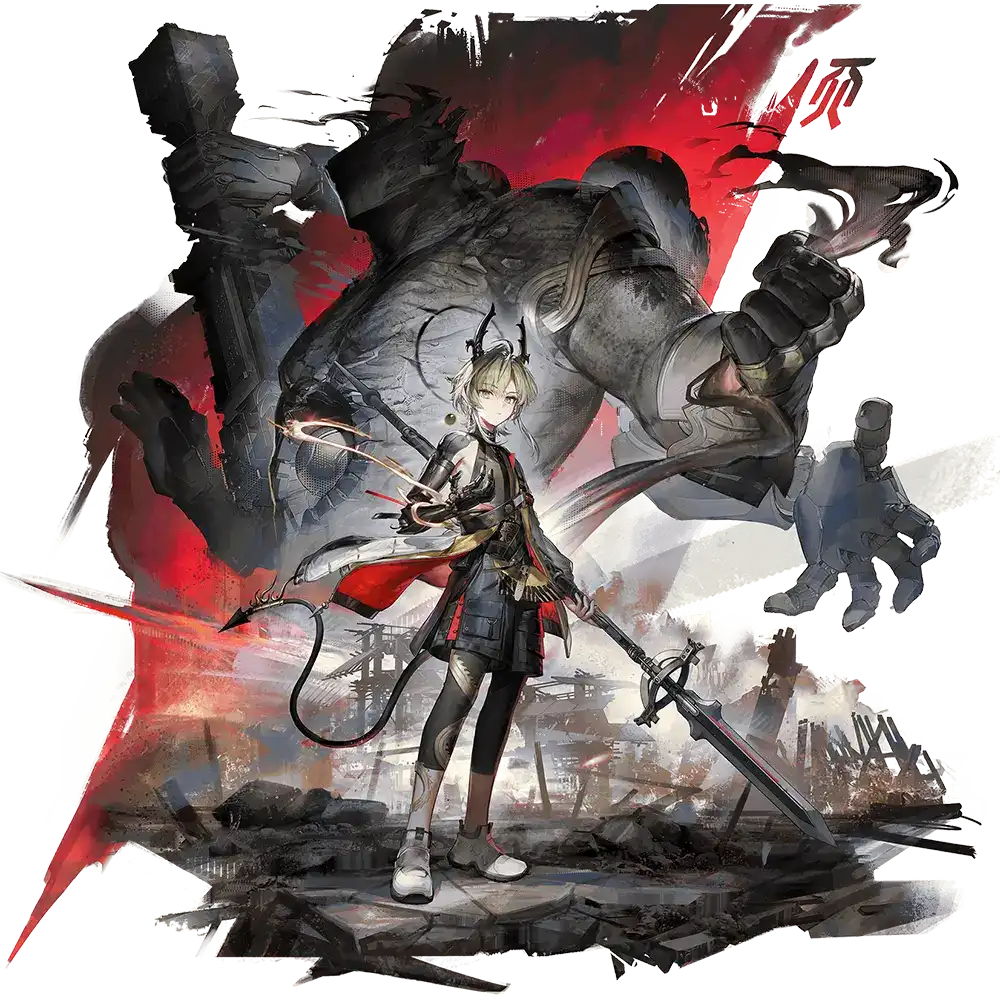
Lifeng is a 6-star character in Arknights: Endfield (AKE). Lifeng wields a Polearm and belongs to the Guard class. Lifeng also has access to the Physical element. This guide provides a comprehensive overview of Lifeng's best build, including recommended Weapons, Gear pieces, Stats, and the strongest team compositions and rotations that maximize their potential.
Lifeng Video guide
Lifeng has no video guide yet.
Last review update
Patch 1.0
Last major build/calcs update
Patch 1.0
Last profile update*
February 22nd, 2026
*Profile update means smaller edits to the guide that don't require new calculations.


To learn more about Lifeng check the sections below. Use the tabs to quickly switch to the kind of information you're looking for - whether it's best build, teams, synergies or calculations.
Profile
Review
Build
Teams & Synergies
Profile
Lifeng Attributes (level 90)
The yellow color shows the Primary Attribute and the green Secondary Attribute. Both of those attributes, on top of their normal bonuses, provide additional ATK to the character.


Lifeng Skills
Ruination
BASIC ATTACK:
An attack with up to 4 sequences that deals Physical DMG. As the controlled operator, Final Strike also deals 19 Stagger.
DIVE ATTACK:
Basic attack performed in mid-air becomes a dive attack that deals Physical DMG to nearby enemies.
FINISHER:
Basic attack performed near a Staggered enemy becomes a finisher that deals massive Physical DMG and recovers some SP.
[Final Strike]: Final Strike is the last sequence of Basic Attack. When the controlled operator's Final Strike hits the enemy, it also deals Stagger and restores some Skill Points (SP).
Turbid Avatar
SP Cost: 100
If the enemy struck by the last hit of this skill has no Vulnerability stacks, apply Physical Susceptibility to the said enemy instead.
[Knock Down]: Applies Vulnerability to an enemy. If the enemy is already Vulnerability, then add 1 stack of Vulnerability, and deal Physical DMG and Stagger.
[Vulnerability]: Hitting an enemy for the first time with a skill with Physical Status applies Vulnerability instead of the actual Physical Status. A Vulnerability enemy can be Lifted and Knocked Down to add more Vulnerability stacks (up to 4). Hitting a Vulnerability enemy with Crush or Breach will consume the Vulnerability stacks.
[Physical Susceptibility]: Physical Susceptible targets temporarily take more Physical DMG. The number represents the degree of increase. Effects of the same type can stack.
Aspect of Wrath
Cooldown: 15s
Trigger: When the controlled operator performs a Final Strike on an enemy with Physical Susceptibility or Breach.
[Final Strike]: Final Strike is the last sequence of Basic Attack. When the controlled operator's Final Strike hits the enemy, it also deals Stagger and restores some Skill Points (SP).
[Physical Susceptibility]: Physical Susceptible targets temporarily take more Physical DMG. The number represents the degree of increase. Effects of the same type can stack.
[Breach]: Applies Vulnerability on an enemy. If the enemy is already Vulnerability, then consume all Vulnerability stacks, deal Physical DMG, and temporarily increase the Physical DMG taken by the enemy.
[Link]: Next battle skill or ultimate cast by the team consumes the link buff and deals more DMG, with battle skills getting a higher increase. Effects of the same type can stack, but with diminishing returns.
Heart of the Unmoving
Energy cost: 90
If the skill consumes a Link, it deals additional massive Physical DMG.
[Knock Down]: Applies Vulnerability to an enemy. If the enemy is already Vulnerability, then add 1 stack of Vulnerability, and deal Physical DMG and Stagger.
[Debuff Consumption]: Various Physical and Arts debuffs can be ended early. For example, Crush consumes Vulnerability debuffs, while Combustion consumes Arts Infliction debuffs.
[Link]: Next battle skill or ultimate cast by the team consumes the link buff and deals more DMG, with battle skills getting a higher increase. Effects of the same type can stack, but with diminishing returns.
Lifeng Talents
Youthful Ambition
Laddie Reliable
Illumination
Subduer of Evil
[Knock Down]: Applies Vulnerability to an enemy. If the enemy is already Vulnerability, then add 1 stack of Vulnerability, and deal Physical DMG and Stagger.
Lifeng Potential (dupes)
Breaking the Obsession
Potential 1
[Physical Susceptibility]: Physical Susceptible targets temporarily take more Physical DMG. The number represents the degree of increase. Effects of the same type can stack.
[Vulnerability]: Hitting an enemy for the first time with a skill with Physical Status applies Vulnerability instead of the actual Physical Status. A Vulnerability enemy can be Lifted and Knocked Down to add more Vulnerability stacks (up to 4). Hitting a Vulnerability enemy with Crush or Breach will consume the Vulnerability stacks.
Self Refinement
Potential 2
Spiritual Cultivation
Potential 3
Brief Instant
Potential 4
Unremitting
Potential 5
Lifeng Lore
"I came to Endfield to learn. But ... there's way too much to take in. Gotta work even harder!"
Lifeng, born in Wuling City, now interns at the Specialist Tech Division of Endfield Industries.
Back in Wuling, Lifeng's mind and personalities made him popular with his peers and elders. Years of guidance from Da Pan have honed his spear fighting skills, arming him for his pursuit of justice. Few would guess from his cheerful demeanor the shadow he carries — an accident that shattered his once-happy family and cost him an arm. Yet hardship has never dimmed his fire. He continues to grow with sincerity and passion, yearning for the day he can take on greater responsibilities. Someday, he will stand tall on his own and return to protect the home that waits for him.
Lifeng Voice Actors
Lifeng Gallery

Review
Lifeng Ratings
Lifeng Pros & Cons
Pros
Easily applies Physical Susceptibility at the same time as Vulnerability.
Grants Link to the team,
Applies a large amount of Vulnerability through Ultimate.
Gains value from all stats, not just his main and secondary.
Outputs a strong amount of Stagger.
Activates his own combo.
Cons
Cannot consume the Vulnerability stacks he generates, forcing him to play with a character that can.
Can’t activate his damage talent, Subduer of Evil, on every Knock Down without giving up his Physical Susceptibility without potentials.
Battle Skill has a long animation, which can leave Lifeng vulnerable.
Timing Combo Skill to apply Link to the right ability takes planning and proper execution to do well.
Lifeng Review
Kit Intro
Lifeng is a 6-star, Physical, Polearm support damage dealer with a blend of personal damage and supportive elements within his kit, but notably doesn’t have a way to consume [Vulnerability]. Meaning, he’ll most often want to be played with another character capable of acting as the team's consumer (A [Crush] or [Breach] character). He can also satisfy the requirement of his own Combo Skill without assistance, allowing him to slot easily into most Physical teams.
The supportive portion of Lifeng’s kit revolves around his ability to apply [Vulnerability] or [Physical Susceptibility] with his Battle Skill, a stack of [Link] with his Combo Skill, and further 2 stacks of [Vulnerability] with his Ultimate. All while dishing out a strong amount of Stagger thanks to [Knock Down].
When it comes to DPS, Lifeng may not be able to consume Vulnerability himself, but he still has a lot of damage tools at his disposal. Both of Lifeng’s talents are damage-related, with one boosting his ATK% significantly and the other granting each of his knockdowns an extra damage multiplier. Using Lifeng’s Ultimate to consume Link also causes it to deal almost twice the damage, enabling him to make use of his own [Link] selfishly.
Battle Skill
Lifeng’s Battle Skill is one of his major selling points and a big reason you may consider bringing him to your Physical teams. It deals 2 strikes of Physical DMG on use, while also inflicting [Knock Down]. Also, if the enemy isn’t yet Vulnerable, it applies Physical Susceptibility to them for the next 10 seconds. Using this as your opening attack will net you a strong buff for all your Physical attacks as well as a [Vulnerability] stack, giving you 2 effects for the price of one skill.
This ability is primarily used as the opening attack when building Vulnerability stacks to take, but is still useful after that as well, thanks to one of Lifeng’s talents. This can make using it multiple times back-to-back worth considering.
Talents
Both of Lifeng’s talents are boosts to his personal damage; the first is what makes using his Battle Skill against already Vulnerable enemies viable. The talent Subduer of Evil causes successful Knock Down triggers to also deal an additional hit of 100% ATK Physical damage. It’s important to note that this talent will only trigger when [Knock Down] fully works, and you see the text and damage number. In other words, using [Knock Down] abilities against enemies who don’t have [Vulnerability] stacks won't activate it. Because of this, the only time you’ll be getting this talent is through non-opener Battle Skills and Lifeng’s Ultimate.
Lifeng’s other talent, Illumination, allows him to gain attribute attack from both of his off stats, Intellect and Will, at a rate of 1:0.15%, essentially granting Lifeng another 2 secondary stats, which are only slightly weaker. This talent allows Lifeng to be a little more flexible with gear at best, and at worst, will still grant him some extra attribute attack thanks to his base attributes, boosting his overall damage.
Combo
Lifeng’s Combo Skill becomes available when performing a Final Strike on enemies that have either Physical Susceptibility or [Breach] on them. Something Lifeng himself can accomplish with his Battle Skill. Using his Combo Skill will launch a single Physical hit and grant the team [Link], boosting the next Battle Skill or Ultimates damage significantly. You should time this combo so that the Ultimate or Battle Skill directly following it is one of your team’s most potent. Furthermore, when Lifeng’s Ultimate is ready, or about to be ready, you should aim to ensure [Link] lands on it instead, in order to activate its additional effect.
Ultimate
Lifeng’s Ultimate is a two-part Physical attack that inflicts [Knock Down] on the second hit, and, if [Link] is consumed, when activated, it will also perform an even larger third hit, which applies [Knock Down] again. When taking advantage of [Link], this one ability applies two stacks of [Vulnerability], triggers [Knock Down], and Stagger twice. Assuming it’s used against an enemy that is already Vulnerable, it will also activate Subduer of Evil twice as well.
When taking everything into account, even though this Ultimate seems simple, it offers a lot of value between its damage potential and the stacks it generates for a quick [Crush] or [Breach] from teammates.
Gameplay
Playing Lifeng is simple:
Use Lifeng’s Battle Skill when starting your combos to establish the first stack of Vulnerability on enemies in order to apply his Physical Susceptibility. Then, either cycle through the rest of your team’s Battle Skills/combos or follow up with more Lifeng skills to accumulate more Vulnerability stacks while triggering Subduer of Evil.
Time using Lifeng’s combo before your operator’s Ultimates to grant them [Link], but be careful, you don’t wait too long and let his Physical Susceptibility expire. If Lifeng’s own Ultimate is going to be available, prioritize it over others. If no Ultimates are on the horizon, consume it with your team’s strongest Battle Skill instead.
Lastly, use Lifeng’s [Link] empowered Ultimate to deliver a burst of damage, while accumulating a large amount of [Vulnerable] stacks at once. You can choose to either use Lifeng’s Ultimate during Stagger, in order to boost its damage. Or use it outside of Stagger, in order to take advantage of its higher total Stagger, thanks to it inflicting [Knock Down] twice on top of its own base Stagger.
Depending on the team you’re playing, there will be even more optimizations. To learn more, check out our teams and synergies section.
Build
Lifeng Best Weapons
The percentages show the performance of the weapon based on calculations, but in some cases, some Weapons might provide additional QOL that can't be quantified and it would push that weapon ahead of others in the priority (and in those cases, we would put that weapon higher).
The solo percentage shows how the weapon impacts Lifeng performance if you look at their damage in the vacuum, while the team percentage shows the impact of the weapon when taking into account full team, including buffs etc.
Stat 1 Boost - 9/9
Agility: +156
Stat 2 Boost - 9/9
Physical DMG Bonus: +43.30%
Passive Boost - 4/9
Stat 1 Boost - 9/9
Agility: +156
Stat 2 Boost - 9/9
Physical DMG Bonus: +43.30%
Passive Boost - 4/9
Attack: +16.00%
Lifeng's other viable 6-star option, which only falls slightly behind his Signature in performance in most battle scenarios. It has a more optimal combination of passives than Mountain Bearer, all of which are fully passive. The ATK% (normal, not attribute) on this weapon specifically is a stat Lifeng lacks on his optimal Gear and his kit. Its Weapon Effect is also not bad for Lifeng and grants him an additional multiplier whenever he properly inflicts Knock Down, that is, when using his Battle Skill or Ultimate against already Vulnerable enemies.
Stat 1 Boost - 9/9
Agility: +93
Stat 2 Boost - 9/9
Attack: +23.40%
Passive Boost - 9/9
Last resort option if you're lacking any of the choices above. It has the correct passive stats, but all at much lower base values, setting it significantly behind all other choices.
Specialist Weapon Options
Stat 1 Boost - 9/9
Strength: +124
Stat 2 Boost - 9/9
Ultimate Gain Eff.: +37.10%
Passive Boost - 9/9
Critical Rate: +8.40%
A 5-star option that has very low damage potential for Lifeng, even falling below his best 4 star option, but which has Ultimate Gain, making it a niche option with potential for some optimized teams that value the Vulnerability from Lifeng's Ultimate more than his damage. This weapon is only recommended for players who know exactly what Ultimate breakpoint they'll be able to hit with this polearm.
Lifeng Best Gear Set
The solo percentage shows how the set and gear impact Lifeng performance if you look at their damage in the vacuum, while the team percentage shows the impact when taking into account full team, including buffs etc.
Stagger Efficiency Bonus +20%. When the wearer applies a Physical Status, the wearer also performs 1 hit that deals 250% ATK of Physical DMG and 10 Stagger. Effect trigger cooldown: 15s.
Description
Swordmancer is a drop for Lifeng's personal damage due to having less optimal damage gear pieces, but its 3P Set Bonus has a much better supportive effect, which, if you're ok giving up some of Lifeng's personal output, can be worth the trade off. The 3P bonus of Swordmancer grants an on-hit effect that deals 10 Stagger every 15 seconds and increases all Stagger Lifeng outputs by 20%. It's important to keep in mind, though, in order to activate Swordmancer's on-hit effect, Lifeng must apply a Physical Status, which his opening Battle Skill against non-Vulnerable enemies doesn’t. This means you'll need to weave in additional Battle Skills while the enemy is already Vulnerable or rely on his Ultimate to trigger it instead.
Note: With Swordmancer, our calculations don't reach a new stagger breakpoint, but if they allowed for an additional one over Bonekrusha, its overall team damage would be higher. This will also be the case in your own play; if Swordmancer gets an extra stagger, it can be better, if it doesn't, it can fall behind.
Pieces
Armor

Gloves
Kit
Kit

Alternative Pieces
- - If you're not confident playing optimally around Stagger Windows, Swordmancer Flint may end up being a larger damage increase on average for you over Bonekrusha Mask. Swap them out if you think this aligns better with your playstyle.Swordmancer Flint
![Gear]()
Flat HP +1000. When the wearer applies Amp, Protected, Susceptible, or Weakened, other teammates also gain DMG Dealt +16% for 15s. This effect cannot stack.
Description
When using Lifeng's Battle Skill as the opener to apply Vulnerbility and Physical Susceptibility, it can activate the Set Effect to provide a teamwide buff, which can result in overall higher team damage at the cost of his personal damage. This build has some Ultimate Gain Efficiency for Lifeng which allows him to apply more Vulnerable stacks, and his Combat Talent allows any Attribute to be converted to ATK.
Pieces
Armor
Gloves
Kit
Kit
Lifeng Best Gear Pieces
Keep in mind that the gear pieces below are being compared against having nothing equipped on the character at all. This means that in some cases, when you include Weapons, other pieces, outside buffs etc, the values of some pieces may change. For more accurate information, check the section above where we picked the best combination when you look at all pieces equipped.
Pieces marked with a star* can perform better than listed - this applies to:
- Ult gain efficiency pieces, granting new Ultimate breakpoints,
- Arts Intensity boosting the efficacy of Electrification, Corrosion and Breach, rising overall team output even if personal damage is less impressive.


Lifeng Dupes Calculations / Review
Allows Lifeng to use his Battle Skill after the enemy already has [Vulnerability] stacks on them and still applies his Physical Susceptibility as long as their [Vulnerability] stacks are 2 or lower. This makes Lifeng far more flexible when using his Battle Skill, as he no longer must use it first in order to function optimally. Instead, he can act after giving the opening attack to another teammate. This Potential also increases his Susceptibility by +5%, bringing it to 17% at max. At worst, this dupe improves Lifeng and the team’s damage, and at best, improves uptime and application Susceptibility while also allowing for more Subduer of Evil activations. Note: Calculations include additional Subduer of Evil procs over P0.
A small boost to all of Lifeng’s attributes and attribute attack, but nothing crazy.
Boosts Lifeng’s Illumination talent from 0.15% to 0.20%, making Will and Intellect as strong as his secondary stat Strength to stack. Another small damage increase, but nothing game-changing.
Reduces Lifeng’s Ultimate cost by -15%, taking it from 90 to 77. More Ultimates is welcome on Lifeng, but as he’s not an Ultimate-focused character, this potential isn’t as transformative as it is on some other operators.
Empowers Lifeng’s Subduer of Evil talent once every 15s, causing it to deal an additional 250% ATK Physical damage and 5 Stagger, bringing its damage total to 350% while active. This is an ok damage boost for Lifeng and doesn’t require you to change up your gameplay in order to take advantage of it. As long as you’re taking advantage of potential 1 and using his Battle Skill against already Vulnerable enemies. This allows another character to apply the initial stack.
Dupes information - visual
Important! The graph generator tool we're using has some issues currently and it displays the 'rows' wrong visually. The percentages shown are fully correct though.

Lifeng Calculations
In this section we're showing the team setup used for the above calculations as well as the damage split for Lifeng based on where it comes from. The setup isn't always best in slot for each character and also please keep in mind that with different team members, Weapons, and Gear, the calculations will change.
Operator 1
Weapon

Operator 2
Weapon

Operator 3
Weapon

Operator 4
Weapon

Lifeng Damage Split
Lifeng Skill Priority
Off Field:
Battle Skill > Ultimate >= Basic Attack = Combo Skill
Teams and Synergies
Lifeng Best Synergies

- Lifeng generates bursts of Vulnerability with the Ultimate to fuel more frequent, higher stack size Crushes.
- Lifeng applies Physical Susceptibility to targets, boosting Endmin's damage potential.
- Lifeng applies Link to the team, which, when not consumed by his own Ult, can be used by Endmin to amplify their Ult or battle skill.
- Endmin provides team-wide buffs while performing their role as a damage dealer, which will raise Lifeng's damage potential as well.

- Lifeng generates bursts of Vulnerability with the Ultimate, which allows Pog to far more easily maintain high stack size Breaches on the target with the potential to have stacks left over for other teammates to Crush.
- Lifeng applies Physical Susceptibility to targets, boosting Pog and the whole team's damage
- Pog's Breach ensures Lifeng can use his combo skill at any time, meaning when you trigger it becomes more flexible
- Pog's Breach and outstanding supportive weapon and set effects all boost Lifeng's damage by a notable amount
- Lifeng generates bursts of Bulnerability with the Ultimate to allow Da Pan to more easily reach 4 Vulnerability stacks without high SP investment
- Double Vulnerability ultimate application, combined with Da Pan's cooldown talent, can allow for huge 4-stack Crushes back to back
- Lifeng applies Physical Susceptibility to targets, boosting Da Pan's damage potential
- Lifeng applies Link to the team which, when not consumed by his own Ult, can be used by Da Pan to amplify his Ult or battle skill

- Able to permanently maintain both Arts and Physical susceptibility on targets for generic team-wide damage increases that work in any team
- Outstanding supportive weapon and set options for even more damage amplification, with options that work for both Physical and Arts
- Forcibly applies Corrosion, which, when optimized around, can lower enemy resistances to all damage temporarily if Susceptibility doesn't need to be refreshed
- Only requires 100 SP roughly every 30 seconds to function at maximum capacity
- Strong enough sustain to single handedly keep the team alive through most endgame encounters as long as smart dodging is used.
Lifeng Teams
Lifeng teams aren't listed in any specific order - so they're not listed best to worst or vice versa. Check our Team Tier List for more information about best teams.
Team Members
Opening rotation
Final Strike
→
Battle Skill
→
Combo
→
Battle Skill
→
Combo
→
Final Strike
→
Combo
→
Combo
→
Battle Skill
After your opener is done and your team's combos are on cooldown, there will be spare SP available for Ardelia to apply her debuffs without interferring with your rotation. Execute the below to keep her Susceptibility up the rest of the fight. You can also omit her in the rotation above as after the opener, it's better to use her Combo during downtime.
Final Strike
→
Combo
→
Battle Skill
Ultimate timings
- Endministrator - Use Endmin's Ultimate directly after their and Lifeng's Combo Skill to ensure it consumes the Crystals and Link to deal additional damage,
![Endministrator]()
- Chen Qianyu - Use Chen's Ultimate after Endmin and Lifeng's Combos as well. It doesn't apply Vulnerability or a physical status, so it will gain the Crystals debuff without Shattering them, meaning Endmin's Battle Skill will still gain full value.
![Chen Qianyu]()
- Ardelia - Save Ultimate for before one of your rotations, ideally during Stagger. Ardelia should be using Stanza Memoralis so using her Ultimate this way will buff the team.
![Ardelia]()
- Lifeng - When Lifeng's Ultimate is available, in order to make use of the 2 Vulnerable it provides, it's best to modify your rotation. Remember to wait for a short pause so the Ultimate finishes casting and you get both Vulnerability stacks. Here is what we recommend adjusting to as a starting point:
![Lifeng]()
Final Strike
→
Battle Skill
→
Combo
→
Combo
→
Final Strike
→
Combo
→
Combo
→
Ultimate
→
Battle Skill
Extra things to look out for
- Against weaker enemies and those who struggle with sequencing all four characters at once, investing the time into establishing Ardelia's combo skill at the start of your rotation may not be worth it. Instead you can skip it and go straight to your physical rotation,
- Also against weaker enemies that may die in a single Crush, you can cut Chen's Battle Skill from the rotation to reduce its total cost to 200 SP instead of 300, making it immediately usable at the start of combat.
- Lifeng's Battle Skill has a long animation. Make sure not to use Ardelia's Combo skill until it lands, otherwise you may accidently trigger Endmin's combo before Chen's, ruining the rotation.
- Once you're confident in the timings, you can begin Lifeng's Battle Skill halfway through your Main Field Character's Basic Attack animation so that it lands right after the Final Strike, which will trigger Ardelia and then Chen Combo in quick succession. Just be careful you don't have Lifeng's Battle Skill land before your Final Strike, otherwise Ardelia's Combo will be blocked.
Sometime's you'll have multiple Ultimates available at the same time and will have to choose which to buff with Lifeng's Link here is the priority order: ![]()
![]()
![]()
Lifeng's signature is his best-in-slot option, but not by an overwhelming margin; there are other competitive 6-star options. It has a strong but not a perfect combination of passive stats, although one of them isn't completely passive, as it requires enemies to be Vulnerable to be in effect (which won't always be the case). Fortunately, to make up for these small quirks, its Weapon Effect is very powerful and grants Lifeng an all-attribute increase when using his Battle Skill to apply Susceptibility and Vulnerability, which scales strongly with his Talent that allows all his stats to be converted into Attribute ATK%.