


Ideal
HP%
Desire
HP%
Imagination
DEF% = EGO Regen >= HP%
Last review update
Season 2
Last build update
Season 2
Last profile update*
15.03.2026
*Profile update means updates done to reviews/builds/gear within a season - showing the last date we changed anything on this page.
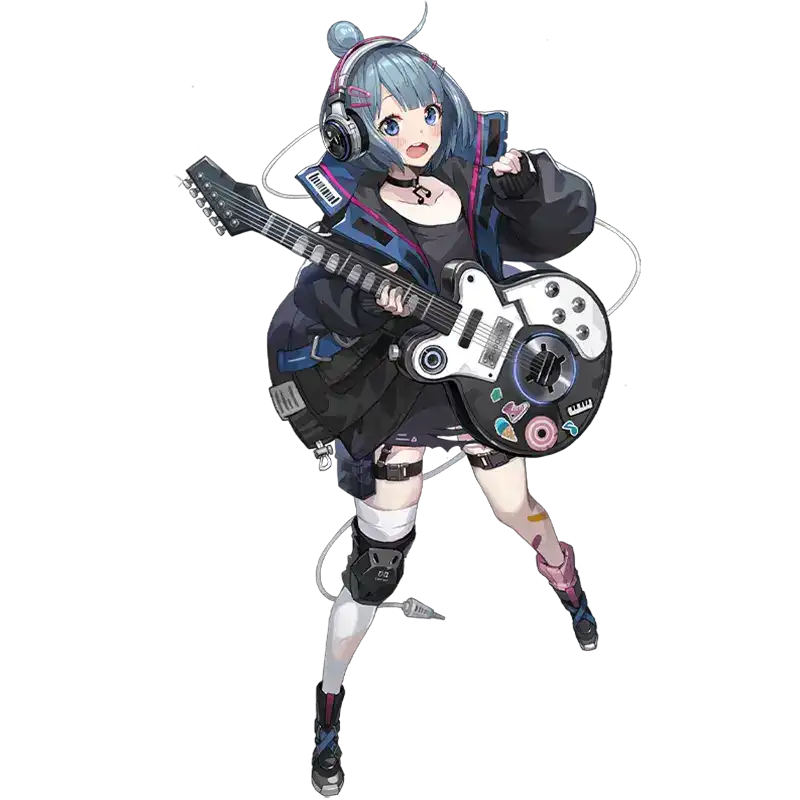
To learn more about Nia check the sections below. Use the tabs to quickly switch to the kind of information you're looking for.
Profile
Review
Epiphanies
Gear
Deck & Teams
Profile
Stroke
Amp Therapy
Show Effects
G Chord
Show Effects
Mute Accent
Soul Rip
Show Effects
Adagio
Nia's Curiosity
Rock and Roll
Ego Skill
Show Effects
Epiphany cards are special evolutions for the cards you can obtain while playing the roguelike mode. Only some cards in the character's deck can get Epiphany effects. Since there's quite a lot of them, we don't display them by default - press the button below to show them. There are also Divine variants of Epiphany cards, but we're still working on gathering them.
G Chord I
Show Effects
G Chord II
Show Effects
G Chord III
Show Effects
G Chord IV
Show Effects
G Chord V
Show Effects
Mute Accent I
Mute Accent II
Mute Accent III
Show Effects
Mute Accent IV
Show Effects
Mute Accent V
Show Effects
Soul Rip I
Show Effects
Soul Rip II
Show Effects
Soul Rip III
Show Effects
Soul Rip IV
Show Effects
Soul Rip V
Show Effects
Adagio I
Adagio II
Show Effects
Adagio III
Show Effects
Adagio IV
Show Effects
Adagio V
Epiphany Bonus
Potential 1
Basic Card Upgrade
Potential 2
Common Card Upgrade
Potential 3
Basic Card Proficiency
Potential 3-1
Unique Card Upgrade
Potential 4
Health Proficiency
Potential 5
Basic Card Proficiency
Potential 5-1
Divine Epiphany Adaptation
Potential 5-2
Attack Proficiency
Potential 6
Unique Stat Upgrade
Potential 7
Sleeping Memory
Manifest Ego 1
Awakening Memory
Manifest Ego 2
Vivid Memory
Manifest Ego 3
Inner Memory
Manifest Ego 4
Complete Memory
Manifest Ego 5
Liberated Memory
Manifest Ego 6
Review
Nia is an Instinct controller who is all about deck manipulation. Nia has an abundant amount of Card Draws throughout her cards, alongside multiple different sources of Discard. Nia turns card Discard from what's traditionally a downside into an upside via her Signature mechanic, Decibel.
“Decibel” is gained via multiple different sources in her kit. It's a persistent buff that can stack up to 5 times and activates when your Discard Pile is shuffled into your deck and then removes all stacks. When Decibel is triggered, every team member will do an extra attack on an enemy, dealing 50% damage per stack removed. Decibel also heals for 50% per stack removed, providing a generous source of healing.
Nia can gain these stacks when she activates her “G-Chord” card, or when discarding cards when under the effect of “Soul Rip”. She can also cheat out specific cards by using Adagio to move a card in hand to the top of the Draw Pile and activating it for cheap with G Chord. Her kit features multiple Discard effects (such as her pseudo-card search Nia’s Curiosity) that allow her to cycle through a deck quickly to trigger Shuffles as often as possible.
Nia doesn’t offer much on the damage front, so you’ll ideally want her to be paired with a high DPS character who benefits from or is looking for Card Draw.
Thanks to all these amazing qualities, Nia is an amazing support choice to be paired with almost any character. If you specifically are looking for some deck cycling on the cheap side, whilst still offering some decent healing, Nia’s might be the perfect fit.
Fantastic deck manipulation with her Activate, Draw, Discard and “move to top of Draw Pile” effects.
Makes other allies perform Extra Attacks through Decibel and Mute Accent.
Can cheat out expensive cards by playing Adagio and G Chord together.
Pseudo-card search in Nia’s Curiosity, which also Discards cards to accelerate deck cycling.
Solid healing capabilities thanks to Decibel and Potential Nodes.
Most Decibel stacks come from Soul Rip, which requires lots of active Discard effects to trigger; it does not work with the automatic end-of-turn Discard.
Deals no personal damage; extremely reliant on allies’ stats.
Extremely Skill-heavy, which can be good in some cases, but also punished heavily by some enemies.
E1 improves her AP efficiency and overall feels better to play.
The ratings below are based on the Season Save Data modes and the Chaos Manifestation mode. Each of the modes values different mechanics, so some characters may shine in one of the, while being underwhelming in the other.
Decibel: Nia’s cards generate stacks of Decibel, which are displayed in the top left corner under Nia’s icon. Decibel triggers a 50% Extra Attack from each Combatant when your deck is Shuffled; each stack of Decibel increases this Extra Attack’s damage and will also heal per stack. After this Extra Attack is triggered, you lose all stacks of Decibel. This means that you’ll ideally want to reach 5 stacks of Decibel per deck cycle.
Extra Attack: Nia’s Decibel mechanic and her Skill card Mute Accent can trigger Extra Attacks on Combatants, which will prompt them to automatically unleash an attack with a specified damage multiplier.
Discard: Much of Nia’s kit revolves around actively discarding cards from hand as opposed to automatically discarding at the end of the turn. By discarding cards with her skills, she can trigger a variety of effects, such as gaining Decibel, triggering an Extra Attack, or moving the Discarded card to the top of the Draw Pile. Discarding cards also helps her cycle through your deck faster to trigger Shuffles.
Shuffle: When there are no cards in the Draw Pile and a Draw effect is triggered (like Drawing 5 cards at the start of each turn), the game Shuffles all the cards in the Graveyard back into the Draw Pile. Nia wants to do this as much as possible to trigger Decibel’s Extra Attacks.
Elasticity: Unlocking Potential 3-1 adds this effect to her two basic healing Skill cards, Amp Therapy. Each stack heals 50% whenever an ally performs an Extra Attack; this amount is increased by unlocking Potential 7. Elasticity allows Nia to provide sustenance without spending AP after the first two casts of Amp Therapy.
Activate: Nia can activate a card from the Draw Pile, which automatically plays a card without paying for its AP cost. Nia can use this to cheat out more expensive cards, especially since she can manipulate which card is on the top of the Draw Pile.
Nia’s Signature Potentials focus entirely on healing, which isn’t really a priority given her primary use as a deck manipulator.
3-1: Causes Amp Therapy to accumulate 1 stack of Elasticity on use. Good passive healing.
5-1: Improves Amp Therapy’s heal by 5% and an additional 5% if Nia’s Ego Recovery is greater than 30.
7: Increases Elasticity’s healing by +30% and another +20% if Nia’s Ego Recovery is greater than 70.
Base
Ego 1
Nia’s E1 reduces the cost of her “Nia’s Curiosity” card by 1. A really, really good first node for Nia, which slightly reduces her AP needs whilst allowing you to ramp your decibel stacks even further.
Ego 2
Her 2nd Ego node grants Nia an additional passive buff called “Rhythm Boost”. Whenever a shuffle occurs, Nia grants 4 stacks of Rhythm Boost, which provides a 5% multiplicative damage buff per stack. At the start of each turn 1 stack will be lost. This is a fantastic 2nd node for Nia that now allows her to provide a solid buff to her allies that can be consistently maintained.
Ego 3
This node increases the base and maximum level of their [Basic Card Upgrade], [Unique Card Upgrade] and [Common Card Upgrade] Potentials by 3. As Nia doesn’t necessarily have many cards that directly deal damage or heal, this node is relatively minor and doesn’t overall provide a huge benefit to her gameplay.
Ego 4
Her 4th Ego node boosts her “Rock & Roll” Ego skill by increasing the amount of Decibel stacks granted by 2, to a total of 5. An okay node that allows her Ego skill to fully stack Decibel to maximize healing and damage dealt when your next Shuffle occurs.
Ego 5
E5 again increases the base and maximum level of their [Basic Card Upgrade], [Unique Card Upgrade] and [Common Card Upgrade] Potentials by 3. As mentioned earlier, a very minor increase that really only benefits her basic cards, which are often removed.
Ego 6
Her E6 node is arguably her most impactful node that allows Nia to function additionally as an amazing Healer. Not only does this node grant a 40% heal per Decibel stack when a shuffle triggers, but it also now starts battles off with 4 stacks of Rhythm Boost to immediately boost the damage output of your team. When combined with her 7-1 Potential Node, whenever a shuffle occurs she has the Potential to heal for a huge 500% + 200% whenever a shuffle occurs.
Rock and Roll
Ego Skill
Show Effects
Nia’s Ego Skill costs 5 EP to deal AoE damage, increases Decibel by 3 and Discards all cards from the Draw Pile. This basically guarantees a Shuffle at the start of the next turn, which will then trigger the buffed Decibel Extra Attacks. The damage is alright, but you won’t be building Nia for damage since this is one of her two sources of damage.
Stroke
Nia’s Basic Attack is completely standard and doesn't have any extra synergy with her kit. A good removal target.
Amp Therapy
Show Effects
Nia’s basic Heal card grants an Elasticity stack on use thanks to Potential 3-1, which forms the core of her sustain. Healing is very situational, though, so your mileage may vary.
G Chord
Show Effects
A 1-cost Skill that increases Decibel by 2 and activates the top card of the Draw Pile. This can be played with Adagio to cheat out specific cards.
Mute Accent
1-cost Skill card that actively discards the highest cost card in hand and triggers an Extra Attack from the card’s owner. One of Nia’s sources of Discard, which is important for Soul Rip.
Soul Rip
Show Effects
A 1-cost Skill card that increases Decibel every time you actively Discard a card this turn. Nia’s main source of Decibel, but it feels clunky to use.
Adagio
A 0-cost Skill card that Draws 1 card and allows you to select a card to Discard, which will be moved to the top of the Draw Pile. Fantastic effect that allows you to remove the RNG of G Chord or save a card for next turn.
Nia's Curiosity
A 1-cost Skill card that reveals 3 cards from the Draw Pile and allows you to choose one of them to Draw into your hand and Discard the other two options. Speeds up deck cycling to trigger Shuffles for Decibel. A pseudo-card search that gets even better with Nia’s E1, which discounts this to 0.
Best Epiphanies
Note
We have given a star rating for each Epiphany, showing how strong and useful it is - with 1★ being the lowest rating and 5★ the highest.
G Chord I
Show Effects
G Chord II
Show Effects
G Chord III
Show Effects
G Chord IV
Show Effects
G Chord V
Show Effects
Epiphanies:
Divine Epiphanies:
Which Divine Epiphany to go for will depend on what your team needs and which Epiphany you chose, but here are the main ones to look out for if you have spare Save Data: Draw 1, -1 Cost Reduction.
Mute Accent I
Mute Accent II
Mute Accent III
Show Effects
Mute Accent IV
Show Effects
Mute Accent V
Show Effects
Epiphanies:
Divine Epiphanies:
Which Divine Epiphany to go for will depend on what your team needs and which Epiphany you chose, but here are the main ones to look out for if you have spare Save Data: Draw 1, -1 Cost Reduction.
Soul Rip I
Show Effects
Soul Rip II
Show Effects
Soul Rip III
Show Effects
Soul Rip IV
Show Effects
Soul Rip V
Show Effects
Epiphanies:
Divine Epiphanies:
Which Divine Epiphany to go for will depend on what your team needs and which Epiphany you chose, but here are the main ones to look out for if you have spare Save Data: Draw 1, -1 Cost Reduction.
Adagio I
Adagio II
Show Effects
Adagio III
Show Effects
Adagio IV
Show Effects
Adagio V
Epiphanies:
Divine Epiphanies:
Which Divine Epiphany to go for will depend on what your team needs and which Epiphany you chose, but here are the main ones to look out for if you have spare Save Data: +1 AP.
Gear
The Memory Fragments & Equipment suggestions below are based on calculations we did. If you want to check the damage formula and how scaling the damage works in CZN, check this guide.
[2-PC]: +12% Max HP.
[2-PC]: +12% Defense.
Nia cannot activate the most powerful 4P supportive set Glory's Reign with her base deck and needs neutral cards or epiphanies to do so making whether it's worth running highly dependent on your specific deck. Because of this in general we recommend running 2/2/2 on her instead. When running 2/2/2 it's best to run 2P Healer's Journey with 2P Tetra's to maximize surviability and healing.
Use either Seth's Scarab to boost the healing output of Basics for early chaos comfort or you can bypass Seth's small bonuses in favor of using non-set pieces to target better main/sub stats.
[4-PC]: When generating or using Exhaust Skill Cards, +5% to Damage Amount of all allies (max 15%).
As mentioned above it's possible for Nia to access Exhaust Skill cards via neutrals or epiphanies so if you're using decks with either of these Nia can run this set quite well, but if you're not this set is a downgrade to 2/2/2. If you can activate it, you can run it on Nia, otherwise run 2/2/2 instead. It's important to Note that Glory Reign's effect cannot be stacked so you only want to run 1 set of it per team.
Use either 2P Tetra's for a tankiness and a healing boost or 2P Healer's Journey to bolster the overall HP total of the team.
In a lot of cases, flat sub-stats are better than percentage ones when it comes to HP, ATK and DEF. The reason behind this is that in CZN the characters stats are pretty low and you get more value from flat bonus rather than percentage one based on calcs.
DEF > DEF% > EGO Regen = HP > HP%
If you care about raising the healing multipliers of Nia's Elasticity and to a lesser extent, Amp Therap,y you can optionally aim to reach 71 or higher Ego Recovery to amplify their effects. However, this isn't mandatory to do and it can be more productive to instead focus on maximizing DEF and HP, both of which boost survivability as well. We only recommend going for this stat goal if you were already going to build Ego Regen.
Our best Partner recommendation try to balance both the raw damage boost they provide based on our calculations with the additional utility provided by the skill - combined with how it interacts with the characters's kit. We have rated each Partner based on how much additional damage and the utility they provide. Read the comments under each Partner to better understand our reasoning.
No calculations in Chaos Zero Nightmare are completely accurate for all scenarios, including the ones below. What team, decks, epiphanies, gear, equipment, and enemies you’re facing all impact them. Because of this, take the results as guidelines and combine them with the explanations to make your decisions. Calculations use endgame save data set-ups, including 5 turns of combat using the whole deck with all Ego skills unless otherwise stated.
The assigned combatant's Defense, Health and healing are increased by 12–20%.
When the assigned combatant Draws for the first time each turn using an ability, +8/16% Damage dealt by allies for 1 turn.
Discard up to 3 cards, then Draw +1 cards equal to the number discarded.
Nyx is a safe all-around choice for Nia thanks to her ability to churn through 4 cards of the deck with her Ego Skill while also still having some multipliers to survivability and healing. Nyx also offers a small buff, which Nia is easily able to keep active with all her card draw, which is a nice bonus. The one downside of Nyx is that her Ego Skill costs 4EP, which in Save Data game modes usually means you won't be able to easily use it in Turn 1, something the other main supportive Draw Partner Yuri, is capable of. All up, if you need Draw Power or value the Passive stats Nyx provides, she's a safe pick for most teams, but if all you care about is survivability/combo potential, check out other options as they may suit your needs better.
The assigned combatant's Attack is increased by 8/16%.
Upon the first shuffle, the assigned combatant's damage dealt is increased by 8/16%.
Draw 2 Cards.
Yuri isn't a Controller Partner, so her Passives don't work. However, that doesn't disable her Ego Skill, which is a potent Draw 2 for 2 EP. Yuri is an alternative option to Nyx, which can be used in Turn 1 in Save Data and is far more accessible and spammable in Chaos. If that appeals to you and you're ok downgrading how many cards you're drawing and losing out on all the Passives Nyx provides, you can use Yuri instead.
The assigned combatant's HP and healing are increased by 8/12%.
At the start of the turn, gain [Ponopoko's Cheer] equal to the number of enemies with attack intentions.
[Ponopoko's Cheer]: Incoming Damage is reduced by 10/20%. Upon activation, remove Ponopoko's Cheer (stacks up to 3 times).
Heal 200%. Apply 1 Damage Reduction.
Arwen is one of the top options when it comes to survivability, thanks to her great Passive Stats, which boost both healing and total team health, but most of all her constantly refreshing Damage Reduction. If you're struggling to stay alive and need more survivability, especially in fights that launch large but infrequent attacks, giving up utility or draw for Arwen can be worth considering, especially in Chaos-based game modes.
The assigned combatant's Defense is increased by 12/24%.
At the end of battle, recover 3/6% Health.
Heal 100%. When in an Injured state, increase Healing Amount by 50%. 1 Morale for 1 turn.
Alyssa works as an alternative to Arwen with quite a different stat line, favoring Combat Defense and Passive Healing instead. Usually not as universally strong for survivability as Arwen, but if you value the higher defense over Arwen's higher HP total and mitigation buff, she can be a more appealing option.
The assigned combatant's Defense is increased by 8/16%.
If the combatant ends the turn without using an attack card, Heal 30/60% at the start of the next turn.
Heal 100%. For 1 turn, gain 1 Fortitude.
A F2P survivability option that falls behind both Arwen and Alyssa in most cases, but is still an acceptable choice if you have neither of them available at an acceptable Ego level.
In the Zero System, it’s incredibly easy to access all items acquirable via the shop thanks to the five free refreshes you get each shop node - that's why the recommendations below are limited to them only. ATTENTION! Area-specific items can sometimes be more powerful than shop items, but are far less consistent to get or require running a specific world or giving up certain event options. Use the shop list as a starting point for building up your deck saves.
The equipment recommendations are based on items obtainable in Season 2’s Chaos - Burning Life. If you’re running content outside of Season 2, it’s possible some options may not be available for acquisition, or that other options not obtainable in Burning Life may be better.
We're currently working on updating all builds for Season 3.
Deck & Teams
While she can be played with other carries, she often falls behind as a solo Healer when not played with Extra Attackers like Hugo or Renoa, who can activate her Elasticity Heal through their Extra Attacks.
She can be substituted as a Draw unit for many teams, although it’s important to be aware of her drawbacks since she very often isn’t actually netting Draw (often losing you Draw) even though she’s deck-cycling. Typically, she’ll find a lot of success when a unit wants all of just their cards in hand (Rin, Haru, etc.) since Adagio V can easily target draw only a specific unit’s cards. Moreover, she can be used to abuse Attunement: effects multiple times a turn, if there are ones available to your team’s decks.


Base performance of the character.